How to Use Docusign Navigator
- Manage, filter, and extract value from agreements
- Upload agreements into Navigator
- Use filters to narrow your search
- Manage custom agreement types
- Locate relevant agreements with comprehensive search
- Rely on AI to surface key details
- Streamline how party information is organized
- Easily track renewals with renewal management
- Never miss a renewal deadline with automated reminders
- Grant access to agreements and manage user settings
- Ready to learn more?
Table of contents
- Manage, filter, and extract value from agreements
- Upload agreements into Navigator
- Use filters to narrow your search
- Manage custom agreement types
- Locate relevant agreements with comprehensive search
- Rely on AI to surface key details
- Streamline how party information is organized
- Easily track renewals with renewal management
- Never miss a renewal deadline with automated reminders
- Grant access to agreements and manage user settings
- Ready to learn more?

Managing agreements can be a real hassle. When it comes to locating agreements, research shows it takes an average of 45 minutes to find a specific agreement. Additionally, 31% of contracting professionals have difficulty understanding the terms and risks in existing contracts.
These inefficiencies come with costly consequences and it’s no surprise that crucial information can easily get lost in the shuffle or buried in PDFs.
That’s why Docusign Navigator transforms your static agreements into data-rich assets that are stored, organized, and easily searchable for your internal teams all thanks to Docusign AI. Navigator is an integral part of Intelligent Agreement Management (IAM). Learn more about how Navigator supercharges your ability to effectively manage agreements in the following post.
Manage, filter, and extract value from agreements
As a foundational component of the Docusign IAM platform, Navigator is a smart repository that enables organizations to centrally store, manage, and analyze agreements from any source. More than just document storage, Navigator is powered by Docusign AI, to effectively transform unstructured agreements into structured data. With this data unlocked, Navigator makes it easy for you to find agreements, access vital information quickly, and gain valuable insights from your agreements.
With Navigator, your organization can:
Drive efficiencies for your internal teams: Centralize agreements and empower your most valuable teams to find what they need fast.
Uncover opportunities to lower costs: Put AI to work to handle tedious tasks and uncover cost-saving opportunities by harnessing agreement data.
Increase oversight and security: Tighten agreement access and ensure only the right users have access to the right agreements.
Upload agreements into Navigator
In the following section, we’ll walk you through how to upload agreements into Navigator via the Upload Center, before using its search functionality and additional capabilities. Note:
After you purchase an IAM application that includes Navigator, Docusign historical completed agreements are automatically ingested into Navigator for you. This section details how to bulk upload historical agreements completed outside of Docusign, either stored locally or in a cloud storage account.
Bulk upload is available when you want to upload more than five files, such as uploading a folder of files. An administrator must grant the bulk upload permission for users.
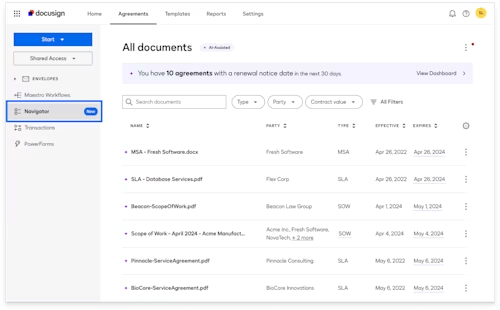
To enter the Navigator experience, go to the Agreements tab up top, and click on Navigator on the left-hand side. This is the main Agreement List in Navigator where you can automatically access all your completed (and newly signed) agreements from Docusign eSignature. Here you can search, filter, and sort through your agreements.
Upload agreements stored locally (desktop) into Navigator
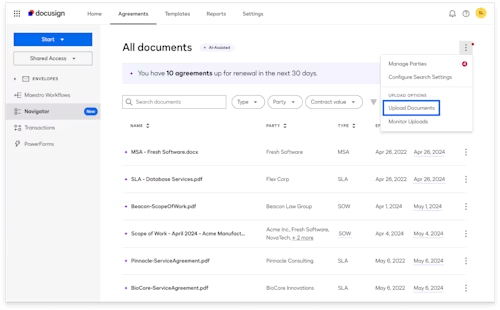
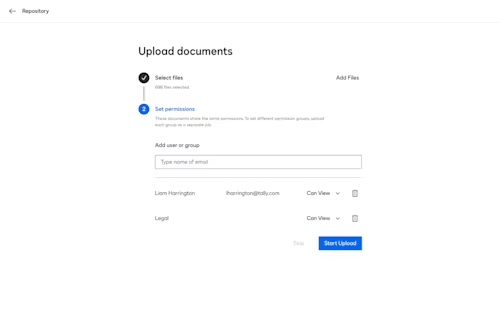
To upload additional completed agreements from local storage, such as a desktop, click the dotted Menu icon in the upper right, then click Upload documents.
Before completing your upload, you may choose permissions and set the access level for a specific user or group. Once you’ve configured these settings, choose the files you’d like to upload, then Start upload.
Upload agreements stored in the Cloud to Navigator
We recently released a feature that allows admins to upload agreements directly from a cloud storage account into Navigator. This provides more flexibility and enables you to rely on Navigator as your single source of truth for signed agreements. For the following example, we’ll use Google Drive. However, note that Navigator supports the following cloud storage apps in addition: Onedrive, Box, Dropbox and Sharepoint
To use Cloud Storage Upload in Navigator, you’ll first need to have your account administrator visit the Docusign App Center and download the correct app. In this case, Google Drive would be installed.
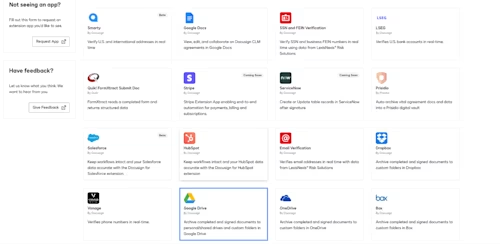
Once your account administrator installs the Google Drive app, they’ll need to authorize the app to receive data by logging in with their credentials.
Next, they can give themself permission to bulk upload agreement files into Navigator via Google Drive.
For this, they would go to Settings in Navigator -> User Settings page.
Click Users, under User and Groups in the left-hand navigation menu.
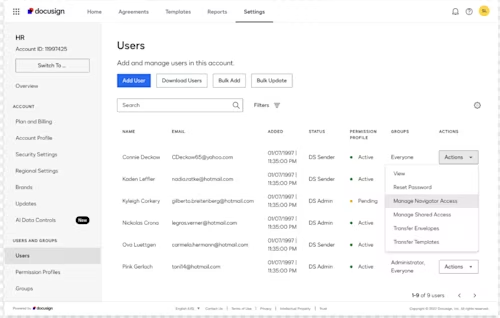
Locate the user.
Click on the actions button and Manage Navigator Access. Under Navigator Access, toggle the permission that allows users to bulk upload documents.
Once this is enabled, the user can now bulk upload files into Navigator directly from Google Drive.
Go to Navigator by clicking on Agreements in the upper navigation menu, then selecting Navigator in the left-hand navigation menu.
Now click the upload icon in the upper-right corner of Navigator, then select Google Drive or your chosen Cloud storage provider (must be installed and authorized via the App Center).
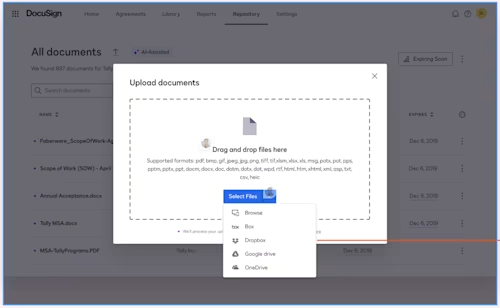
From here, the authorized user can select their chosen folder or agreement files to upload into Navigator by finding where they’re stored on the Cloud.
*Note: When a folder is selected, all files within that folder will be uploaded to Navigator.
Use filters to narrow your search
Back in the Agreements List, you can clearly see key agreement details that have been extracted by AI — such as the agreement type, the parties involved, the contract value and more. You can sort or filter agreements in the list by the different attributes at the top.
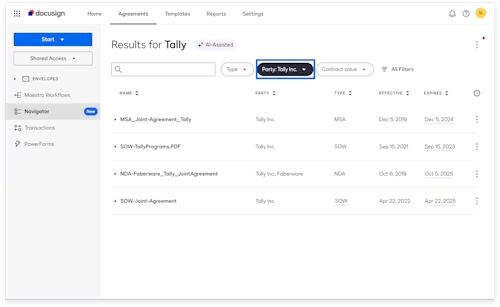
Manage custom agreement types
Navigator supports almost 40 different out-of-the-box agreement types, from consulting agreements, to purchase orders. However, we know every organization is unique and you may have other types of agreements in place with customers or vendors. Now users can manually create a custom agreement type (such as reseller agreements) and assign it a category (i.e. business services) to track and manage specific types of agreements more closely.
Once a new agreement type is created, the user can easily update existing agreements to the new type as needed. This ensures agreements are properly labeled and can be searched, filtered, and included in reports.
To do this, you can click on the 3 dots in the upper right-hand corner and select manage agreement types.
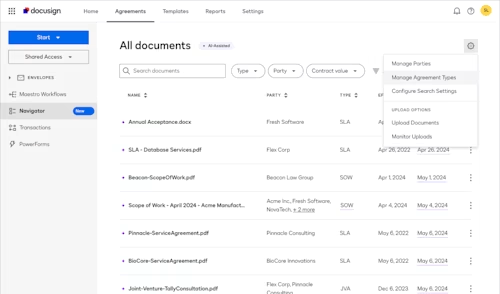
This new view allows you to manage and configure all your agreement types and fields in one place.
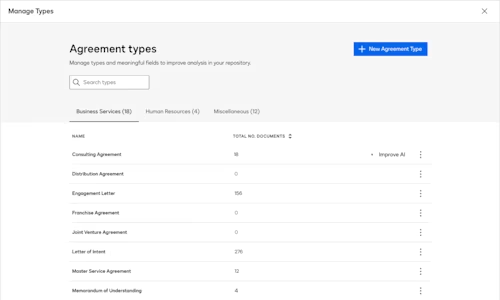
To add a new agreement type, click the new agreement type button in the upper right.
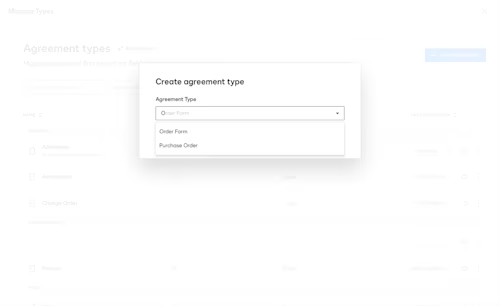
Then give the new agreement type a name and assign it to the most relevant category.
Once created, you’ll see this new type appear in the list of agreement types and you can easily navigate to the main agreement list to update any existing agreements to this new type.
Locate relevant agreements with comprehensive search
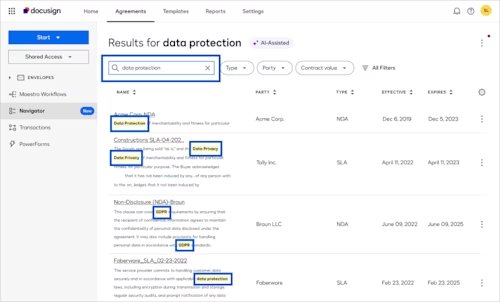
The Navigator search bar allows you to quickly find agreements right when you need them. Simply type in a keyword, phrase, or specific attribute (such as party name) and Navigator returns a list of related agreements. In the example below, the user searched for “data protection.” The results show signed agreements containing that exact phrase plus agreements that contain similar concepts such as ‘data privacy', 'data breach', and even 'GDPR'.
Rely on AI to surface key details
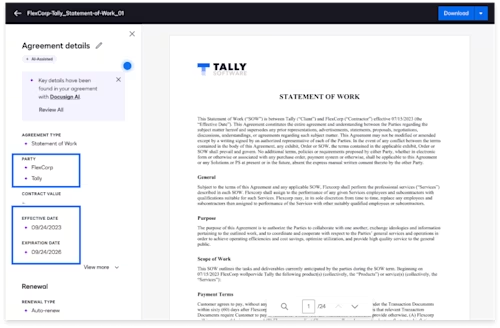
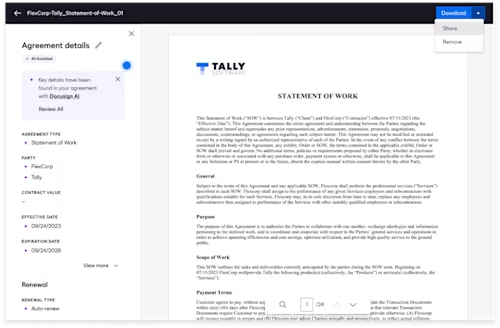
AI-powered insights for your agreements appear throughout the Navigator experience. For instance, when you click into an individual agreement, the Details pane clearly displays the essential attributes that AI has identified which make up the agreement. No more wasting precious time hunting for this information, agreement details are now right at your fingertips.
Note: Users can choose to accept or edit the attributes extracted by AI.
Streamline how party information is organized
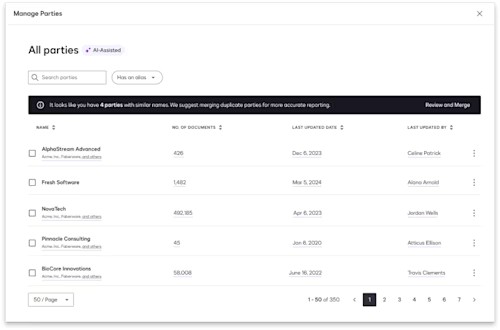
As mentioned earlier, AI within Navigator is helping to identify and store key attributes that make up your agreements. This also enables you to streamline the way you organize and view the different parties you have business relationships with. For instance, Navigator will alert users when it detects party name variations (e.g. “Tally” vs. “Tally Inc.” ), and allow them to merge party names together under a single preferred display name so parties are organized more effectively.
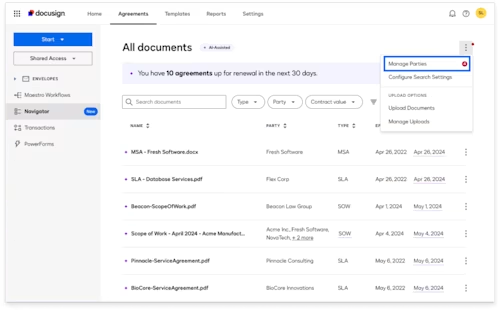
From the Agreement list, users can select the ellipses in the upper right, then Manage parties. Navigator then provides merge suggestions for the user to accept or adjust as needed.
Easily track renewals with renewal management
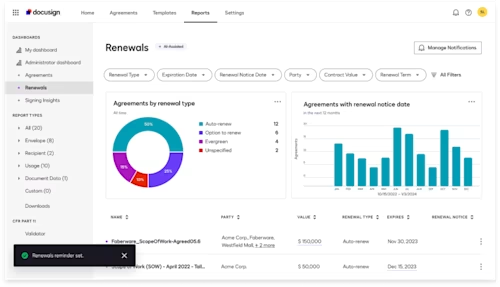
One of the most unique aspects of Navigator is that it includes renewal management. To take advantage of these capabilities, click on the Reports tab in the top navigation. From there, click on Renewals on the left-hand side.
Navigator has simplified renewal tracking with a dedicated dashboard that keeps you up-to-date on all your upcoming renewals. This is made possible because AI has identified which of your agreements are renewing and when and which type of renewal applies. This gives your teams greater insight into client and vendor relationships so they can be more proactive with renewals and have more strategic conversations.
Never miss a renewal deadline with automated reminders
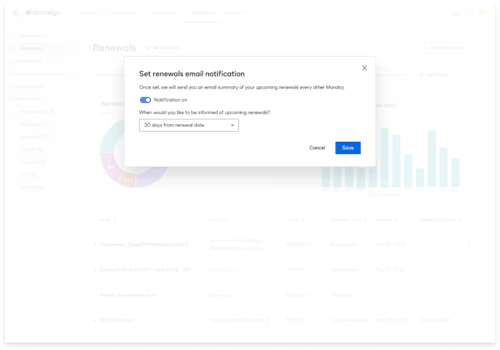
Now you can subscribe to agreement reminders where you will receive an email summary of your renewals well in advance. From the Renewal Dashboard, choose the Set Notifications button in the upper right. Click the notification toggle and choose how far in advance you’d like to be notified, then click save.
Grant access to agreements and manage user settings
By default, all users on the account will have access to Navigator but they will only be able to view their own completed agreements. That’s why it’s important Administrators on the account become familiar with how they can set and adjust user permissions to ensure only the right users have access to the right agreements.
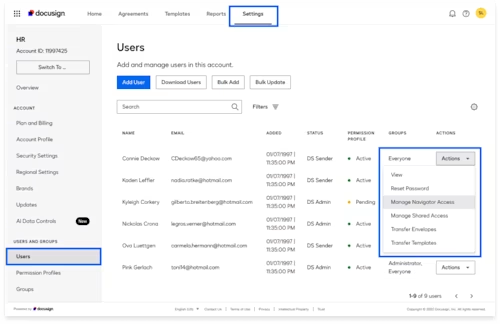
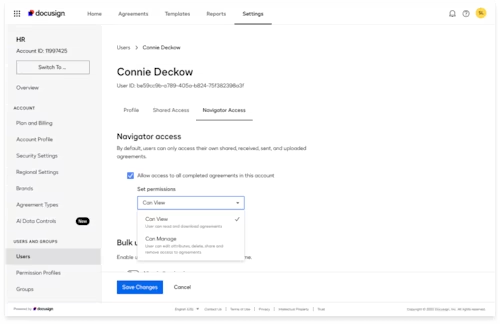
For example, let’s say your General Counsel needs broader access to all completed agreements in the account. Click into the Settings tab in the top navigation. Locate the user you’d like to grant access and click the Action button that corresponds to them. From there, select Manage Navigator Access and you are taken to a page where you can check the access box and specify what level of access they need. Additionally, if you find out the entire legal team needs access to all agreements, you can follow similar steps by clicking Groups on the main settings page.
Additionally, users can share access to individual agreements that they own using the direct sharing feature. For example, a Sales Rep can easily share a single completed agreement with another person on the Sales Team or with the larger Sales Group. They can do this by clicking into an agreement, choosing the arrow next to download, then share. Here, they can select who to share with and what level of access they want to provide.
Ready to learn more?
Navigator makes agreement management a breeze by unlocking the data hidden in your agreements. Together with other Platform Services such as Maestro, the App Center and Data Verification, which make up our IAM Applications, Navigator transforms the way you manage and analyze your signed agreements.
Ready to learn more? Get in touch with our sales team and find the right plan for your business on our Plans and Pricing page. If you already have Navigator and want to start using it with the outlined steps above, log into your account.
Related posts
Docusign IAM is the agreement platform your business needs

