
Expanding Power Automate Series: Long-lived Embedded Signing URLs
In this post, Robert Schendle and Mohamed Ali will take you through how to create a long-lived signing URL using Power Automate.

Co-author: Mohamed Ali
Enhancing the efficiency of document signing processes is a common goal for many organizations, and Docusign’s integration with Power Automate offers an elegant solution. By using static embedded signing links, you can create seamless, dynamic signing workflows without compromising user experience or security.
Many Docusign workflows rely on embedded signing for a seamless user experience. Power Automate can generate short-lived signing URLs (five-minute expiration), but how do you generate long-lived URLs? You may want to:
embed a signing URL in your app
include the signing URL in your in-app notifications
Use your own SMS gateway to send the signing URL
All these examples require a long-lived or static signing URL
For this reason, we’ve built this Power Automate flow. There are well-documented methods for creating long-lived URLs using custom API methods, and this blog is a low-code method of achieving the same outcome.
Here’s a step-by-step guide to implementing this solution, using a healthcare scenario where signing roles are assigned to a Doctor and a Patient.
Prerequisites: Preparing for embedded signing
Before generating a signing URL, it’s essential to configure the clientUserIds. These IDs signal to Docusign that signers won’t receive email invitations, but will interact directly with signing links.
If you're not already familiar with embedded signing in Docusign, be sure to first review the embedded signing documentation in the Docusign Developer Center.
Step-by-step implementation
For the purposes of this demonstration, we will assign the Doctor and Patient roles clientUserIds of doctor and patient, respectively. However, we will use query parameters of d and p, for simplicity. More on that below.
1. Set the trigger
Start by creating a Power Automate flow with the trigger “When an HTTP request is received.”
This trigger is Power Automate's (PA) native webhook listener, very similar to the Docusign Trigger. It's a very useful action that can not only enable you to kick off a flow in PA, but also pass data to it, and even respond to your application with new data. We're going to leverage this capability for our embedded signing flow.
Key points:
Set the trigger to allow requests from “Anyone”. This is critical…without this setting, signers won't be able to kick off this flow unless they are inside your Microsoft organization.
Define your schema. This isn't strictly necessary, as you can parse the query params manually with expressions, but adding this schema will let you choose the params from the dynamic picker later in the flow:
{ "type": "object", "properties": { "queries": { "type": "object", "properties": { "eid": { "type": "string" }, "sid": { "type": "string" } } } }eidwill represent theenvelopeIdandsidwill represent the signerId (doctorvs.patient).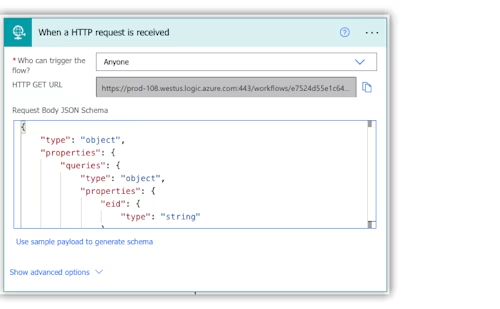
The trigger won't generate the GET URL until you save your flow for the first time. Don't worry, we'll be able to do that after the next step.
2. Extract query parameters
Extract eid (envelope ID) and sid (signer ID) from the incoming query parameters using Compose actions by either:
Choosing the parameters from the dynamic picker (if you used the schema provided above):
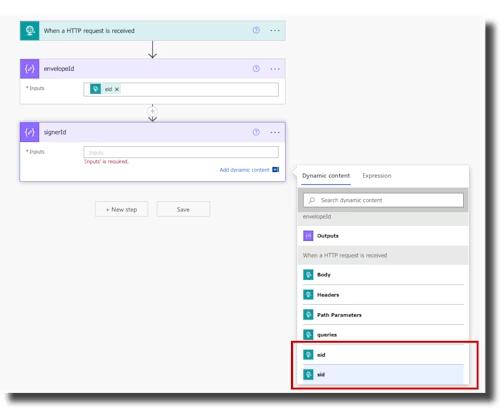
or, by entering manual expressions:
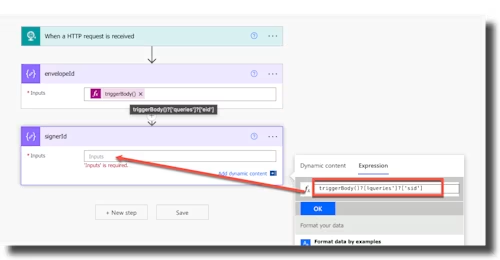
triggerOutputs()?['queries']?['eid']triggerOutputs()?['queries']?['sid']
Notes:
The query param names can be whatever you prefer. In this example, they are
eid(for envelope ID) andsid(for signer ID).The envelope ID must be the Docusign envelope ID.
Signer ID is a unique identifier to distinguish between Doctor (d) and Patient (p) and can be whatever you prefer, as long as it remains consistent.
3. Initialize variables
Define two string variables:
recipNamerecipEmail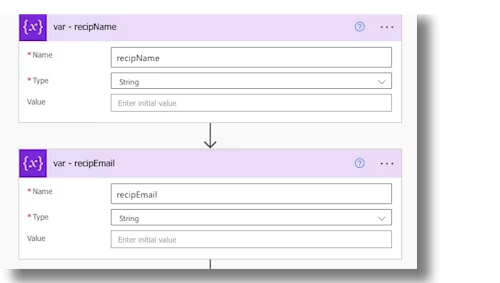
These will later store recipient-specific details based on the sid provided.
4. Retrieve envelope details
Use the Docusign: List Recipients from Envelope action to pull signer details:
Account: Select the sending account.
Folder: Use “Sent Items.”
Envelope: Map this to the
envelopeIdextracted earlier.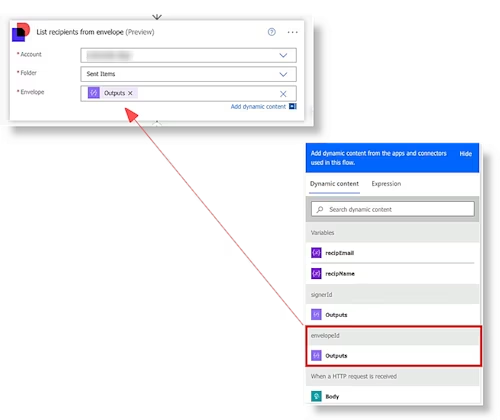
5. Filter recipients
Use two Filter Array actions to identify the Doctor and Patient signers:
getDoctor
From: (picker) Signers
Compare: (expression)
item()?['roleName']is equal to Doctor
getPatient
From: Signers (use the dynamic picker)
Compare: (expression)
item()?['roleName']is equal to Patient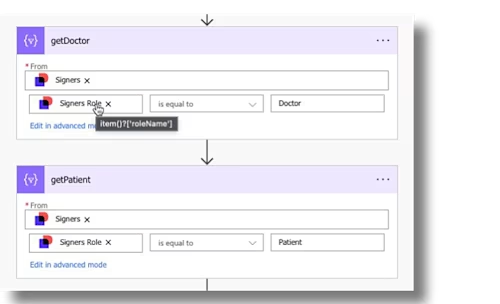
Note:
These two actions will return all signers with roleNames of Doctor and Patient, respectively. This is necessary because signers is an array of objects. We know there will only ever be one Doctor and one Patient (based on the template design). Nonetheless, signers is still a JSON array and we must parse it as such.
6. Configure a switch case
This is where we determine whether we’re fetching a signing URL for the Doctor or the Patient, using the sid query param ('d' or 'p'), so that we can set the recipName and recipEmail variables appropriately.
Switch action On: (picker)
Output - signerId
Switch case: Doctor Equals:
dInside the case: Action: Set Variable Name: (variable)recipNameValue: (expression)body('getDoctor')[0]['name']Action: Set Variable Name: (variable)recipEmailValue: (expression)body('getDoctor')[0][‘email’]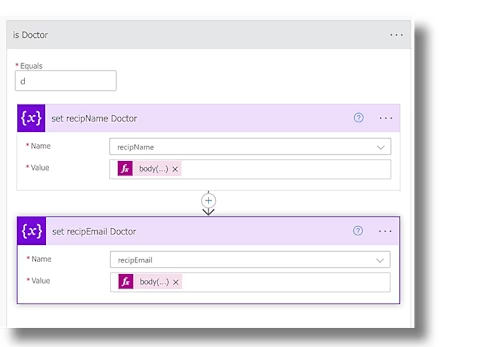
Switch case: Patient Equals:
pInside the case: Action: Set Variable Name: (variable)recipNameValue: (expression)body('getPatient')[0]['name']Action: Set Variable Name: (variable)recipEmailValue: (expression)body('getPatient')[0][‘email’]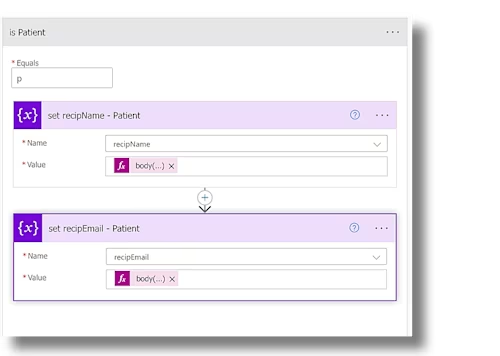
Note:
This is where we target the recipient object returned by the array filter for Doctor or Patient. Again, we know there will only ever be one signer returned, so we specify the item at index [0] and return its name and email values.
7. Generate the embedded signing URL
Docusign: Generate Embedded Signing URL action:
Account: Specify the sending account.
Envelope:
Outputs - envelopeIdSigner Name:
recipNameSigner Email: r
ecipEmailClient User ID:
Outputs - signerIdAuthentication Method: see note below
Return URL: Add a different URL
Add Return URL: Add a redirection URL post-signing
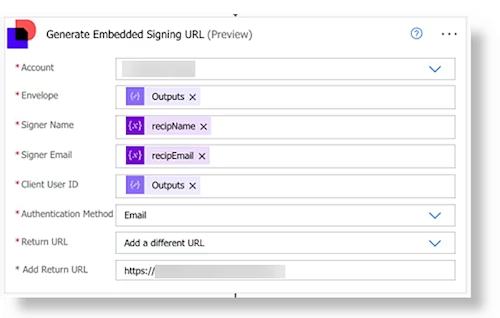
Note: Docusign is generating and handing over the signing URL with the assumption that your application has independently verified the signer's identity. Authentication Method is how you memorialize the method by which you performed this verification and it will be recorded on the envelope's Certificate of Completion. Please see Recipient authentication on the Docusign Developer Center for more info.
8. Return the signing URL
The Response action will send a response to the GET client (the user's browser). In this case, we want to respond with Javascript that will tell the browser to redirect to the signing URL.
Response action:
Status code: 200
Header:
Content-Type text/html; charset=utf-8Body:
<script>location.href='[(picker) URL]'</script>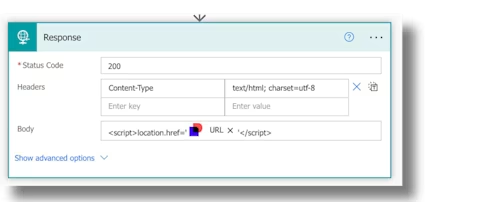
9. Embed the final static signing link
The URL generated by the Trigger action can now be appended with query parameters (envelopeId and signerId) and used as a custom GET endpoint to fetch a fresh signing URL and redirect the user's browser to the signing session.
Format:
https://<logicappurl>?eid=<EnvelopeID>&sid=<SignerID>
Example: https://prod-xxx.westus.logic.azure.com:443/workflows[...]&eid=a29bb1ac-xxxx-xxxx-xxxx-xxxxx369863d&sid=p
Note: You can use a third party to convert this to a shortened link. In the case where you may have a limited number of characters (like an SMS), this will be recommended.
By integrating static embedded signing links in Power Automate, you unlock a powerful mechanism for real-time, secure document signing. Ready to optimize your workflows? Get started today!
Additional resources

Rob is a Lead Digital Transformation Consultant at Docusign, based outside Washington D.C., where he provides strategic and technical expertise to customers in the financial, health sciences, and public sectors. He has over 20 years of technical implementation experience, working with organizations including The Bill and Melinda Gates Foundation, KIPP Foundation, DC Public Schools, and NOAA. He holds an undergraduate degree from Tulane University and a JD from Tulane Law School.
Related posts
Discover what's new with Docusign IAM or start with eSignature for free


