
Expanding Power Automate Series: Send an envelope
In this blog post, I’m going to explore just how easy it is to send envelopes from Microsoft Power Automate, using the standard Docusign connector for Power Automate.
Already, fans of Power Automate will know that it’s a great tool for streamlining common enterprise workflows, such as archiving completed envelopes based on metadata or labels in the envelope, setting up software accounts for new hires when they sign an offer letter, or provisioning services when a sales contract is signed.
Let’s take a look at how it works.

Example: Automatically send an envelope from a new SharePoint List item
The example I’m using in this article is triggered when a SharePoint List item is created. Note that the same workflow can be easily configured for a different trigger to meet your specific business needs; for example:
In procurement, when a tender/project status is changed in a SharePoint List, a trigger could send a group of contracts within a project folder for execution.
In HR onboarding, when a new employee is added, a trigger could send the onboarding pack (personal profile, payroll data collection, NDA, etc.) through an approval-and-signature workflow.
In Sales, a trigger could send a contract to close the deal faster.
This will primarily use the connector steps available in Power Automate today. For more advanced scenarios where you may want the full power of the Docusign eSignature REST API, check out my earlier blog: Get into the flow...
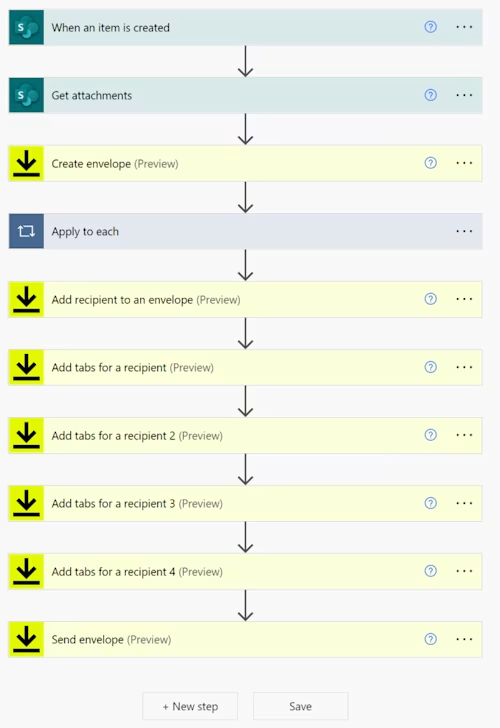
This example uses the Docusign prebuilt connectors within Power Automate that require zero code. The final workflow should look like this:
This is the SharePoint List I’ll be using for the example. Once I add a new item with an attached file, the goal is to trigger a new envelope automatically.

Step 1: Create Flow
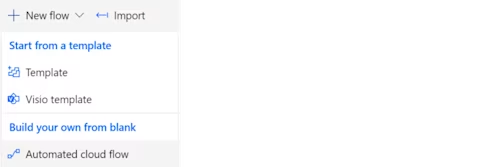
Create a new Automated Flow. Select New Flow > Automated cloud flow.
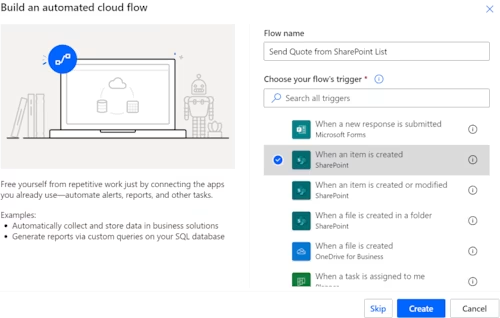
2. Add Trigger. Name your flow, select When an item is created, and then click Create.
3. Select Site Address and List Name.

4. Add Step: Get attachment. Use the ID from the previous step.

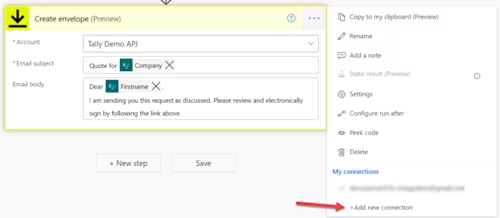
5. Add Step: Create envelope. Authenticate with Docusign by clicking the three dots, then +Add new connection. Then, select your account and add the email subject and body.
6. Add Step: Get file content. Add the ID from the Get attachment step.
Note: Power Automate will automatically add this to an Apply Each loop. This just means it will loop through all attachments you make to the item. This won’t affect the behavior, as you’re only attaching one document.
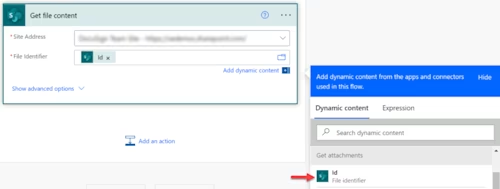
7. Add Step: Add documents to an envelope. Add this step within the Apply Each loop as below. Add the Account and Envelope ID. For the document Base64 step, this requires a formula to convert the document to Base64 format. To do so:
Select the Expression tab.
Type “base64()” and leave the cursor in between the brackets.

Change to the Dynamic content tab, then select File Content.

Select OK. The end result should be as shown:
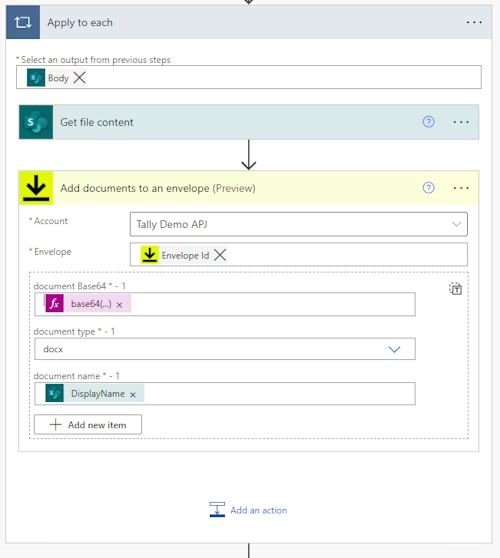
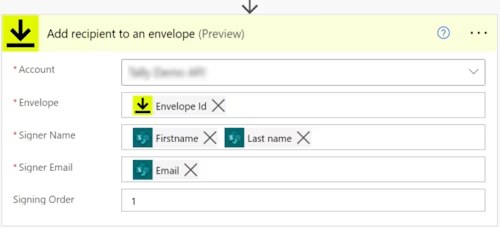
8. Add Step: Add recipient to an envelope. Get the Envelope Id from the previous Create envelope step. Add the signer name and email from the SharePoint List parameters. Signing Order specifies the order which recipients will sign—useful with multiple signers. In this case, assign it the value 1.
9. Add Step: Add tabs for a recipient. Add a tab (field) for Signature. This is needed to tell Docusign where to place the signature field on the document. Docusign will align the signature field with the location of the special text, called an anchor string; this implements auto place signing. Set the anchor string as below (see Step 2: Signing document setup below for setting up the document to match).
Key fields:
tab type: Signature
tabs anchor string: \s1\
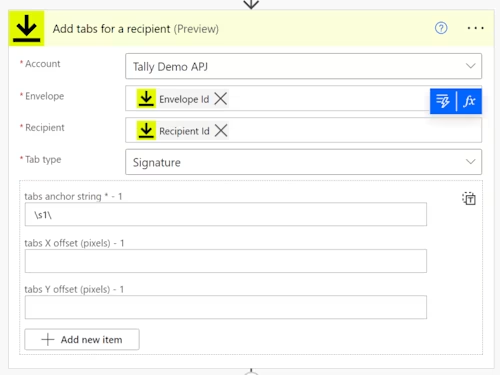
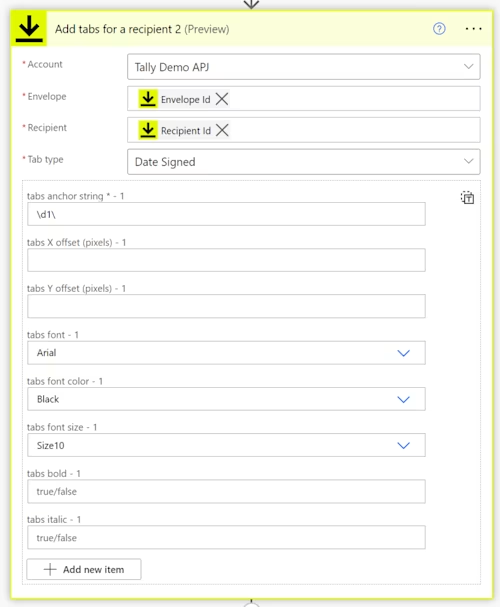
10. Add Step: Add tabs for a recipient.
Key fields:
tab type: Date Signed
tabs anchor string: \d1\
11. Add Step: Add tabs for a recipient.
Key fields:
tab type: Name
tabs anchor string: \n1\
12. Add Step: Add tabs for a recipient.
Key fields (for Company):
tab type: Text
tabs anchor string: \co1\
13. Add Step: Send envelope

Save and activate the workflow.
Step 2: Signing document setup
You only need to make minor changes to the document you want signed, to flag where the Docusign tabs should appear (see “Add tabs for a recipient” steps above). Simply enter the special anchor string (auto-place) text you created in the flow anywhere in the document that you want those fields to appear.
For example, the image below shows a Word document that needs a signer: “\s1\” for the first signer, “\n1\” for the full name of the signer, “\d1\” for the date of signing, and “\co1\” for the company name.
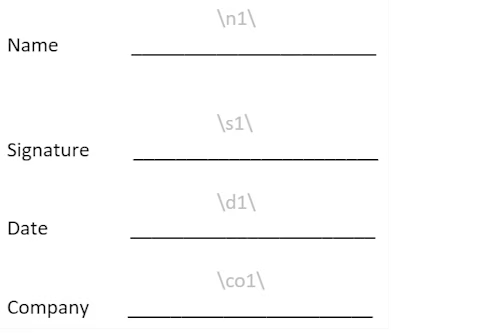
Just remember, in your final version, make the auto-place text white (so it’s hidden from view)!
That’s all there is to it. Now give it a whirl!
Additional resources

Mo is a Principal Solution Architect with over 20 years of experience working with companies of all sizes, helping them realise their digital strategies. Mo is based on Australia, loves all things low-code, architecture, and is currently attempting to master the art of dad jokes.
Related posts

 DevelopersPublished Mar 21, 2025
ISV developers: Enhance your product by building a Docusign connector
 DevelopersPublished Mar 13, 2025
Docusign eSignature Integration 101: Setting the foundation

ISV developers: Enhance your product by building a Docusign connector

Docusign eSignature Integration 101: Setting the foundation
Discover what's new with Docusign IAM or start with eSignature for free


