
Expanding Power Automate Series: Document Generation
It takes just four actions to generate a document and send envelopes for signature with Microsoft Power Automate, using the Docusign connector. See how.

In this blog post, I’m going to explore just how easy it is to generate a document and send envelopes from Microsoft Power Automate, using only four actions in the standard Docusign connector for Power Automate.
But first, why use Document Generation in general? Like many teams, you probably spend up to 30 minutes to prepare new documents for signature. This multi-step process typically includes locating the correct template version, manually editing that template using Microsoft Word or a PDF editing tool, and entering in custom information, such as personalized details or location-specific terms that often need to be inserted before an agreement is ready to be delivered. Existing workflows don’t scale enough to customize high volumes of agreements, leaving your team stuck with manual busy-work. Docusign Document Generation does this customization for you.
With Document Generation for Microsoft Power Automate, you integrate the capabilities of Docusign Document Generation directly into your Microsoft Power Automate workflows, saving employee time and reducing manual work, all while delivering professional-looking agreements. With this integration, teams can dynamically insert data fields into eSignature templates to customize documents at scale, then easily send the documents and request signatures using their standard process. Create templates using the Docusign Template Assistant for Word, including conditional tags that hide or display content per business rules to reduce the number of templates needed. Fill template fields with data from third-party systems and send the final document out for signature, and then archive it to the right systems by creating Microsoft Power Automate flows.
How can you get started with Document Generation and Power Automate? Here are a few examples to get your wheels turning:
For procurement, when a tender/project status is changed in a SharePoint List, a Power Automate trigger can generate a contract and send it to a group within a project folder for execution.
For customer onboarding, an application website created using Power Pages would then trigger a document to be generated and signed in a single experience.
For sales, a trigger can automatically generate and send a contract to close the deal faster
Note: To use Document Generation, please reach out to your Docusign account executive or reach out to support@docusign.com to enable the functionality
Example: Generate and send an offer letter to a candidate automatically from a new item in a Microsoft List (in Sharepoint)
The example I’m using in this article is triggered when a Microsoft List item is created.
This example uses the Docusign prebuilt connectors within Power Automate. There are three components:
The document generation eSignature template
A Microsoft List (in Sharepoint)
A Power Automate flow
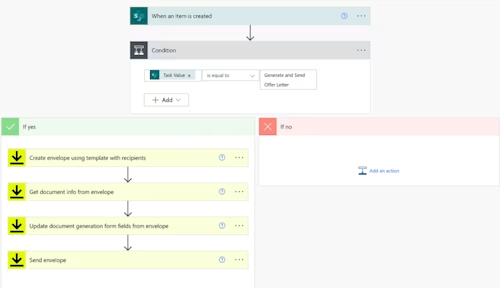
The final workflow should look like this:
Step 1: Create a document generation template
Create a document generation Word template
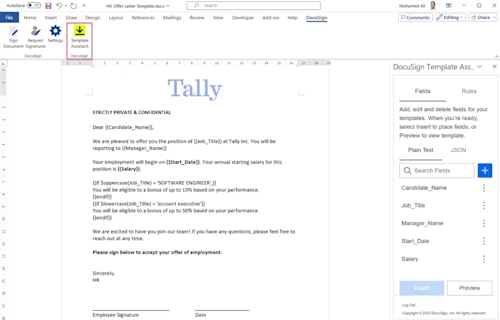
You will need to create a document generation template within Docusign. This will be created in Microsoft Word, using the Docusign Template Assistant. In this blog’s example I’m using the document in the image below, and there is one recipient.
Add signing auto-place text
You only need to make minor changes to the document you want signed, to flag where the Docusign tabs should appear. Simply enter the special auto-place text anywhere in the document that you want those fields to appear. This will be important with generated documents, as the signing tabs need to be aligned with the document as it grows and shrinks dynamically based on conditions (for example, if “travel = yes” , add the section on candidate travel requirements).
In the example below, the image shows the same Word document with the following auto-place text: “/sign1/” for the first signer and “/date1/” for the date of signing.

Just remember, in your final version, make the auto-place text white (so it’s hidden from view)!
Create eSignature Template
Take the Word document and upload it to Docusign as a new template. Add the fields/tabs based on the autoplace text created in the previous step.
This blog won’t have the step-by-step guide on creating the template, but if you’d like to see this I've covered it in detailed in this video:Deep Dive: Document Generation for eSign. For the purposes of this blog, the main merge fields I will be mapping to data in the Microsoft List are: "Candidate_Name", "Job_Title", "Manager_Name", "Start_Date", and "Salary".
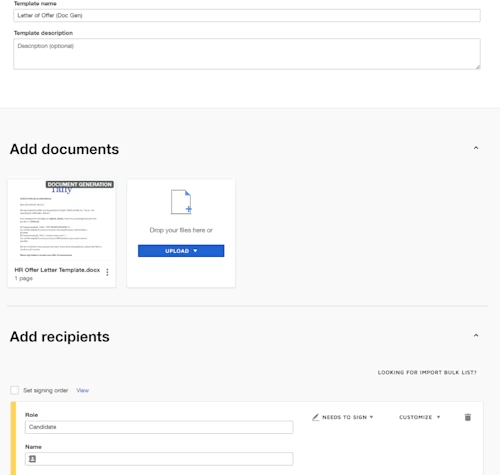
Important: Take note of the document’s filename that you’ve uploaded to the eSign template as well as the eSign Template name. You will need to reference these in the Flow below. In this example I am using:
Template name: Letter of Offer (Doc Gen)
Filename: HR Offer Letter Template.docx
Step 2: Create a Microsoft list (in Sharepoint)
This is the Microsoft list I’ll be using for the example. Once I add a new item and select the task “Generate and Send Offer Letter”, the goal is to trigger a new envelope automatically.

Note: This is just my example. In your scenario, this would be whatever your trigger is going to be to run the flow.
Step 3: Create a Power Automate flow
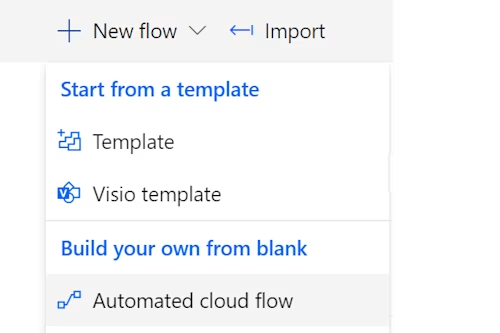
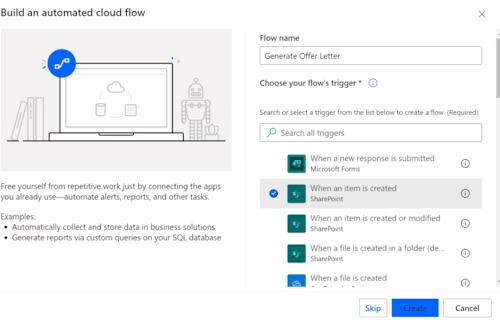
Create a new Automated Flow. In Power Automate, select New Flow > Automated cloud flow.
Add Trigger. Name your flow, select When an item is created, and then click Create.
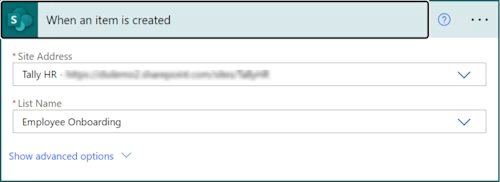
Select Site Address and List Name.
Optional Step: Condition. This is my trigger. Once the Task value = “Generate and Send Offer Letter”, then Power Automate completes the rest of the Docusign flow.

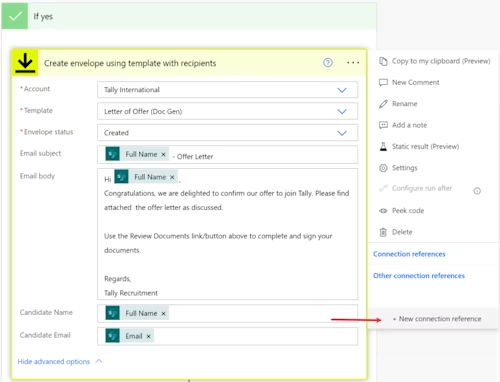
Add Step: Create envelope using template with recipients. Authenticate with Docusign by clicking the three dots, then +Add new connection. Then, select your account and add the email subject and body. Select the Account and Template (created in Step 1), and the remaining details as you see in the example below.
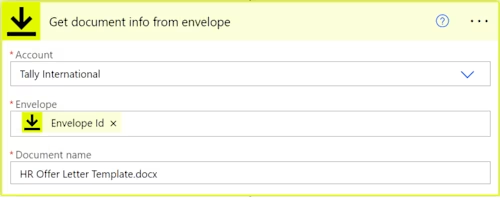
Add Step: Get document info from envelope. This is required to get the unique ID (GUID) of the document in the Docusign template. Enter the Envelope Id from the previous step, and the Document name must match the name in the eSignature template created in Step 1.
Add Step: Update document generation form fields from envelope. This is where the magic happens: the merge fields are mapped to your data from the Microsoft List entry. In this example, I have five merge fields, and I've mapped them to data from my Microsoft List.
Field Name: The name in your Word Document merge field (step 1)
Field Value: the corresponding value in your Microsoft List item.
To add a new item, click +Add new item
Note: Document generation is available as a separate add-on for Docusign eSignature. To add this feature to your account, contact Sales to reach our sales team. For development purposes, this feature is already enabled on your developer account.
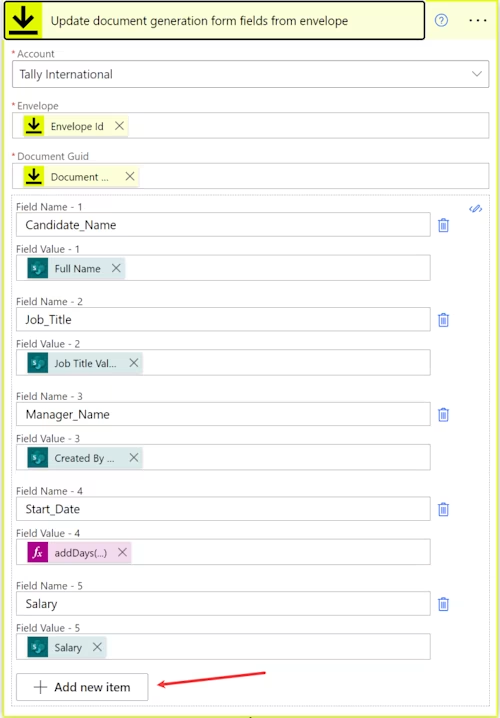
Tip: You can use expressions (formulas) in Power Automate. So for the Start Date, I wanted it set automatically to 30 days from today. So I simply added the expression:
addDays(utcNow(),30,'MM/dd/yyyy').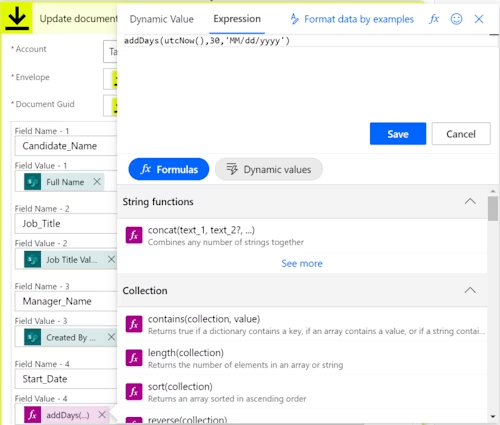
Add Step: Send envelope

Save and activate the workflow.
That’s all there is to it. Now take it for a spin!
This is part of the broader Expanding Power Automate content series. Here’s a few of the assets i think you’ll find useful:
Blog post: Send an envelope
Blog post: Common post-signing tasks
Additional resources

Mo is a Principal Solution Architect with over 20 years of experience working with companies of all sizes, helping them realise their digital strategies. Mo is based on Australia, loves all things low-code, architecture, and is currently attempting to master the art of dad jokes.
Related posts
Docusign IAM is the agreement platform your business needs


