From the Trenches: Bulk publish historical envelopes using Docusign Connect
See how to use Docusign Connect messages to export completed envelopes in bulk, using a CSV file you upload to the user interface or directly via an API call.

Docusign Connect is a webhook service that enables you to receive updates when specific triggering events occur in your eSignature workflows.
To use a Connect webhook, you must set up a web service (known as a webhook listener) that is available on the public internet. When a subscribed event occurs, Docusign Connect sends an HTTPS POST request to your webhook listener and your app uses the sent information to perform actions.
Docusign Connect also enables you to publish messages for envelopes in your account in bulk. This is particularly useful if you need to take your listener offline for maintenance and want a mechanism to catch up quickly to missed messages. It can also be used as a way to archive all the historical envelopes in your account.
There are two ways of publishing envelopes in bulk. I will detail the steps involved in both below.
Through the Docusign eSignature user interface
Through the eSignature REST API
Through the user interface
Log in to your Docusign account with a user who has administrative privileges.
Select Admin in the top menu.
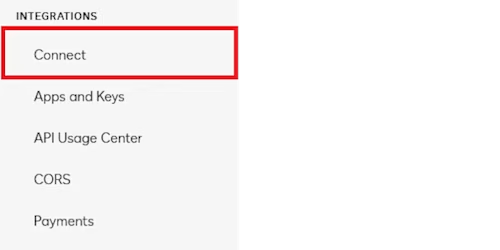
Navigate to “Connect” under “Integrations” in the left nav.

In the Connect section, select Publish > Publish using CSV.

Here, you can upload a CSV file containing a list of envelope IDs you want to publish along with the configuration ID of the listener you would like to target.
You can publish up to a maximum of 9999 envelopes using a CSV file.
Here's an example CSV file:
EnvelopeId, ConfigurationId
59xxxxxx-xxxx-xxxx-xxxx-xxxxxxxxxxxx, 1xxxxxxxx
28xxxxxx-xxxx-xxxx-xxxx-xxxxxxxxxxxx, 1xxxxxxxx
03xxxxxx-xxxx-xxxx-xxxx-xxxxxxxxxxxx, 1xxxxxxxx
46xxxxxx-xxxx-xxxx-xxxx-xxxxxxxxxxxx, 1xxxxxxxx
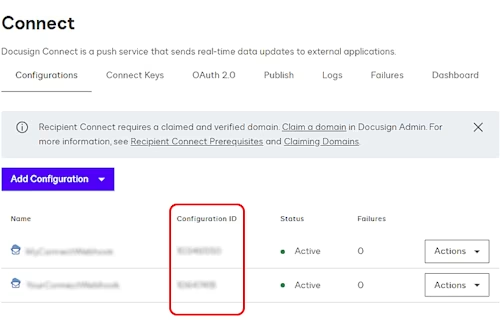
How to find your Connect configuration ID:
Log in to your Docusign account with a user who has administrative privileges.
Select Admin in the top menu.
Navigate to “Connect” under “Integrations” in the left nav.
In the “Configurations” section, all your configurations will be listed with their Configuration ID:

Through the eSignature REST API
If you have an existing integration with Docusign, you can use the EnvelopePublish : createHistoricalEnvelopePublishTransaction endpoint to submit a batch of envelopes to a URL of your choice. It does not need to be an existing configuration on your account. This endpoint uses an ad hoc configuration to publish the envelopes requested. This endpoint only supports publishing messages in JSON SIM event model format and cannot support legacy, Salesforce, or eOriginal configurations. For legacy, Salesforce, or eOriginal configurations, you would need to use the UI as described previously.
Here’s an example request to this endpoint:
{
    "envelopes": ["4280f274-xxxx-xxxx-xxxx-b218b7eeda08", "8373a938-xxxx-xxxx-xxxx-e992a2abae01"],
    "config": {
        "configurationType":"custom",
        "name": "Test",
        "urlToPublishTo":"YOUR-WEBHOOK-URL",
        "allowEnvelopePublish": "true",
        "enableLog": "true",
        "requiresAcknowledgement": "true",
        "IncludeHMAC": "true",
        "SignMessageWithX509Cert": "true",
        "deliveryMode": "SIM", // Send Individual message for each event.
        "eventData": {
            "version": "restv2.1",
            "format": "json",
            "includedata": ["tabs","payment_tabs","custom_fields","powerform","recipients","folders","extensions","attachments", "prefill_tabs", "documents"]
        }
    }
}If the request succeeds, it returns a 201 (Created) HTTP response code, and the response body property processingStatuswill be set to processing. You can then view the status of each historical republish request in the Bulk Actions Log.
Once you’ve successfully set up the request, the envelopes will be sequentially queued for processing, and you will see events flowing into your listener as soon as the processing finishes.
Additional resources

Karan Kaushik began his Docusign career in January 2022. As a front-line developer support engineer, Karan enjoys working on complex technical problems. He is passionate about using technology to make people's day-to-day lives easier and simpler, leveraging his array of experience across information technology, cloud operations, and software development.
Related posts
 DevelopersPublished Mar 21, 2025
 DevelopersPublished Mar 13, 2025
Docusign eSignature Integration 101: Setting the foundation
 DevelopersPublished Mar 11, 2025
How to set up Salesforce authentication with JWT to access any Docusign API

ISV developers: Enhance your product by building a Docusign connector

Docusign eSignature Integration 101: Setting the foundation

How to set up Salesforce authentication with JWT to access any Docusign API
Discover what's new with Docusign IAM or start with eSignature for free


