
DevelopersPublished Jan 24, 2022
How to set up Salesforce authentication with JWT to access any Docusign API
Summary•7 min read
Learn to configure your authentication in Salesforce using the JSON Web Token (JWT) Grant authorization flow so you can call any Docusign API from an Apex class.
Table of contents

Integrating Docusign eSignature with Salesforce has historically been made easy with the help of the Apex Toolkit. With the introduction of Docusign IAM, the Salesforce extension app has made it frictionless to bring Salesforce into your Maestro workflows to automate agreement processes. But with the wide variety of Docusign APIs and Salesforce’s breadth of configuration options, there are so many more possibilities for what you can build beyond what’s available out-of-the-box. For example, you might call the Navigator API from Agentforce to access data from the Navigator smart agreement repository. Or you might build a button that calls the Maestro API, triggering custom extensible workflows from inside Salesforce. While authentication for eSignature is made simple with the Apex Toolkit, other APIs that aren’t included in eSignature for Salesforce require a different method of authentication before you can take advantage of their unique capabilities. In this post, I’m going to walk you through how to authenticate with JSON Web Token (JWT) so you can call any Docusign API from an Apex class in Salesforce.
Authentication with named credentials
To make raw HTTP requests from an Apex class, you first need to authenticate with the Navigator API. The easiest way to do this in Salesforce is through named credentials. I’m going to walk through the steps required to set up a named credential in this post, but if you’d prefer to watch a video demonstration, see Steven Cooke’s Named Credentials video:
Upload your private key as a certificate in Salesforce
First, create a new integration key in your Docusign developer account. Add an RSA key pair to your app and save the private key in a file with the extension .key on your local desktop. Now the .key file needs to be converted to a format that can be uploaded to Salesforce as a Signing Certificate. You can accomplish this by running the following commands in the command line of your choice. As a prerequisite, you’ll need to install OpenSSL.
Convert the .key file to a .pem file. Replace <file-name> with the name of the file where you stored your private key. Replace <certificate-name> with the name of the new file where the output of this command will be stored.
openssl req -new -x509 -key <file-name>.key -out <certificate-name>.pem -days 1095Create a .p12 file from the .pem and .key files. You will be prompted to create a password for the certificate.
openssl pkcs12 -export -in <certificate-name>.pem -inkey <file-name>.key -certfile <certificate-name>.pem -out <certificate-name>.p12Create a .jks file from the .p12 file. You will again be prompted to create a password. Be sure to use the same password that you used in the previous command. Salesforce will not let you upload the certificate if the passwords don’t match.
keytool -importkeystore -srckeystore <certificate-name>.p12 -srcstoretype pkcs12 -destkeystore <certificate-name>.jks -deststoretype JKSGive the key an alias that will be accepted by Salesforce.
keytool -keystore <certificate-name>.jks -changealias 1 -destalias docusignjwtNow your private key has been stored in a format that can be uploaded as a certificate to Salesforce.In Salesforce Setup, navigate to Certificate and Key Management.

Before you can upload your Docusign certificate, Salesforce requires that you complete two prerequisites, including creating a Self-Signed certificate in your account and enabling Identity Provider. To create the certificate, choose Create Self-Signed Certificate and give it a name and label. Then, enable Identity Provider and assign this new self-signed certificate as the chosen certificate.
Once those prerequisites have been completed, you can return to Certificate and Key Management and choose Import from Keystore. Upload the .jks file created in the previous steps and enter the password that you used when creating that file.
Create an authentication provider for Docusign
In Salesforce Setup, navigate to Auth. Providers. Select New, then choose Open ID Connect for the Provider Type. Configure the Auth. Provider with the following fields:
Consumer Key: Enter the value of the integration key where you created the RSA keypair in the previous steps
Consumer Secret: Add a secret key to your integration key and copy that value here
Authorize Endpoint URL: https://account-d.docusign.com/oauth/auth
Token Endpoint URL: https://account-d.docusign.com/oauth/token
Use Proof Key for Code Exchange (PKCE) Extension: Uncheck this box
Default Scopes: This should include all of the scopes that you need for the API of your choice and an additional scope openid. For example, if you were authenticating with the Navigator API you would enter the following:
signature adm_store_unified_repo_read impersonation openidSend access token in header: Check this box
Include Consumer Secret in SOAP API Responses: Check this box
This screenshot shows an example of an Auth. Provider configured with these fields.

After saving your Auth. Provider, you should see a few URLs that were automatically generated for you at the bottom of the page, similar to those in the screenshot below.
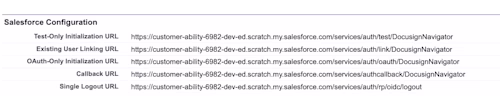
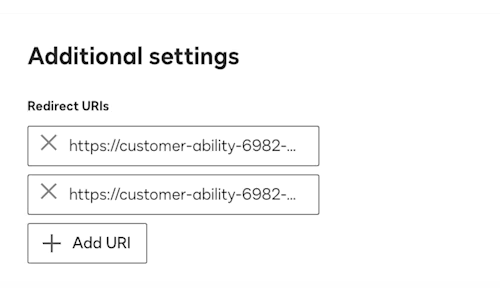
Add the OAuth-Only Initialization URL and Callback URL as redirect URIs in your integration key.
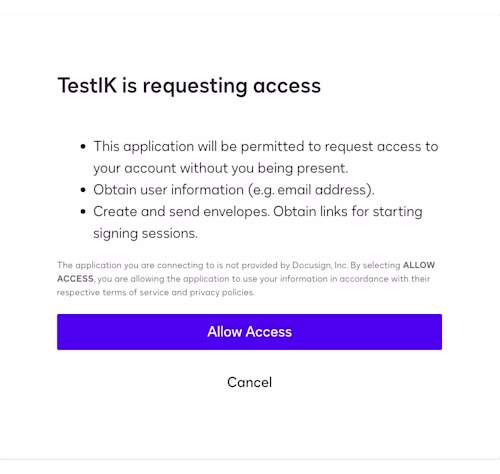
Grant consent
To grant consent, copy the OAuth-Only Initialization URL into a new browser tab. This will redirect you to the consent flow pictured below. After granting consent, you’ll be redirected back to Salesforce.
Create an external credential
In Salesforce Setup, navigate to Named Credentials, then choose the External Credentials tab. Select New. Select OAuth 2.0 for the Authentication Protocol and JWT Bearer Flow for the Authentication Flow Type. Set the identity provider URL to https://account-d.docusign.com/oauth/token. Set the JWT Expiration to 3600.
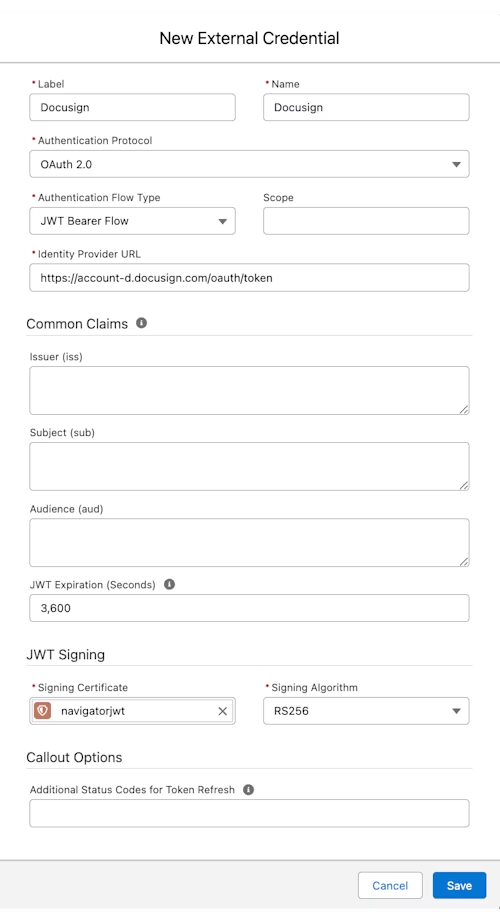
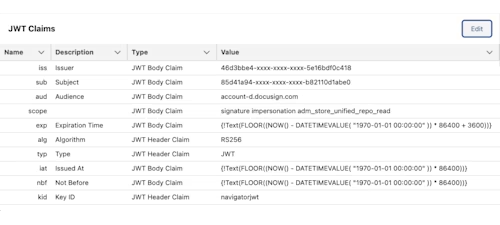
After saving that, scroll to JWT Claims and choose Edit. Set the values of the claims following the table below:
Claim Name | Value |
iss | The value of your integration key |
sub | The user ID of your Docusign account |
aud | account-d.docusign.com |
scope | Any scopes required to make the API calls, separated by spaces. In this example use the following: adm_store_unified_repo_read signature impersonation |
After updating these values, the JWT Claims on your external credential should look similar to this screenshot:
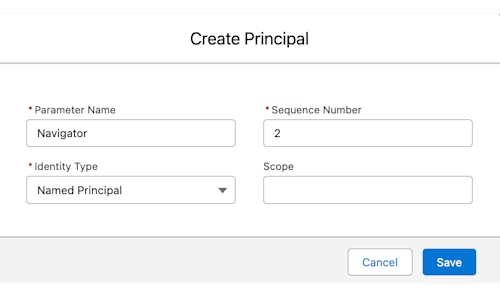
Finally, add a principal to the external credential by scrolling to Principals and selecting New. Give the principal a name and choose Named Principal for the Identity Type.
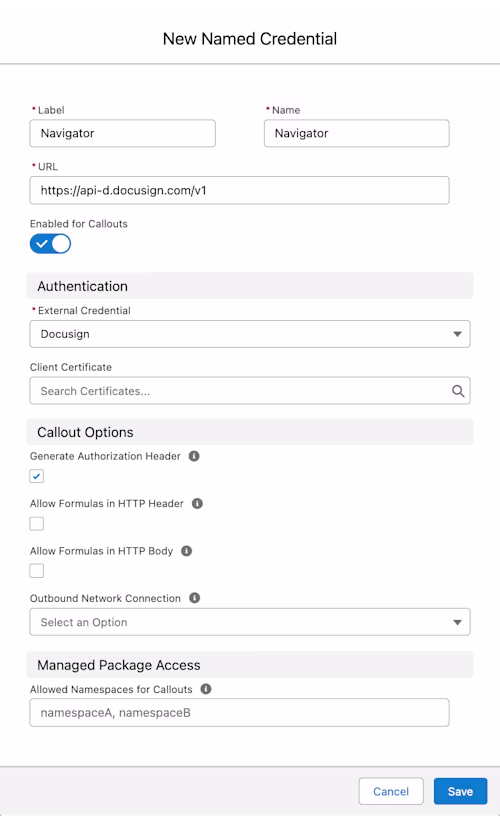
Create a named credential
Navigate to Named Credentials and choose the Named Credentials tab. Select New. Give the credential a descriptive label and name. Set URL to the base path for the Navigator API: https://api-d.docusign.com/v1. For the associated External Credential, choose the external credential that you created in the previous step. After saving this, your named credential and external credential will be linked.
Assign the external credential to a permission set
In Salesforce Setup, navigate to Permission Sets, and create a new permission. Edit that permission set, and from the edit view, choose External Credential Principal Access.
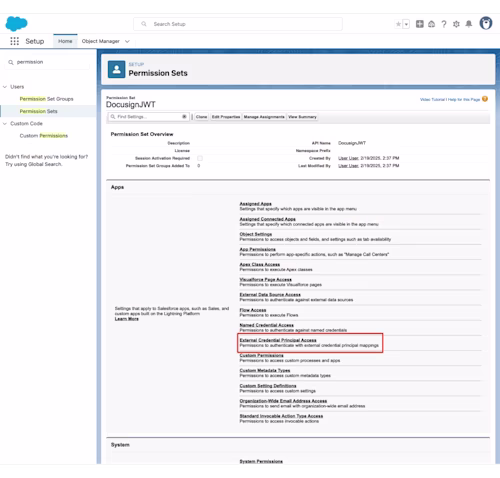
Select Edit, then select the external credential that you just created and use the arrow buttons to add that to the box labeled Enabled External Credential Principals. Then click Save.
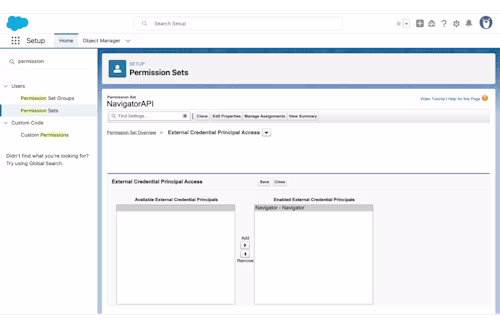
Finally, be sure that this permission set is assigned to the user who will be making the API calls.
Now you’re ready to call the API of your choice. In your code, use callout:{YOUR_NAMED_CREDENTIAL_NAME} in place of the endpoint’s base path. The snippet below shows what this looks like.
req.setEndpoint('callout:Navigator/accounts/{API_ACCOUNT_ID}/agreements');
With this authentication through named credentials, you can call any Docusign API from inside an Apex class, allowing you to bring even more Docusign functionality into Salesforce. When developing with Salesforce and the eSignature REST API, we recommend using the Apex Toolkit, but with named credentials, you can go beyond eSignature, leveraging a wide variety of other Docusign features.
Additional resources
Learn how to authenticate for Salesforce eSignature integrations with the Apex Toolkit.
Explore all of the Docusign APIs.
Watch an overview of how to set up an integration key.

Paige RossiSr. Programmer Writer
Paige has been working for Docusign since 2020. As a Sr. Programmer Writer on the Developer Content team, she writes content and code to help developers learn how to use Docusign APIs.
Related posts


DevelopersPublished Jan 24, 2022
Beyond eSignature for Salesforce: Smart Send
Discover what's new with Docusign IAM or start with eSignature for free