How to certify your documents using a Docusign electronic seal via API
Arnaud Lesueur demonstrates how easy it is to use the Docusign Electronic Seal feature on an envelope to certify the origin of your document sent by Docusign.

In this blog post, I’m going to show how you can apply an electronic seal on the document to certify the origin and authenticity of these documents.
So first, what’s an electronic seal according to eIDAS ?
An electronic seal is data in electronic form, which is attached to or logically associated with other data in electronic form to ensure the latter’s origin and integrity, where the creator of a seal is a legal person (unlike the electronic signature that is issued by a natural person).
And how is it reflected when using Docusign ?
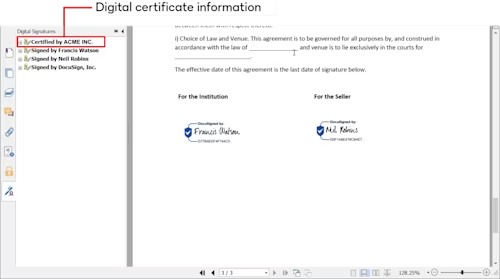
Each electronic seal that is applied to a PDF document is characterized by a digital certificate. Seal certificates do not show in the content of the complete PDF document itself, but in its signature properties. When a user displays such a PDF document, one can notice the presence of the electronic seal by displaying the signature details.

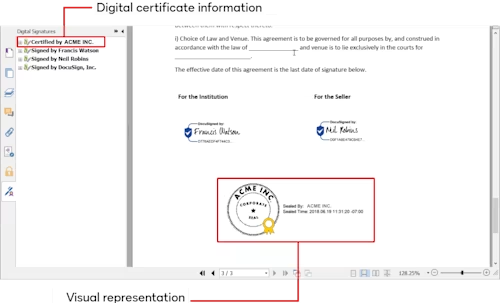
It is also possible to include a visual representation of your electronic seal and place it at the desired location in your document.

For example, a company may apply an electronic seal on a contract before sending it out for signature or might use it to digitally seal their invoices before sending them to their customers to ensure their origin.
In the rest of this blog article, I will focus on a eInvoicing use case where:
The invoice has been already generated from a third-party system
The invoice is passed to Docusign to certify its origin and will be communicated to the customer using a carbon copy recipient
As part of the sealing process, a visual representation of that seal will be added to the document using an anchor tag
Additionally, the invoice will be pushed automatically to an eArchiving system using an eventNotification/webhook defined at envelope level
Prerequisites
To proceed, you will need to have:
A Docusign account with the Standards-Based Signature module enabled
At least one electronic seal certificate provisioned on this account
A user member of a group who has access to this electronic seal
Already implemented a Connect Listener (see our Developer Center guide JSON SIM event model (Connect 2.0))
Note: Your account might not support the option discussed in this blog article. If you don’t have such an account, contact Docusign Sales and discuss any possible configuration details.
Step 0: Set up your integration key
If this is your first API integration with Docusign, you will need to create an integration key.
As this use case will be a system integration, it will rely on JWT for the authentication process. You can refer to JSON Web Token (JWT) Grant authentication and its associated links.
Step 1: Identify the Seal Identifier/sealName
To apply the seal to your envelope, you would need to know its Seal Identifier, also known as its sealName in our API terminology.
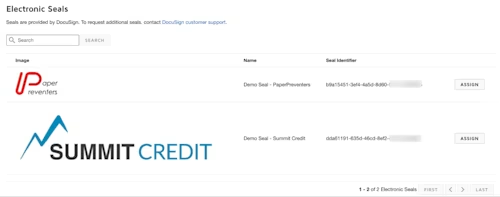
You can apply the seal in your eSignature account under Settings > Electronic Seals, as shown below:

If you are looking to automate this process, the AccountSealProviders:list method will return the list of Electronic Seals available for your account. Here is a sample of the returned JSON on the same account from the AccountSealProviders:list call:
{
   "seals": [
       {
           "sealName": "b9a15451-3ef4-4a5d-8d60-xxxxxxxxxxxx",
           "sealDisplayName": "Demo Seal - PaperPreventers"
       },
       {
           "sealName": "dda61191-635d-46cd-8ef2-xxxxxxxxxxxx",
           "sealDisplayName": "Demo Seal - Summit Credit"
       }
   ]
}
Let’s assume you are looking to seal the document using the PaperPreventers Seal certificate, so the identifier you need to use for the rest of this blog is: b9a15451-3ef4-4a5d-8d60-xxxxxxxxxxxx.
Step 2: Create the envelope with the eSeal
Now that you have identified the seal that will be applied, you need to create an envelope using the Envelopes:create endpoint: /restapi/v2.1/accounts/{accountId}/envelopes
To match your invoice use case, you will need to:
Pass the document encoded in Base64 format
Make sure to use the following recipient types:
seal with its corresponding
recipientSignatureProviderinformation andtabproperty for the visual representation placement based on an anchorcarboncopy with the contact details of the customer
Use an envelope custom field to give some context for the archiving system regarding the transaction with the InvoiceID and the CustomerID
Define the webhook listener for JSON notifications in charge of archiving the sealed document when the envelope is in the completed state.
Your resulting envelope definition JSON should look something like this:
{
 "emailSubject": "Your Monthly Invoice from PaperPreventers",
 "status": "sent",
 "documents": [
   {
     "documentBase64": "<place here your document base64 encoded>",
     "documentId": "1",
     "fileExtension": "pdf",
     "name": "invoice.pdf"
   }
 ],
 "recipients": {
   "seals": [
     {
       "recipientId": "1",
       "routingOrder": "1",
       "recipientSignatureProviders": [
         {
           "sealDocumentsWithTabsOnly": "false",
           "sealName": "b9a15451-3ef4-4a5d-8d60-xxxxxxxxxxxx"
         }
       ],
       "tabs": {
         "signHereTabs": [
           {
             "anchorString": "myESealAnchor",
             "recipientId": "1"
           }
         ]
       }
     }
   ],
   "carbonCopies": [
     {
       "recipientId": "99",
       "routingOrder": "99",
       "name": "John Doe",
       "email": "my.customer@mailinator.com"
     }
   ]
 },
 "customFields": {
   "textCustomFields": [
     {
       "name": "Invoice ID",
       "show": "true",
       "required": "false",
       "value": "123456"
     },
     {
       "name": "Customer ID",
       "show": "true",
       "required": "false",
       "value": "JD4182"
     }
   ]
 },
 "eventNotification": {
   "url": "https://webhook.site/a494ce82-6e6e-4130-8904-xxxxxxxxxxxx",
   "requireAcknowledgement": "true",
   "loggingEnabled": "true",
   "deliveryMode": "SIM",
   "events": [
     "envelope-completed"
   ],
   "eventData": {
     "version": "restv2.1",
     "format": "json",
     "includeData": [
       "custom_fields",  "documents"
     ]
   }
 }
}
</place>
You should obtain as a response something with the following data structure:
{
   "envelopeId": "a7938bf5-5667-4a2d-9976-xxxxxxxxxxxx",
   "uri": "/envelopes/a7938bf5-5667-4a2d-9976-xxxxxxxxxxxx",
   "statusDateTime": "2023-02-09T17:17:18.3370000Z",
   "status": "sent"
}
Now the envelope has been created and sent.
Within a moment, your customer should receive an email from Docusign showing where they can access the invoice, or even obtain the invoice directly as an attachment if the Attach documents to completion email setting has been set up at the account level.
Step 3: Check the data received by your listener
In the meantime, the event notification is sent to your listener with a payload similar to the following one:
{
 ...
 "event": "envelope-completed",
 "apiVersion": "v2.1",
 "uri": "/restapi/v2.1/accounts/37a5be9b-b83e-4498-aa68-xxxxxxxxxxxx/envelopes/a7938bf5-5667-4a2d-9976-xxxxxxxxxxxx",
 "retryCount": 0,
 "configurationId": 0,
 "generatedDateTime": "2023-02-10T01:18:05.2710000Z",
 "data": {
   "accountId": "37a5be9b-b83e-4498-aa68-xxxxxxxxxxxx",
   "userId": "e3a65b13-513a-4b63-b715-xxxxxxxxxxxx",
   "envelopeId": "a7938bf5-5667-4a2d-9976-xxxxxxxxxxxx",
   "envelopeSummary": {
     "status": "completed",
     ...
     "emailSubject": "Your Monthly Invoice from PaperPreventers",
     "envelopeId": "a7938bf5-5667-4a2d-9976-xxxxxxxxxxxx",
     ...
     "createdDateTime": "2023-02-09T17:17:17.273Z",
     "lastModifiedDateTime": "2023-02-09T17:17:17.273Z",
     "deliveredDateTime": "2023-02-09T17:17:45.24Z",
     "initialSentDateTime": "2023-02-09T17:17:18.337Z",
     "sentDateTime": "2023-02-09T17:17:45.24Z",
     "completedDateTime": "2023-02-09T17:17:45.24Z",
	...
     "customFields": {
       "textCustomFields": [
         {
           "fieldId": "10847266193",
           "name": "Invoice ID",
           "show": "true",
           "required": "false",
           "value": "123456"
         },
         {
           "fieldId": "10847266194",
           "name": "Customer ID",
           "show": "true",
           "required": "false",
           "value": "JD4182"
         }
       ],
       "listCustomFields": []
     },
     "envelopeDocuments": [
       {
         "documentId": "1",
         "documentIdGuid": "813b45a7-3c30-4936-8893-xxxxxxxxxxxx",
         "name": "invoice.pdf",
         "type": "content",
         "uri": "/envelopes/a7938bf5-5667-4a2d-9976-xxxxxxxxxxxx/documents/1",
         "order": "1",
         "pages": [
           {
             "pageId": "a0a2eaee-bcbe-4d98-9449-xxxxxxxxxxxx",
             "sequence": "1",
             "height": "842",
             "width": "595",
             "dpi": "72"
           }
         ],
         ...
         "PDFBytes": "<certified document base64 encoded>"
       }
     ],
     ...
   }
 }
}
</certified>
From here your webhook listener will be able to focus on:
The
envelope-completedtype of eventsExtract the context using the envelope custom field value positioned under
data.envelopeSummary.customFieldsExtract the sealed document, which is Base64-encoded, from
data.envelopeDocuments[0].PDFBytes
in order to archive the document into your archiving system.
Additional resources

Arnaud Lesueur has been with Docusign since 2015 in various pre sales roles within EMEA.Over the years, he's been working with hundreds of our customers to digitalize their agreement processes.With a strong background across the complete Docusign portfolio, Arnaud received his Gold Certified PreSales Agreement Cloud Expert in 2023.Arnaud can be reached at arnaud.lesueur@docusign.com
Related posts
 DevelopersPublished Mar 21, 2025
 DevelopersPublished Mar 13, 2025
Docusign eSignature Integration 101: Setting the foundation
 DevelopersPublished Mar 11, 2025
How to set up Salesforce authentication with JWT to access any Docusign API

ISV developers: Enhance your product by building a Docusign connector

Docusign eSignature Integration 101: Setting the foundation

How to set up Salesforce authentication with JWT to access any Docusign API
Discover what's new with Docusign IAM or start with eSignature for free


