From the Trenches: Testing Docusign Connect with ngrok
How do you test your webhook listener code during development, before it's deployed? Ivan Dinkov shows you how to use ngrok, a reverse-proxy service that lets you safely expose a tunnel to your localhost for testing your application's receipt of Connect notifications.

As you may already know, to use the Docusign Connect notification service, you must have a publicly available internet-based HTTPS URL.
In a previous blog post, Replaying webhook messages with Postman, I showed you how to test Connect using an external service like webhook.site. This is very convenient when running a quick single test without making security exceptions in your firewall.
The problem
What about if you want to run end-to-end automated tests, including envelope creation/management and notification cycles, and the firewall is not an issue?
The answer: user reverse proxy
There are many available reverse proxy solutions, from paid to open-source, with their pros and cons. However, I will use ngrok as an example for this blog post.
I won’t go into all the nitty-gritty of what ngrok is and how it differs from the rest. This can be found in ngrok’s documentation. For this exercise, you simply need ngrok's main functionality to generate a public API endpoint for my Connect configuration.
Install ngrok
To install and configure ngrok, you can follow ngrok's Quickstart guide
Connect listener
First, you need to create a Connect listener. The listener could be as simple as just a couple of lines of code accepting and logging the request in your preferred programming language. I’ll use a simplified version of this PHP code for my test.
Envelope creation
The Connect notification service can be configured at the account or envelope levels. The main difference is that account-level configurations are triggered by any envelope sent from the account, whereas envelope-level configurations trigger notifications only for a single envelope.
For this exercise, you are going to use an envelope-level trigger. This is done by adding the eventNotification object to the envelope.
The notification object below configures Connect to fire on the envelope-sent event only for this envelope and send it to your listener URL as specified in the eventNotification object’s url property:
{
    "status": "sent",
    "emailSubject": "Subject",
    "emailBlurb": "Test Connect",
    "documents": [
        {
            "documentId": "1",
            "fileExtension": "pdf",
            "name": "test",
            "documentBase64": "JVBERi0xLjQKJdPr6eEKMSAwIG9iago8PC9UaXRsZSAodGVzdCkKL1Byb2R1Y2VyIChTa2lhL1BERiBtMTMwIEdvb2dsZSBEb2NzIFJlbmRlcmVyKT4+CmVuZG9iagozIDAgb2JqCjw8L2NhIDEKL0JNIC9Ob3JtYWw+PgplbmRvYmoKNCAwIG9iago8PC9MZW5ndGggODQ+PiBzdHJlYW0KMSAwIDAgLTEgMCA3OTIgY20KcQouNzUgMCAwIC43NSAwIDAgY20KMSAxIDEgUkcgMSAxIDEgcmcKL0czIGdzCjAgMCA4MTYgMTA1NiByZQpmClEKCmVuZHN0cmVhbQplbmRvYmoKMiAwIG9iago8PC9UeXBlIC9QYWdlCi9SZXNvdXJjZXMgPDwvUHJvY1NldCBbL1BERiAvVGV4dCAvSW1hZ2VCIC9JbWFnZUMgL0ltYWdlSV0KL0V4dEdTdGF0ZSA8PC9HMyAzIDAgUj4+Pj4KL01lZGlhQm94IFswIDAgNjEyIDc5Ml0KL0NvbnRlbnRzIDQgMCBSCi9TdHJ1Y3RQYXJlbnRzIDAKL1BhcmVudCA1IDAgUj4+CmVuZG9iago1IDAgb2JqCjw8L1R5cGUgL1BhZ2VzCi9Db3VudCAxCi9LaWRzIFsyIDAgUl0+PgplbmRvYmoKNiAwIG9iago8PC9UeXBlIC9DYXRhbG9nCi9QYWdlcyA1IDAgUgovVmlld2VyUHJlZmVyZW5jZXMgPDwvVHlwZSAvVmlld2VyUHJlZmVyZW5jZXMKL0Rpc3BsYXlEb2NUaXRsZSB0cnVlPj4+PgplbmRvYmoKeHJlZgowIDcKMDAwMDAwMDAwMCA2NTUzNSBmIAowMDAwMDAwMDE1IDAwMDAwIG4gCjAwMDAwMDAyNjQgMDAwMDAgbiAKMDAwMDAwMDA5NSAwMDAwMCBuIAowMDAwMDAwMTMyIDAwMDAwIG4gCjAwMDAwMDA0NTIgMDAwMDAgbiAKMDAwMDAwMDUwNyAwMDAwMCBuIAp0cmFpbGVyCjw8L1NpemUgNwovUm9vdCA2IDAgUgovSW5mbyAxIDAgUj4+CnN0YXJ0eHJlZgo2MjQKJSVFT0YK"
        }
    ],
    "recipients": {
        "signers": [
            {
                "name": "Joe Dow",
                "email": "test@email.com",
                "recipientId": "1",
                "routingOrder": "1",
                "tabs": {
                    "signHereTabs": [
                        {
                            "xPosition": "100",
                            "yPosition": "200",
                            "width": "50",
                            "height": "14",
                            "name": "signHere",
                            "documentId": "1",
                            "pageNumber": "1"
                        }
                    ]
                }
            }
        ]
    },
    "eventNotification": {
        "url": "your ngrok URL",
        "requireAcknowledgment": "true",
        "loggingEnabled": "true",
        "deliveryMode": "SIM",
        "events": [
            "envelope-sent"
        ],
        "eventData": {
            "version": "restv2.1",
            "includeData": [
                ""
            ]
        }
    }
}
Putting everything together
Run your local listener app.
If your app runs on localhost:8080, to start ngrok, run this command from the command line: ngrok http http://localhost:8080 If you have configured ngrok correctly, you should see something similar to this:
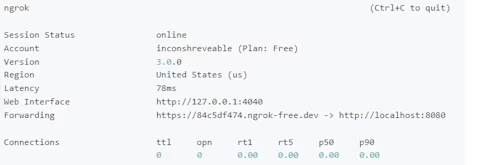
So far, so good. Your ngrok is running and is ready to forward requests to your local listener.
Copy your ngrok Forwarding URL from the console and update your
eventNotificationURL. In my case, it is https://84c5df747.ngrok-free.devSend the envelope.

The Connect notification could take about 20 seconds, after which you can examine the request details.
Another place you can examine the request details is the ngrok’s web interface. You can access it by opening http://127.0.0.1:4040 in your browser. The interface also allows you to re-send any requests delivered to your listener through ngrok.
Summary
Reverse proxy testing with ngrok allows you to streamline your Connect Webhook development and test many use cases locally.
Additional resources

Related posts


Docusign IAM is the agreement platform your business needs
