Calling the Docusign API from a Cloudflare App
Spotlight Developer Connor Peshek introduces you to developing apps for Cloudflare using Docusign APIs.

By Connor Peshek, Developer Relations, Cloudflare
All businesses use paper forms for a variety of reasons. This ranges from NDAs, to job offers, contracts, employment agreements, and everywhere in between. Much of that paperwork requires user input and signatures. Using the Docusign eSignature API and Cloudflare Apps, you can quickly transform your manual paper processes into online digital forms embedded into your website. In this blog post, I’m going to show you the details of how to do this. You can find more information about developing with Cloudflare Apps here.
Cloudflare is a performance and security network known for mitigating DDoS attacks and caching static assets. Cloudflare also has an apps platform that allows developers to create plugins for non-technical website owners to install. As long as someone has their website inside the Cloudflare network, they can install one of these apps.
Developers can integrate the Docusign API with Cloudflare Apps to automate paperwork and collect electronic signatures. Since Cloudflare Apps are reusable on multiple sites, you only have to write your Docusign API code once, then easily deploy it to other sites in a few clicks.
To show you an example, I’ll walk you through creating an app that will enable a visitor to your company’s office to electronically sign paperwork using Docusign PowerForms. We’ll do this by setting up OAuth for the integration and allowing the app installer (you or anyone else on the Cloudflare network) to select a PowerForm to embed into their website.
Sign up for Docusign’s eSignature API
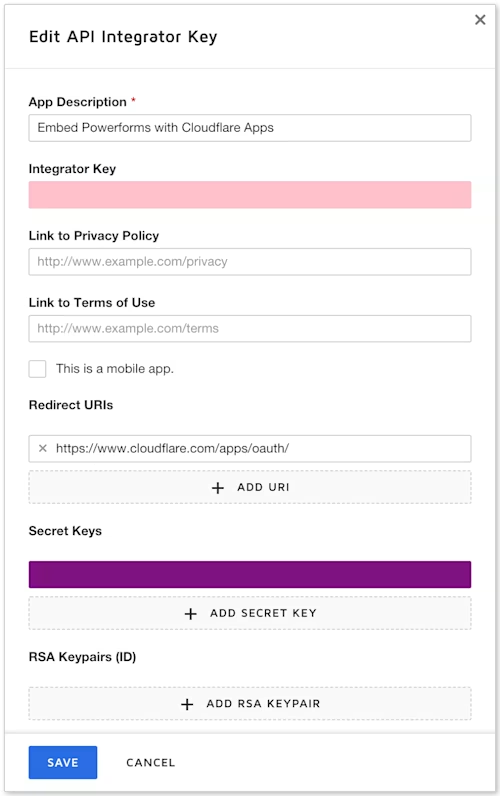
Before we can use Docusign’s eSignature API, we’ll need to register our integration with Docusign and provide a few details. This will allow us to use OAuth for the integration in order to get the app installer’s Docusign account information, allowing them to choose what document they want embedded on their site.
You can register for a developer account if you don’t have one already. You’ll need to create a Docusign PowerForm in your deeloper account. You can use this sample document to create the template. Then, head to the integrator keys page to create an integrator key. After creating the Integrator Key, click the + Add Secret Key button to generate a Secret Key. When we generate information through OAuth, Docusign will need to know where to send it, so set the redirect url to https://www.cloudflare.com/apps/oauth/. This tells Docusign to give the OAuth token to Cloudflare.
Cloudflare will send the Integrator Key and Secret Key to Docusign when it starts the OAuth flow so that Docusign knows what Integration OAuth is being initiated for. Remember those for when we set up our Cloudflare Apps service.
Create a Service in Cloudflare Apps
We’ll need to provide some info from the Docusign eSignature API to connect our app to their OAuth login. We’ll put in the Integrator Key and Secret Key provided by Docusign. Fill out all the other information to let people know what your service does.
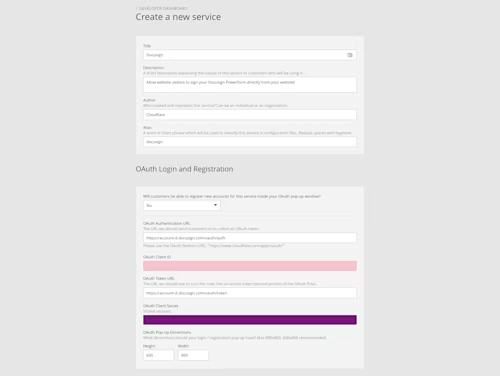
Field | Value |
OAuth Auth URL | |
OAuth Client ID | From the Docusign admin page for your integrator key |
OAuth Token URL | |
OAuth Client Secret | From the Docusign admin page for your integrator key |
Create the Cloudflare App
Before creating a Cloudflare App, let’s look at the App Creator and get an idea of what we’re working with. The App Creator is how we can test the code for our app live. Let’s start by downloading the example app zip file, extracting it, and uploading the folder in the App Creator.
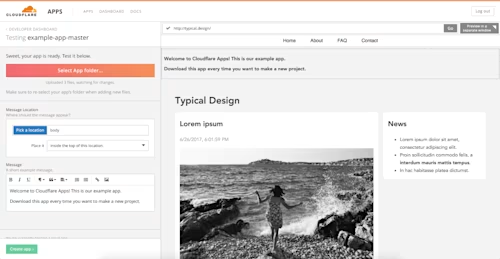
On the left, you’ll see a panel with a box in it. The panel hosts customizable options that a user can set when they install an app. We declare these panels in the properties key of the options object inside the install.json file in the project.
Let’s expose the option for people to log into their Docusign account via OAuth. We’ll do this by creating an account option that links to the Cloudflare Service we created earlier. Then, we’ll create an object inside of our hooks array that will send the OAuth initiation request to a specified endpoint so we can do things with the OAuth token. We’ll set up that endpoint in the next step.
{
    "hooks": [{
        "endpoint": "https://yourcloudflaredomain.com/docusign",
        "events": ["option-change:account"],
        "block": true,
        "authenticate": ["account"]
    }],
    "options": {
        "properties": {
            "account": {
                "title": "Docusign Account",
                "type": "object",
                "format": "account",
                "services": ["{{your service ID}}"],
                "order": 0
            }
        }
    }
}Creating a Cloudflare Worker to handle OAuth
Cloudflare Workers is Cloudflare's new way to handle code on the edge. Workers allow you to write javascript that can listen for requests and edit them, whether it’s a get request on your homepage or a post request on a hidden path. Let’s set up a Cloudflare Worker to listen for our Cloudflare Hook from our Service so we can add the installer’s PowerForm URL to our install options.
*In order to use Workers, you’ll need a domain on Cloudflare. Follow these steps if you don’t already have a domain on Cloudflare. Workers is usually $5 a month, but we’ve got you covered with a $5 dollar credit for Cloudflare Workers for trying out this Docusign sample.*
In order to find the PowerForm URL, we’ll need to use the OAuth token to find what accounts the installer has linked to their email, and then find all the powersheets affiliated with those accounts. Let’s figure out where the token will be on the request.
{
    event: "[The event name]",
    install: {
        /* The install record being created or manipulated */
        schema: {
            properties: {
                /* The form fields the customer sees while installing */ }
        },
        options: {
            /* The form field values the customer has provided */ },
        productId: "gold-plan" /* The product this customer has purchased if this is a paid app */
    },
    authentications: {
        /* The access tokens for account fields which were authenticated */
        account: {
            /* A key matching the OAuth login field declared in your install.json file */
            token: {
                /* Token with metadata. */
                token: "94094f928a82c6d5171c75f52fc1818f",
                extra: {
                    /* All extra fields which were returned with the access token */ }
            }
        }
    },
}The token we need will be at authentications.account.token.token. Now, let’s check Docusign's eSignature API to see what we need to do with the token in order to get a selected PowerForm URL.
As shown in the Docusign User Info Endpoint documentation, we can post at the /oauth/userinfo endpoint to get account information with an OAuth token. It will return a list of account ID’s associated with the token. Then, we can perform a Get request at /v2/accounts/{accountId}/PowerForms to get a list of all PowerForms associated with an account ID.
Now that we have a plan, go to the Service Workers page and launch the editor.
On the left is an editor for writing your Javascript code. On the right is an example of that code running. Let’s write some code that will listen for the Cloudflare hook and send back a PowerForm from the installer’s account.
async function handleDocuSignInstall(request) {
    const text = await request.text();
    const json = JSON.parse(text);
    const { token } = json.authentications.account.token;
    const headers = { headers: { Authorization: `Bearer ${token}` } };
    let accountCall;
    let accountAnswer;
    try {
        // When in production, update account-d.docusign.com to account.docusign.com
        accountCall = await fetch(
            "https://account-d.docusign.com/oauth/userinfo",
            headers
        );
        accountAnswer = await accountCall.json();
    } catch (err) {
        return new Response("Error fetching from Docusign", { status: 500 });
    }
    const accountId = accountAnswer.accounts[0].account_id;
    const baseUri = accountAnswer.accounts[0].base_uri;
}Click on the Routes tab at the top of the left pane. Here, you can select what endpoint on your domain you will listen for Cloudflare’s hook for. I recommend yourdomain.com/docusign. After you set a URL, make sure to go back to your install.json file and update the endpoint key inside of the object in the hooks array. Now when we run our app, we can access a PowerForm URL inside our app through the PowerFormURL key on the options object.
Create the Front-end
Go into the app.js file and look for the updateElement function. That’s where we’ll be doing all the work for this app. You’ll see that there’s a main element, called element, already made for us inside of the updateElement function. Let’s create a button that directs people to the PowerForm URL in their browser so people can sign the chosen document.
function updateElement() {
    element = INSTALL.createElement(options.location, element);
    // Set the app attribute to your app's dash-delimited alias.
    element.setAttribute("app", "docusign");
    if (options.PowerFormURL) {
        const aTag = document.createElement("a");
        const button = document.createElement("button");
        aTag.href = options.PowerFormUrl;
        aTag.target = "_blank";
        button.innerText = "Click to sign document " + options.PowerFormName;
    }
}
We just made a fully functioning Cloudflare App using the Docusign eSignature API.
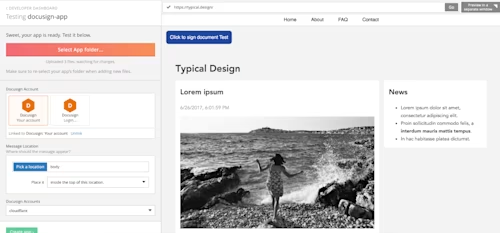
Now that the app is completed, let’s give it a spin. Upload the folder with the code you’ve been working on into the live previewer, click Create App in the lower left, and then submit it for approval. You’ll now see the app in your developer dashboard. Click the app icon and begin the install process. OAuth into your Docusign account and you’ll see the live previewer pause as the app gets the PowerForm URL from Docusign. Then, your button will appear inside your website in the live previewer. Choose the location you want the button to appear in and click Install app. Now your app is installed on your website.
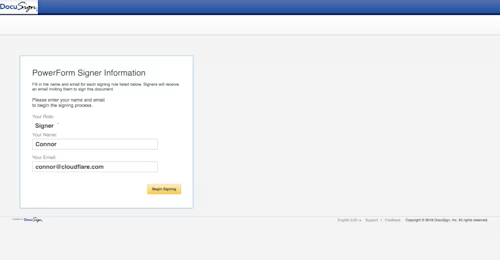
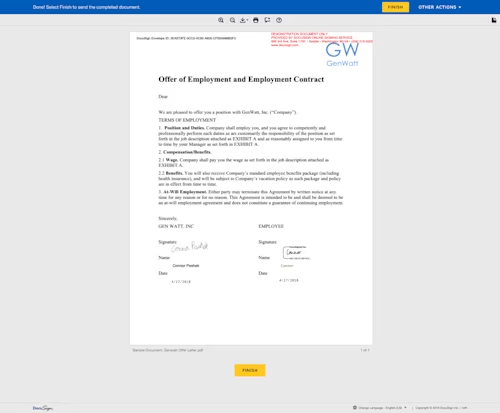
Embedding functionality like handling paperwork digitally is a win-win for everyone. Why not sign up for a Docusign developer account and give Cloudflare Apps a try?
Developer Resources
Related posts
Discover what's new with Docusign IAM or start with eSignature for free


