Building a bulletproof CORS application
Get best practices for creating CORS-enabled browser apps that meet security requirements and handle errors gracefully.
- Introduction
- Starting up
- Authorization and consent
- Completing the login process
- Multiple accounts and UserInfo
- Making CORS calls
- Do not ask your customers to create a client ID!
- CORS proxies and the 403 error
- Docusign eSignature plans
- Application access management
- Automatic testing to detect regression bugs
- Summary
- Additional resources
Table of contents
- Introduction
- Starting up
- Authorization and consent
- Completing the login process
- Multiple accounts and UserInfo
- Making CORS calls
- Do not ask your customers to create a client ID!
- CORS proxies and the 403 error
- Docusign eSignature plans
- Application access management
- Automatic testing to detect regression bugs
- Summary
- Additional resources


Introduction
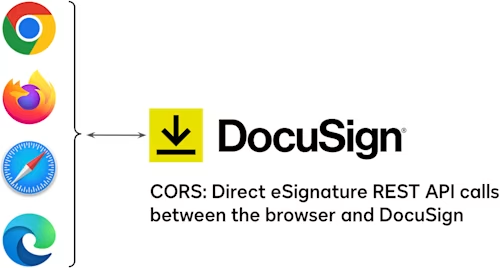
The CORS feature enables an application running within a browser to make API calls to the Docusign eSignature REST API. As an ISV (or smart developer in general), you want your applications to be “bulletproof”: able to gracefully handle many different types of error conditions.
Most of the ideas in this post have been implemented in the live CodePen example Template Embedded Signing. You can open the example in another browser tab and try it as you read this post.
Starting up
element to alert your users that your application requires JavaScript support. Example: see line 31 of the HTML source tab.
Authorization and consent
Use the OAuth Implicit Grant flow to obtain the user’s authorization. The example opens a new browser tab to the authorization service (account-d.docusign.com). Recommendation: If opening a new tab is blocked by the browser, the application should ask the user to enable the login popup. See the ImplicitGrant library object, line 78.
User consent
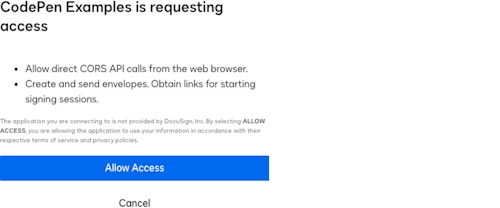
Each user must grant consent to your application. This is done via a specific consent screen that’s shown by the Docusign authorization service the first time a user completes an OAuth flow for your application. Recommendation: Name your application–your client ID (integration key)–with your company name and the application’s name.
An example consent screen:

A user can withdraw their consent via the Docusign web app’s Manage Profile link and the Connected Apps section of the My Profile application.
Completing the login process
OAuth provides an access token for the user, but doesn’t provide any information about the user. To learn the user’s name, email address, account(s), and, most importantly, the base path for each of their account’s Docusign platform (e.g. eu, na2, na3, etc), call the /oauth/userinfo endpoint. Remember that the account-d.docusign.com or account.docusign.com server hosts the userInfo API method. The CodePen example calls a UserInfo library object that calls the API.
Displaying the user’s name and account
After you log in to the Docusign web app, your name, email, the current account name, and its ID are shown in the upper right-hand corner of the screen. Recommendation: implement the same pattern in your application, too. See line 372 of the example.
eSignature account ID vs external ID
The account ID that is shown is the external ID, not the GUID account ID that’s used for API calls. An account’s external ID is available via the externalAccountId response attribute of the Accounts:get API method.
Confirming CORS support
In the example, the Accounts:get API method is called for each account the user has access to when the user logs in. See line 281 of the UserInfo object. This serves two purposes:
Each account’s external ID is looked up. The external ID(s) are stored, and the current account’s external ID is shown in the upper right-hand corner of the example.
If the account lookup fails with a
TypeErrorerror (and the application is already in production), then the user’s account is not allowing CORS calls. If the app is still in development, then the error could be caused by a configuration or developer mistake. Since the CodePen example is for developers, it lists all of the potential causes of a TypeError (403) error response. See line 324 of the example.
Account-level consent
As noted above, each of your application users’ accounts must also enable CORS for your application’s client ID. The default setting is to enable CORS, but your users’ account administrators can change the default to not enable CORS for apps. Account administrators can also withdraw account-level consent that was previously granted.
Multiple accounts and UserInfo
It is common for larger companies and organizations to have multiple Docusign eSignature accounts for different departments (such as HR and Finance) or for other reasons.
Recommendation: Your application should, like the Docusign web app, enable its users to switch between their multiple Docusign accounts. Your app should also enable your users to choose a default account that is not the same as their Docusign web app default account.
The example implements this recommendation. Note that the Switch Account link is only shown if the user is a member of more than one Docusign account. You can create more than one developer account for your email/password combination to test your application’s support for users with multiple accounts.
Multiple accounts UX
Use the Docusign web app’s UX (user experience) for changing accounts as a guide:
Use the Accounts:get API call to fetch the
externalAccountIdvalue for the user’s accounts. TheexternalAccountId(the short-form ID) should always be used in your application’s user interface.Display the user’s current account in your application. Include the account name and external account ID.
If the user has access to more than one account (the UserInfo response provides this information) then provide a Switch Account link near the current account’s name and ID.
The Switch Account link brings up a modal dialog that lists all of the user’s available accounts, including their external account IDs and which of the accounts is the default. Don’t include the current account. The modal is used to switch accounts. Changing the application’s default account can be done implicitly or explicitly.
The application’s default account for the user can be stored for the user in your application’s back end or on their browser.
The example stores the current account ID by using the browser’s localStorage feature.
Making CORS calls
There are multiple reasons why your application may be unable to make a CORS call. In all of these cases, Docusign will return a 403 (Forbidden) HTTP status. Let’s look at each CORS-related issue.
Issues during development
Your client ID (integration key) must enable CORS access by your application’s web origin or origins. Origin specifications include either the default or specific ports: for instance, the origin https://example.com is different from https://example.com:2443. Both must be enabled if needed by your application.
Your client ID must enable CORS access for the HTTP methods (GET, POST, DELETE, etc) used by your application. Security tip: Only enable the HTTP methods needed by your application.
Your application must use a Bearer access token (OAuth).
The access token must include the
corsandsignaturescopes. Other scopes may also be needed depending on the eSignature REST API methods being called.Your application must be using the v2.1 (or later) version of the eSignature REST API.
Your application can only call eSignature REST API endpoints that include
/accounts/_{account_id}_in the URL pathname.
Development issues, once solved, do not need to be revisited per user or when your application is in production. Remember that production client IDs are entirely separate from development client IDs (even though the two use the same alphanumeric ID).
Once your application’s client ID has been approved for the Docusign production platform via the Go-Live process, its production settings must be updated to support CORS.
Recommendations
During development, use the previous list to help solve any CORS-related issues.
During production, the only CORS-specific issue your application encounters should be account-level CORS consent for a user’s account: if your CORS call fails with a 403 status (and the failure is not network or DNS-related), provide a user message such as:
Problem: CORS access failed for account “Newco”.
Solution: Ask your Docusign system administrator to enable CORS access for App Name “CORS Example Application” in account “Newco”.
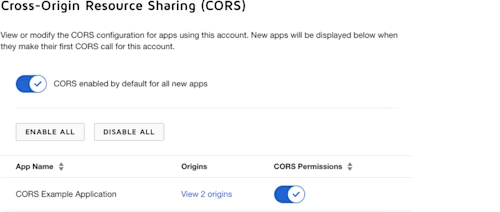
How to do it: Administrators can use the eSign Settings app and its CORS page to grant account-level CORS access.
Here is an example CORS page in the Docusign eSignature Admin Settings used by a user’s account administrator to enable CORS access to an application:

Notes
After enabling account-level CORS access, you may need to wait five minutes until the permission change is fully propagated throughout the Docusign platform.
Your application’s installation instructions cannot ask the account administrator to proactively enable account-level CORS access for your application, since your application won’t be listed on the CORS page until after it attempts a CORS call. Instead, ask your user’s administrator to try your application. If it doesn’t work, then check the CORS page to grant account-level access.
Account-level CORS access is granted per account. Users may have access to multiple accounts as discussed above. So granting account-level CORS access to one of a user’s accounts won’t help them if they update your application to use a different account.
Pro tip: logging
Your application can programmatically log activity, status, and issues to your own back-end service or to a third-party logging service. Your application can also log to the browser’s console, but that’s not recommended as a quality UX.
Pro tip: ad blockers
Remember to test your application with an ad blocker installed on the browser.
Do not ask your customers to create a client ID!
Do not ask your customers to create a client ID (integration key) for your application. Your customers must use your client ID. Your client ID can be used simultaneously by any number of customers, on any of the worldwide Docusign commercial production platforms. Discuss access to US Federal production platforms with Docusign Support.
CORS proxies and the 403 error
Before Docusign supported CORS, some developers would use HTTP proxies to provide CORS support to their browser-based applications. If a proxy’s API calls fail with 403 errors, check that the proxy is not forwarding the Origin header. The origin header indicates a CORS request and must not be set when a proxy makes a non-CORS API request.
Docusign eSignature plans
Not all Docusign accounts include the same features. Test your application with different Docusign eSignature plans to ensure that your application works with all types of accounts or automatically downgrades depending on the available Docusign account features.
Application access management
By default, Docusign applications can be used by anyone. For example, say you’ve created a great application at example.com/docusignGreatApplication. Now any Docusign customer can use your application with their Docusign account(s). But you may not want that! You may want only some people to use your application. You can limit access to named Docusign users, to specific eSignature accounts, or use other criteria. In all cases, to limit access, your application must implement its own access controls.
Automatic testing to detect regression bugs
All applications should use automatic testing to detect Docusign API regression bugs. A regression bug is a client application problem introduced by a Docusign change. Docusign internally uses thousands of automated tests to ensure that it does not introduce regression bugs that can harm partner or customer applications.
But to provide further assurance, you should implement daily automated testing against the Docusign development (demo) platform. If your automated tests detect a regression issue, then contact the Docusign Customer Service Developer Support team immediately. You do not need a support contract to contact the Developer Support team.
Gracefully handle Docusign API updates
Your application must gracefully handle API updates. In particular, Docusign often extends API responses to include added data (both new scalar and object data). Your application must ignore any response data it does not expect.
Summary
Building a bulletproof CORS application is not hard to do. Spend the extra development time to provide a high-quality user experience for your application’s users and to minimize your support costs.
Additional resources

Larry Kluger has over 40 years of tech industry experience as a software developer, developer advocate, entrepreneur, and product manager. An award-winning speaker prominent StackOverflow contributor, he enjoys giving talks and helping the ISV and developer communities.
Twitter: @larrykluger
LinkedIn: https://www.linkedin.com/in/larrykluger/
Related posts
Docusign IAM is the agreement platform your business needs


