Staff picks: Highlights of Docusign’s first official integration with Xero, built in partnership with Amaka
Docusign’s new integration with Xero, with Amaka, comes with some powerful features to help make life easier for people using the popular accounting platform.

At Docusign, we’re always on the lookout for ways to help our customers do things better, faster, and more cost effectively. So you can imagine how excited we are about our first-ever accounting integration, built in partnership with Amaka, for Xero.
The new integration, which is available globally through the Amaka portal, allows users to automate document signing by syncing Xero documents with Docusign, before pushing the final document back to Xero. It syncs all the common Xero documents, including invoices, quotes, bills, purchase orders, and expense claims.
To ensure the solution meets the needs of businesses of all shapes and sizes, it’s easily customisable, with a range of signer options, envelope-specific settings, and notifications.
As Dan Bognar, GVP and General Manager at Docusign Asia Pacific & Japan, said, “We are excited to partner with Amaka to offer this new integration with Xero to our joint customers. The ability to electronically sign important accounting and finance documents directly from within the Xero app will deliver an elevated customer experience, saving valuable time by streamlining the process and eliminating the need to print, sign, post or email documents.”
To learn more about the key features of this game-changing integration, we recently sat down with Mohamed (Mo) Ali, Solution Architect at Docusign and Gian Ottavio, Global Partnerships Lead at Amaka. Here are their top picks.
Mo gives the ‘AutoPlace’ function a 10 out of 10
With Docusign, users can very easily place fields in Xero templates for recipients to sign or act on, with only minor changes to the Xero word templates.
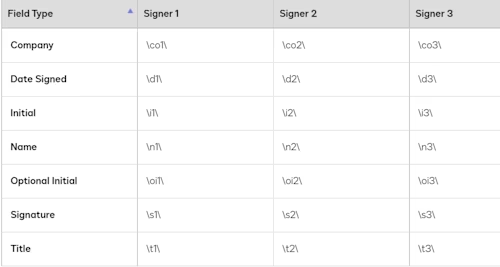
To add the AutoPlace text to a Xero invoice template, for example, simply go to Xero Settings > Invoice Settings, and download the word document. Then, enter any of the following text into your document and Docusign will automatically place the correct field:

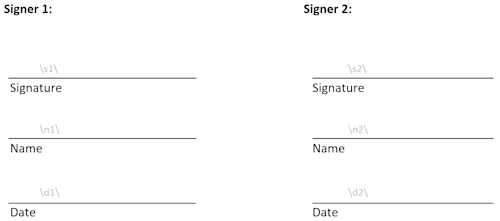
For example, the image below shows a Word document that needed two signers: “\s1\” for the first signer, “\n1\” for the full name of the signer, “\d1\” for the date of signing, and “\x2\” for all the details of the second signer.

Once done, simply upload the document back to Xero. Just remember, in your final version, make the AutoPlace text white in colour (so it’s hidden from view).
Gian rates the simplicity of setting up Xero contacts
To ensure documents are sent to the right person within Xero, you need to set up relevant contacts and make sure your Xero document contact is marked with the correct contact/s.
Here’s how it’s done. In Xero, click the ‘+’ button and select Contact. Then, follow the prompts to create a contact. Be sure to populate the ‘First Name’ and ‘Last Name’ fields, as these will be used for the Docusign envelope. For bulk import of contacts, you can use Xero’s CSV template to import contacts.
To avoid any doubt, the integration allows you to select from the other signing options as part of the configuration settings, including:
Docusign Contact
Docusign Signing Group
Xero User
Custom (i.e. to be created/nominated by the user)
Updates to Xero file status another big win for Gian
The Docusign + Xero integration automatically fetches selected Xero documents in 15-minute intervals when they reach a certain trigger status. For example, when an invoice is marked ‘Awaiting Approval’, it gets pulled and pushed into Docusign by the integration. An envelope is created and sent to the relevant contact/s based on the configuration settings selected. The integration does not pull any documents in ‘Draft’ status.
After the document is executed in Docusign, the status in Xero is updated based on whether it was signed, declined, voided or deleted. Below are the specific statuses for each document:
Xero Document | Trigger Status | Change Status (completed signature) | Change Status (declined/void/deleted) |
|---|---|---|---|
Invoice | Awaiting approval | Awaiting payment | Draft |
Quote | Accepted | None | None |
Bill | Awaiting approval | Awaiting payment | Draft |
Purchase order | Awaiting approval | Approved | None |
Expense claim | Approved | None | None |
The Certificate of Completion and Signed Document from Docusign will also be attached to the Xero document as a PDF as part of the integration.
Got questions or want to get started?
To learn more about the Docusign + Xero integration, or to get started, visit the Amaka website.
Docusign IAM is the agreement platform your business needs


