eSignature API logging made easy
A new web tool for creating and viewing Docusign eSignature REST API request logs is now available.

“Professionals are known by their tools.” And for debugging API integrations, an API logger is often a critical tool, showing you exactly the request that your application sent and the response it received. A new web tool for creating and viewing Docusign Signature REST API request logs is now available.
The new API Logger tool includes:
Quick display of log entries including their response status
Easy access to individual log entries
JSON requests and responses are automatically pretty-printed
JSON objects can be “folded” to enable easier display of relevant content
Requests, responses, headers, and content bodies are separated for quick access.
Installing and configuring the tool
The API Logger tool runs on Heroku using their no-charge usage tier. You can also run the API Logger tool locally on your own computer. To start the API Logger tool on Heroku, just click the button:

The Heroku website will open.
If you don’t already have a Heroku account, sign up for a free account. No credit card is needed.
Click the Deploy button on the Heroku page. No need to name the app, Heroku will generate a name for you.
Scroll down on the page to see the startup log and the button that will be shown below the log. Note that this startup phase will take several minutes, especially at the lxml step.
Click the View button when it is enabled:
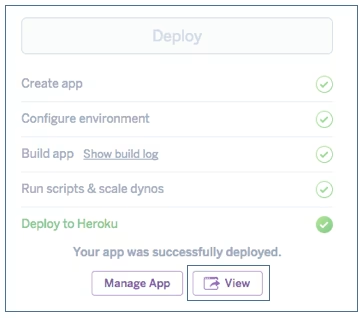
Waiting for the View button to become enabled after launching.
Authentication
The tool can use either OAuth or legacy Docusign authentication. In this example, we’ll use OAuth.
After you click the View button (above), the app will start up:
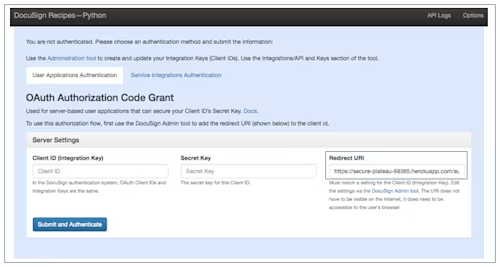
API Logger app after startup.
Note the Redirect URI. You’ll use it later in this process.
Log in to your demo.docusign.net account as an administrator.
Use the menu by your picture and choose Go to Admin.
In the admin tool, click API and Keys on the left navigation section, within the INTEGRATIONS category.
Click Add Integrator Key.
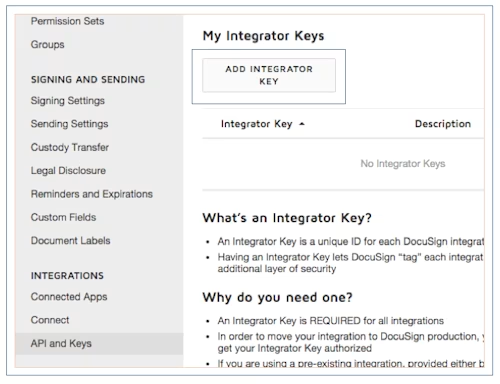
Adding an integrator key.
The Add API Integration Key form will open, see below.
App description: API Logger or similar.
Do not check “This is a Mobile App”
Click Add
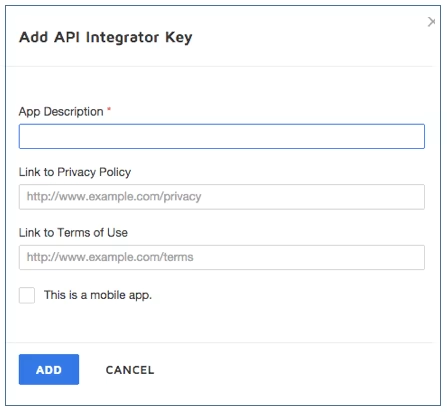
Configuring API integrator ley properties, Step 1 of 2.
The modal popup for the second step in adding an integrator key will be shown:
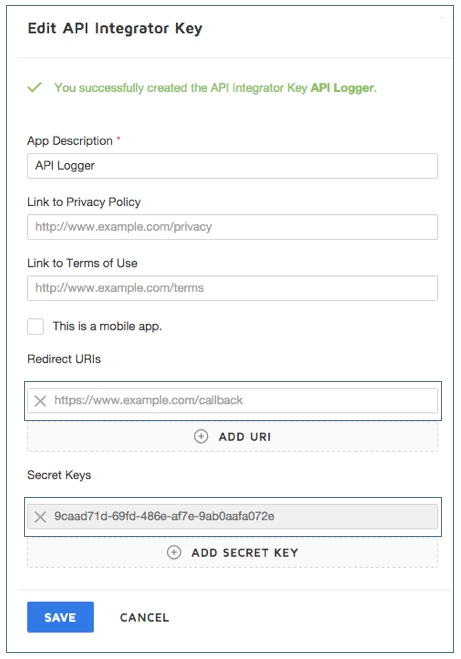
Configuring API integrator key properties, Step 2 of 2.
Click the Add URI button to see an input field. Enter the Redirect URL from the application running on Heroku.
Click the Add Secret Key button. A secret key for this integration key will be shown. Copy the secret key to your Heroku app, to the Secret Key field. You should also copy the key to a secure file. The Docusign platform will not show you your secret key a second time.
Click Save
You’ll see a list of your integration key or keys. Copy your new integration key to the Client ID (Integration Key) field on your Heroku app.
Click Submit and Authenticate on the Heroku app.
You’ll be asked by Docusign to confirm access to your account. Depending on your login status, you may also be asked to sign into Docusign again.
A benefit of the OAuth process is that you will be signing in to Docusign. You will not provide your Docusign email/password to the Heroku app.
You are now authenticated with Docusign on the Heroku app.
Using the API Call Logger
Start the API Call Logger by clicking API Logs in the app’s top navigation bar.

Location of the API Logs link.
The API Logger’s window will open in a new tab on your browser:
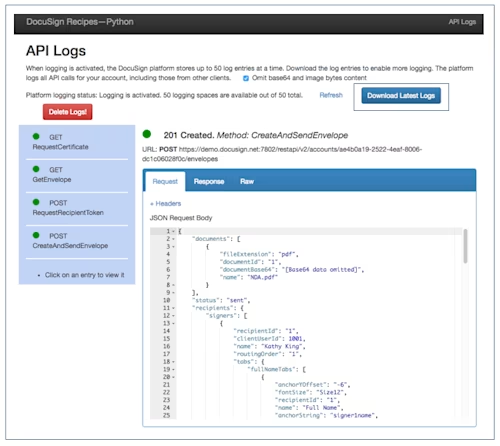
API Logger app window.
Once logging is enabled, the Docusign Signature platform will log the next 50 API calls to your account. Click the Download Latest Logs button to download the current log set and to enable another 50 calls to be logged. Click the refresh link to update the status report on the platform’s log entries for your account.
When you download the latest logs, the previous log entries that were shown to you are not deleted. You can download the current log entries before the 50 available spaces are used up.
Click the Delete Logs button to delete all previously downloaded log entries.
Viewing a log entry
The log entry index section on the left (blue background) is used to select an entry to display. Click on an entry to display it in the main section in the center of the page.
Each log entry includes tabs to see the Request, Response, and Raw log information.
Click the +Headers link to view additional information about the request and response.
For JSON request and response bodies, small arrow glyphs next to the line numbers enable you to “fold” an object or array within the JSON body.
All API calls for your account are logged
The Docusign platform logs all of the API calls made to your account, including requests from the Docusign web tools and other clients.
Plans
The new API Logger is still under development, so please let us know your ideas and suggestions for it. Email us via developers@docusign.com. Don’t forget to signup for our developer newsletter.

Larry Kluger has over 40 years of tech industry experience as a software developer, developer advocate, entrepreneur, and product manager. An award-winning speaker prominent StackOverflow contributor, he enjoys giving talks and helping the ISV and developer communities.
Twitter: @larrykluger
LinkedIn: https://www.linkedin.com/in/larrykluger/
Discover what's new with Docusign IAM or start with eSignature for free
