Common API Tasks🐈: Using eNotary programmatically
Docusign eNotary and how you can use this functionality from the eSignature REST API


Welcome to this issue of the Common API Tasks blog series. In this series I explore various simple activities that you can complete using one of the Docusign APIs. I then proceed to provide code snippets using popular coding languages to help you get an idea of what you need to do if you want to add this functionality to your application. Examples of past posts include voiding an envelope and creating a signing group. In this post I’m going to talk about Docusign eNotary and how you can use this functionality from the eSignature REST API.
What is eNotary?
Docusign eNotary makes the notarization process fully digital for all parties involved: senders, signers, and notaries. It enables a notary public to act as an in-person witness to electronic signing of documents. You may want to check the Docusign eNotary support documentation to see whether your jurisdiction allows for eNotary.
To finish the notarization process without the signer and notary having to be physically together, you can use what we call remote notary, where you combine Docusign with a video conferencing technology such as Zoom or Skype. The following video demonstrates the entire process:
At this point I’m going to assume that you are already familiar with Docusign eSignature and how documents are sent inside envelopes to one or more recipients for signature.
Using eNotary from the web application
The first thing you need to do is create a developer account. Yes, you have to do that, even if you already have one. If you created one before 4/15/2020, chances are your account doesn’t have the eNotary feature enabled.
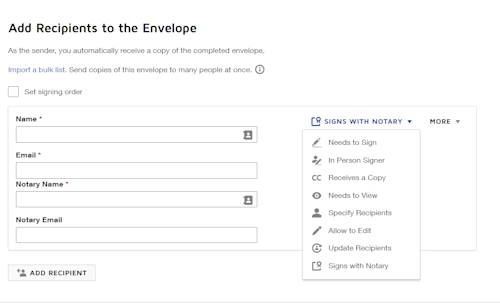
Next, create an envelope that you want others to send, and add to your recipients a new one of type Signs with Notary. Selecting this recipient type enables you to enter not just the name and email of the person who signs the document, but also the name and email of the notary. The notary must also register as a notary with Docusign. More on that later.

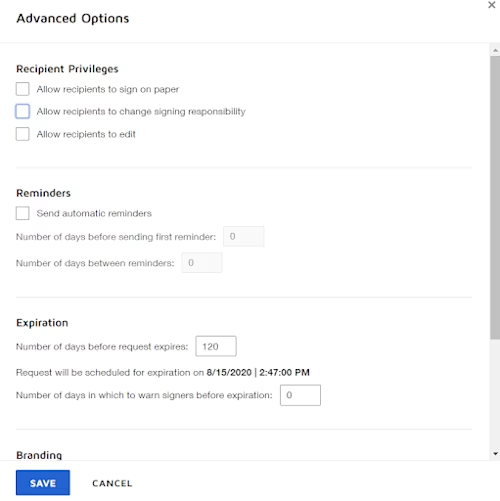
Next, open the Advanced Options pop-up and uncheck the options Allow recipient to sign on paper and Allow recipients to change signing responsibility. These two options are typically selected by default, but are not allowed when using eNotary.

You are now ready to add the document to be notarized. Once you add it, you can also add a special tab type called NotarizePage that the registered notary will use to complete the notarization of the document (this tab type cannot be added to any other type of recipient).
Now, the notary must also register as a notary with Docusign. That process can be done independently of any envelope that is sent for notarization, and need only be done once so that the notary is ready to notarize documents through Docusign electronically.
Once all of this is done, your document is ready to be notarized.
Our API has got you covered!
So far so good, but how can you do it programmatically? Well, that’s what I’m here for. I’m going to give you two code snippets this time. The first one is to be used once by the notary to register themselves and update Docusign with the specific jurisdiction in which they are allowed to notarize documents. The second shows you how to use the eSignature API to create an envelope that will be used to notarize documents electronically.
Adding a jurisdiction for the notary
This section shows you how to register a Docusign user as an electronic notary programmatically by adding a jurisdiction. Note that a Docusign user can only be registered as a notary for a single jurisdiction.
The JurisdictionId for the state is the index of this state when ordering them alphabetically (California is 5 for example). Note as stated above, however, that not all states are supported.
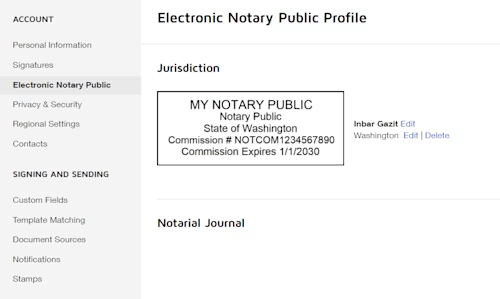
Running the code below creates a jurisdiction in the state of Washington. In your account, it should look like this:

C#
// First, you need to obtain an accessToken using your chosen auth flow
var config = new ApiClient(basePath);
apiClient.Configuration.DefaultHeader.Add("Authorization", "Bearer " + accessToken);
// Next, create the notary jurisdiction
var notaryApi = new NotaryApi(apiClient);
var notaryJurisdiction = new NotaryJurisdiction();
notaryJurisdiction.CommissionExpiration = "01/01/2030";
notaryJurisdiction.CommissionId = "NOTCOM1234567890";
notaryJurisdiction.Jurisdiction = new Jurisdiction { Name = "My Jurisdiction", County = "Me County", JurisdictionId = "47"};
notaryJurisdiction.RegisteredName = "My notary public";
notaryApi.CreateNotaryJurisdictions(notaryJurisdiction);
Java
// First, you need to obtain an accessToken using your chosen auth flow
Configuration config = new Configuration(new ApiClient(basePath));
config.addDefaultHeader("Authorization", "Bearer " + accessToken);
// Next, create the notary jurisdiction
NotaryApi notaryApi = new NotaryApi(config);
NotaryJurisdiction notaryJurisdiction = new NotaryJurisdiction();
notaryJurisdiction.setCommissionExpiration("01/01/2030");
notaryJurisdiction.setCommissionId("NOTCOM1234567890");
Jurisdiction myJurisdiction = new Jurisdiction();
myJurisdiction.setName("My Jurisdiction");
myJurisdiction.setCounty("Me County");
myJurisdiction.setJurisdictionId("47");
notaryJurisdiction.setRegisteredName("My notary public");
notaryApi.createNotaryJurisdictions(myJurisdiction);
Node.js
// First, you need to obtain an accessToken using your chosen auth flow
let dsApiClient = new docusign.ApiClient();
dsApiClient.setBasePath(basePath);
dsApiClient.addDefaultHeader('Authorization', 'Bearer ' + accessToken);
// Next, create the notary jurisdiction
let notaryApi = new docusign.notaryApi(dsApiClient);
let notaryJurisdiction = new docusign.NotaryJurisdiction();
notaryJurisdiction.commissionExpiration = '01/01/2030';
notaryJurisdiction.commissionId = 'NOTCOM1234567890';
let myJurisdiction = new docusign.Jurisdiction();
myJurisdiction.name = 'My Jurisdiction';
myJurisdiction.county = 'Me County';
myJurisdiction.jurisdictionId = '47';
notaryJurisdiction.registeredName = 'My notary public';
notaryApi.createNotaryJurisdictions(myJurisdiction);
PHP
# First, you need to obtain an accessToken using your chosen auth flow
$api_client = new \Docusign\eSign\client\ApiClient($base_path);
$config = new \Docusign\eSign\Configuration($api_client);
$config->addDefaultHeader('Authorization', 'Bearer ' + $access_token);
# Next, create the notary jurisdiction
$notary_api = new \Docusign\eSign\Api\NotaryApi($config);
$notary_jurisdiction = new \Docusign\esign\model\NotaryJurisdiction();
$notary_jurisdiction->setCommissionExpiration('01/01/2030');
$notary_jurisdiction->setCommissionId('NOTCOM1234567890');
$my_jurisdiction = new \Docusign\eSign\model\Jurisdiction();
$my_jurisdiction->setName('My Jurisdiction');
$my_jurisdiction->setCounty('Me County');
$my_jurisdiction->setJurisdictionId('47');
$notary_api->createNotaryJurisdictions($my_jurisdiction);
Python
# First, you need to obtain an accessToken using your chosen auth flow
api_client = ApiClient()
api_client.host = base_path
api_client.set_default_header('Authorization', 'Bearer ' + access_token)
# Next, create the notary jurisdiction
notary_api = NotaryApi(api_client)
notary_jurisdiction = NotaryJurisdiction()
notary_jurisdiction.commissionExpiration = '01/01/2030'
notary_jurisdiction.commissionId = 'NOTCOM1234567890'
my_jurisdiction = Jurisdiction()
my_jurisdiction.name = 'My Jurisdiction'
my_jurisdiction.county = 'Me County'
my_jurisdiction.jurisdictionId = '47'
notary_api.create_notary_jurisdictions(my_jurisdiction)
Ruby
# First, you need to obtain an accessToken using your chosen auth flow
config = DocuSign_eSign::Configuration.new
config.host = base_path
api_client = DocuSign_eSign::ApiClient.new config
api_client.DefaultHeader['Authorization'] = 'Bearer ' + access_token
# Next, create the notary jurisdiction
notary_api = DocuSign_eSign::NotaryApi.new api_client
notary_jurisdiction = DocuSign_eSign::NotaryJurisdiction.new
notary_jurisdiction.commissionExpiration = '01/01/2030'
notary_jurisdiction.commissionId = 'NOTCOM1234567890'
my_jurisdiction = DocuSign_eSign::Jurisdiction.new
my_jurisdiction.name = 'My Jurisdiction'
my_jurisdiction.county = 'Me County'
my_jurisdiction.jurisdictionId = '47'
notary_api.create_notary_jurisdictions(my_jurisdiction)
Sending a document to be notarized
The following code snippets show how to create tabs and recipients for an envelope that can be used for eNotary. We are adding two recipients in a nested fashion using the In-Person Recipient concept. You can have seperate tabs for these two recipients.
C#
// To complete this code snippet, you will need an Envelope and a Document object
var notarizeTab = new Notarize
{
    XPosition = "100",
    YPosition = "100"
};
var signHereTab = new SignHere
{
    XPosition = "200",
    YPosition = "200"
};
var notarizeTabs = new List<Notarize>();
notarizeTabs.Add(notarizeTab);
var signHereTabs = new List<SignHere>();
signHereTabs.Add(signHereTab);
var notaryHost = new NotaryHost
{
    Name = "Nadia Notary",
    Email = "nadianotary@domain.com",
    DeliveryMethod = "email",
    RecipientId = "2",
    Tabs = new Tabs { NotarizeTabs = notarizeTabs }
};
// InPersonSigner is used here even if the signer doesn't sign in person
var inPersonSigner = new InPersonSigner
{
    NotaryHost = notaryHost,
    Name = "Eddie End User",
    Email = "endusersigner@domain.com",
    RecipientId = "1",
    InPersonSigningType = "notary",
    Tabs = new Tabs { SignHereTabs = signHereTabs }
};
var inPersonSigners = new List<InPersonSigner>();
inPersonSigners.Add(inPersonSigner);
var recipients = new Recipients{ InPersonSigners = inPersonSigners };
Java
// To complete this code snippet, you will need an Envelope and a Document object
Notarize notarizeTab = new Notarize();
notarizeTab.setXPosition("100");
notarizeTab.setYPosition("100");
SignHereTab signHereTab = new SignHereTab();
signHereTab.setXPosition("100");
signHereTab.setYPosition("100");
NotaryHost notaryHost = new NotaryHost();
notaryHost.setName("Nadia Notary");
notaryHost.setEmail("nadianotary@domain.com");
notaryHost.setDeliveryMethod("email");
notaryHost.setRecipientId("2");
Tabs notaryTabs = new Tabs();
notaryTabs.setNotarizeTabs(Arrays.asList(notarizeTab));
notaryHost.setTabs(notaryTabs);
// InPersonSigner is used here even if the signer doesn't sign in person
InPersonSigner inPersonSigner = new InPersonSigner();
inPersonSigner.setNotaryHost(notaryHost);
inPersonSigner.setName("Eddie End User");
inPersonSigner.setEmail("endusersigner@domain.com");
inPersonSigner.setRecipientId("1");
inPersonSigner.setInPersonSigningType("notary");
Tabs inPersonTabs = new Tabs();
inPersonTabs.setSignHereTabs(Arrays.asList(signHereTab));
inPersonSigner.setTabs(inPersonTabs);
Recipients recipients = new Recipients();
recipients.setInPersonSigners(Arrays.asList(inPersonSigner));
Node.js
// To complete this code snippet, you will need an Envelope and a Document object
let notarizeTab = docusign.Notarize.constructFromObject({
    xPosition: '100',
    yPosition: '100'});
let signHereTab = docusign.SignHere.constructFromObject({
    xPosition: '200',
    yPosition: '200'});
let signerTabs = docusign.Tabs.constructFromObject({
    signHereTabs: [signHereTab]});
let notaryTabs = docusign.Tabs.constructFromObject({
    notarizeTabs: [notaryTabs]});
let notaryHost = docusign.NotaryHost.constructFromObject({
    name:  'Nadia Notary',
    email: 'nadianotary@domain.com',
    deliveryMethod: 'email',
    recipientId: '2',
    });
notaryHost.tabs = notaryTabs;
// InPersonSigner is used here even if the signer doesn't sign in person
let inPersonSigner = docusign.InPersonSigner.constructFromObject({
    name: 'Eddie End User',
    email: 'endusersigner@domain.com',
    recipientId: '1',
    inPersonSigningType: 'notary',
    });
inPersonSigner.notaryHost = notaryHost;
inPersonSigner.tabs = signerTabs;
let recipients = docusign.Recipients.constructFromObject({
      inPersonSigners: [inPersonSigner],
});
PHP
# To complete this code snippet, you will need an Envelope and a Document object
$notarize_tab = new \Docusign\eSign\Model\Notarize([
    'x_position' => '100',
    'y_position' => '100']);
$sign_here_tab = new \Docusign\eSign\Model\SignHere([
    'x_position' => '200',
    'y_position' => '200']);
$notary_host = new \Docusign\eSign\Model\NotaryHost([
    'name' => 'Nadia Notary',
    'email' => 'nadianotary@domain.com',
    'recipient_id' => '2',
    'delivery_method' => 'email']);
$notary_host->settabs(new \Docusign\eSign\Model\Tabs(['notarize_tabs' => [$notarize_tab]]));
# InPersonSigner is used here even if the signer doesn't sign in person
$in_person_signer = new \Docusign\eSign\Model\InPersonSigner([
    'name' => 'Eddie End User',
    'email' => 'endusersigner@domain.com',
    'recipientId' => '1',
    'inPersonSigningType' => 'notary']);
$in_person_signer->setnotaryhost($notary_host);
$in_person_signer->settabs(new \Docusign\eSign\Model\Tabs(['sign_here_tabs' => [$sign_here_tab]]));
$recipients = new \Docusign\eSign\Model\Recipients(['in_person_signers' => [$in_person_signer]])
Python
# To complete this code snippet, you will need an Envelope and a Document object
notarize_tab = NotarizeTab(x_position = '100', y_position = '100')
sign_here_tab = SignHere( x_position = '200', y_position = '200')
notary_host = NotaryHost(
    name = 'Nadia Notary',
    email = 'nadianotary@domain.com',
    recipientId = '2',
    deliveryMethod = 'email')
notary_host.tabs = Tabs(notarize_tabs = [notarize_tabs])
# InPersonSigner is used here even if the signer doesn't sign in person
in_person_signer = InPersonSigner(
    name = 'Eddie End User',
    email = 'endusersigner@domain.com',
    recipientId = '1',
    inPersonSigningType = 'notary')
in_person_signer.notary_host = notary_host
in_person_signer.tabs = Tabs(sign_here_tabs = [sign_here_tab])
recipients = Recipients(in_person_signers = [in_person_signer])
Ruby
# To complete this code snippet, you will need an Envelope and a Document object
notarize_tab = DocuSign_eSign::Notarize.new
notarize_tab.x_position = '100'
notarize_tab.y_position = '100'
sign_here_tab = DocuSign_eSign::SignHere.new
sign_here_tab.x_position = '200'
sign_here_tab.y_position = '200'
notary_host = DocuSign_eSign::NotaryHost.new
notary_host.name = 'Nadia Notary'
notary_host.email = 'nadianotary@domain.com'
notary_host.recipientId = '2'
notary_host.deliveryMethod = 'email'
notary_tabs = DocuSign_eSign::Tabs.new
notary_tabs.notarize_tabs = [notarize_tabs]
notary_host.tabs = notary_tabs
# InPersonSigner is used here even if the signer doesn't sign in person
in_person_signer = DocuSign_eSign::InPersonSigner.new
in_person_signer.name = 'Eddie End User'
in_person_signer.email = 'endusersigner@domain.com'
in_person_signer.recipientId = '1'
in_person_signer.inPersonSigningType = 'notary'
in_person_signer.notary_host = notary_host
signer_tabs = DocuSign_eSign::Tabs.new
signer.sign_here_tabs = [sign_her_tab]
in_person_signer.tabs = signer_tabs
recipients = DocuSign_eSign::Recipients.new
recipients.in_person_signers = [in_person_signer]
I hope you found this useful. As usual, if you have any questions, comments, or suggestions for topics for future Common API posts, feel free to email me. Until next time...
Additional resources

Inbar Gazit has been with Docusign since 2013 in various engineering roles. Since 2019 he has focused on developer content. Inbar works on code examples including the launchers, available on GitHub in eight languages, and helps build sample apps showcasing the various Docusign APIs. He is also active on StackOverflow, answering your questions. Inbar can be reached at inbar.gazit@docusign.com.
Related posts

 DevelopersPublished Mar 21, 2025
ISV developers: Enhance your product by building a Docusign connector
 DevelopersPublished Mar 13, 2025
Docusign eSignature Integration 101: Setting the foundation

ISV developers: Enhance your product by building a Docusign connector

Docusign eSignature Integration 101: Setting the foundation
Discover what's new with Docusign IAM or start with eSignature for free


