From the Trenches: Tabs with the Apex Toolkit, part 1
Create Docusign tabs within your Salesforce integrations using the Docusign Apex Toolkit. Part 1 of the series covers payments, radio buttons, and formulas.

The Docusign Apex Toolkit is a set of predefined methods, classes and utilities that enable Apex developers to incorporate Docusign functionality in their Salesforce integrations. It is used for programmatically creating and sending Docusign envelopes from within Salesforce.
The Apex Toolkit provides the ability to define Docusign Tabs (also called tags or fields) and apply them to documents inside an envelope. In this post I’ll provide Apex code to create a payment, a radio button, and a formula tab.
The Payment Tab
Before you create your payment tab using custom code, it’s strongly suggested to make sure your payments functionality works while using the standard Docusign eSignature web app. If you have not set up a payment gateway and made a test payment using the point-and-click features of the Docusign platform, you should not yet write the Apex code for payments.
This article outlines the steps to set up a payment gateway, which is required prior to using the payment tabs in Docusign envelopes.
Once you’ve confirmed payments work when using the standard Docusign web app, you can transition to writing Apex code to define your payment tab using the Payment class.
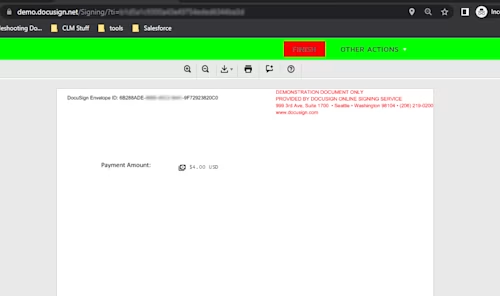
The end result of the code below is that a payment of $4 is added to the envelope:

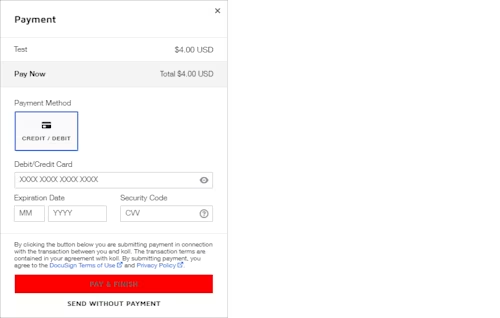
Clicking “Finish” results in the option to pay:

Apex code:
        //Start of payment tab. You will use the methods here: https://developers.docusign.com/docs/salesforce/apex-toolkit-reference/paymenttab.html

        // Create a numbertab to use in the lineItem object.
        // The datalabel is important because you use the exact same data label in the line item shown below
        // WithValue is the amount of the payment and the number tab uses an anchor, but you could also use withPosition instead
        dfsle.Tab Numtab = new dfsle.NumberTab()
            .withRequired(true) // If you set this to false the payment is optional.
            .withValue('4') // Payment of $4
            .withReadOnly(true)
            .withDataLabel('PaymentAmount')
            .withAnchor(new dfsle.Tab.Anchor('Payment Amount', true, true, null, true, true, 'pixels', 120, 0));


        // Before you create the actual payment, you have to first create the payment line item
        // The reason for this is that the payment method below uses a payment line item as a parameter.
        // Notice the last parameter matches the datalabel of the number tab shown above
        dfsle.PaymentTab.LineItem myPaymentLineItem = new dfsle.PaymentTab.LineItem(
            'Test', // Name: This is a sender-defined product name, service name, or other designation for the line item.
            null, // Description: An optional sender-defined description of the line item.
            null, // itemCode: This is an optional sender-defined SKU, inventory number, or other item code for the line item.
            'PaymentAmount'); // This is the tab dataLabel that specifies the amount paid for the line items. The dataLabel matches the numberTab's label defined above

        // You need to get the UUID of a payment gateway. The ID is found under "Settings" -> "Payment Gateways"
        dfsle.UUID paymentGateWayId = dfsle.UUID.parse('73649529-xxxx-xxxx-xxxx-0fe432f1ec07');

        // When you create the payment it requires a list of line items
        List<dfsle.PaymentTab.LineItem> listofLineItems = new List<dfsle.PaymentTab.LineItem>();
        listofLineItems.add(myPaymentLineItem);

        // When you create the payment it requires a list of payment methods
        String[] paymentMethods = new List<String>();
        paymentMethods.add('CreditCard');


        // Create the actual payment using the PaymentTab.Payment
        dfsle.PaymentTab.Payment payment = new dfsle.PaymentTab.Payment(
            paymentGateWayId, // Docusign Gateway: A GUID that identifies the payment gateway connected to the sender's Docusign account.
            null, //Customer ID: The customer ID
            null, // Source ID: The payment source ID.
            paymentMethods, // Payment-Methods: An array of accepted payment methods.
            'USD', // Currency code: Specifies the three-letter ISO 4217 currency code for the payment.
            listofLineItems, // LineItems: A payment formula can have one or more line items that provide detail about individual items in a payment request. The list of line items are returned as metadata to the payment gateway.
            true, // Authorize: When true, the payment details will be used to collect payment.
            false, // Save: When true, the signer's payment method (credit card or bank account) will be saved to the sender's payment gateway.
            null, // Custom metadata: This is a sender-defined field that passes any extra metadata about the payment that will show up in the Authorize.net transaction under “Description” in the merchant gateway portal.
            false); // Custom metadata required: A sender-defined field that specifies whether custom metadata is required for the transaction. When set to true, custom metadata is required.

        // Last, create the payment tab that appears on the document
        dfsle.Tab myPaymentTab = new dfsle.PaymentTab()
            .withPayment(payment)
            .withRequired(false)
            // Define the position which is required but it won't have impact because the positioning comes from the position of the "Numtab" field
            .withPosition(new dfsle.Tab.Position(
                1, // The document to use
                1, // Page number on the document
                220, // X position
                300, // Y position
                100, // 100 pixels wide
                null))
            .withDataLabel('PaymentTest');
        // END of Payment tab

        // Add tab to recipient:
        myRecipient.withTabs(new List<dfsle.Tab> {myPaymentTab, Numtab});
The Radio Button Tab
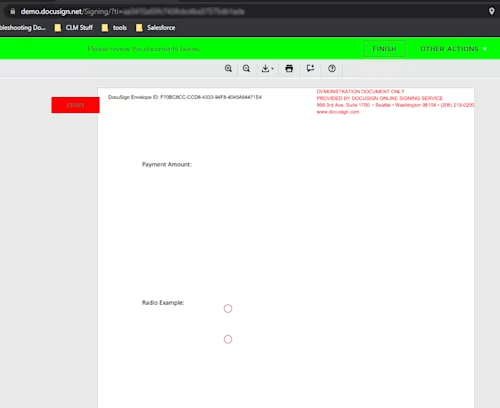
The radio button is created using the RadioGroupTab class. The result is a radio button where the user can select one of the two radios:

Apex code:
  dfsle.RadioGroupTab radioGroup = new dfsle.RadioGroupTab();

List<dfsle.RadioGroupTab.Radio> radios = new List<dfsle.RadioGroupTab.Radio>{
            new dfsle.RadioGroupTab.Radio(1, new dfsle.RadioGroupTab.Position(1, 200, 350), null, null, 'yes', false, false, true),
            new dfsle.RadioGroupTab.Radio(1, new dfsle.RadioGroupTab.Position(1, 200, 400), null, null, 'no', false, false, true)
};

dfsle.Tab.Position pos = new dfsle.Tab.Position(
            1, // The document to use
            1, // Page number on the document
            null, // X position
            null, // Y position
            null, // Width
            null); // Height

radioGroup.withRadios(radios).withPosition(pos);

myRecipient.withTabs(new List<dfsle.Tab> {radioGroup});
The Formula Tab
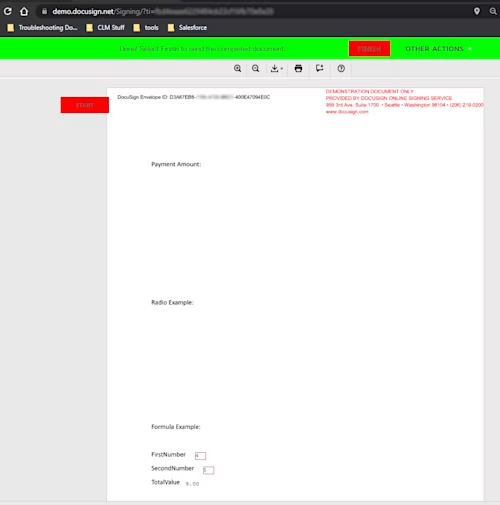
Formula tabs let you do calculations within a tab. They’re created using the FormulaTab class. This example will add two number tabs with a value of 4 and 5 together and place the value in a separate tab using a formula. The end result will look like the following, which shows the formula tab labeled Total Value is 9:

Apex code:
       // Define the first number to add
        dfsle.Tab a = new dfsle.numberTab()
            .withValue('4')
            .withReadOnly(false) // locked
            .withDataLabel('a')
            .withAnchor(new dfsle.Tab.Anchor(
                'FirstNumber', // Anchor string
                false, // Do not allow white space in anchor string
                false, // Anchor string is not case-sensitive
                'right', // Horizontal alignment in relation to the anchor text
                true, // Ignore if the anchor text is not present in the document
                true, // Must match the value of the anchor string in its entirety
                'pixels', // Unit of the X and Y offset properties
                10, // X offset
                0)); // Y offset


        //Define the second number to add
        dfsle.Tab b = new dfsle.numberTab()
            .withValue('5')
            .withReadOnly(false) // locked
            .withDataLabel('b')
            .withAnchor(new dfsle.Tab.Anchor(
                'SecondNumber', // Anchor string
                false, // Do not allow white space in anchor string
                false, // Anchor string is not case sensitive
                'right', // Horizontal alignment in relation to the anchor text
                true, // Ignore if the anchor text is not present in the document
                true, // Must match the value of the anchor string in its entirety
                'pixels', // Unit of the X and Y offset properties
                10, // X offset
                0)); // Y offset

        //Add the two numbers together using a formula
        dfsle.Tab formulaOne= new dfsle.FormulaTab()
            // For the formula to work, you need to tell it which tabs to work with and what operation
            //In this case you are adding together the a and b tabs shown above based on their data labels
            .withFormula('[b] + [a]')
                .withAnchor(new dfsle.Tab.Anchor(
                'TotalValue', // Anchor string
                false, // Do not allow white space in anchor string
                false, // Anchor string is not case sensitive
                'right', // Horizontal alignment in relation to the anchor text
                true, // Ignore if the anchor text is not present in the document
                true, // Must match the value of the anchor string in its entirety
                'pixels', // Unit of the X and Y offset properties
                20, // X offset
                0)); // Y offset

        myRecipient = myRecipient.withTabs(new List<dfsle.Tab> {a,b, formulaOne});
Additional resources

Koll Klienstuber has been with the Developer Support team since September 2021. He specializes in assisting customers with our APIs, SDKs, and third party integrations.
Related posts

 DevelopersPublished Mar 21, 2025
ISV developers: Enhance your product by building a Docusign connector
 DevelopersPublished Mar 13, 2025
Docusign eSignature Integration 101: Setting the foundation

ISV developers: Enhance your product by building a Docusign connector

Docusign eSignature Integration 101: Setting the foundation
Discover what's new with Docusign IAM or start with eSignature for free


