
From the Trenches: Setting up OAuth for Docusign Connect with Microsoft Azure

Docusign Connect is a webhook service that enables you to receive updates when subscribed events occur within the Docusign platform. When receiving messages from Docusign Connect, you may want to build a listener implementation that includes a way to validate that the messages being received are actually coming from Docusign. Docusign Connect has a couple of mechanisms available to facilitate security and message validation. One recent addition to these options is OAuth for Docusign Connect. OAuth for Docusign Connect uses the Client Credentials OAuth grant type. As described in the reference page for this security method, “In the Client Credentials OAuth flow, you set your Docusign Connect configuration to send to your app OAuth credentials alongside Connect event notification messages. Your existing OAuth service or authorization server (IDP) that implements OAuth uses these credentials to authenticate that the messages are from Docusign.” Since there is an interaction with your authorization server, the setup steps can depend on the service you use. I’ll be showing how I set up a test configuration with Microsoft Azure.
Before I continue, I want to note quickly that OAuth for Docusign Connect is not the same as using OAuth to obtain an access token to make Docusign REST API calls. If you were looking for more information on authentication with our REST APIs, our Authentication page would be the best place to find out more information on that.
Setup steps in Microsoft Azure
While there may be other ways to approach this, here are the steps I followed to set up a test configuration:
In the Microsoft Azure Portal,
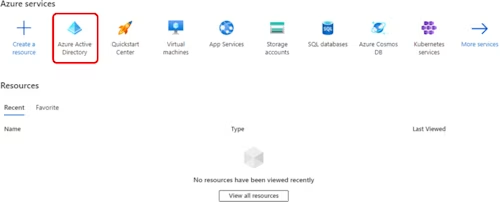
Open Azure Active Directory:
Select Add and then App registration:

On the App Registration page for your app, you can find the Client ID:
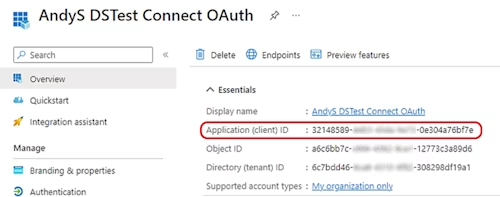
Selecting Endpoints opens a sidebar with various endpoints. For the client credentials flow that Connect uses, you’d be interested in the OAuth 2.0 token endpoint:

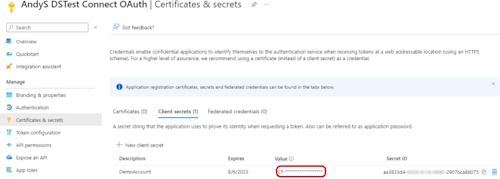
Add a Client Secret on the Certificates & secrets page. (Similarly to Docusign, the secret key value will only display in Azure at the time it was created, so make sure to save the key at the time you create it.)
Setup steps in Docusign
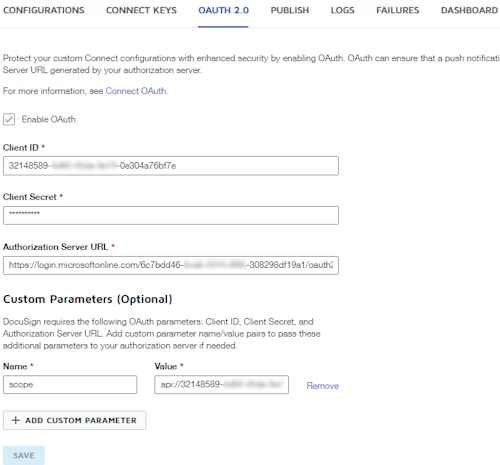
Per the Connect OAuth documentation, these are the following parameters needed to set up Connect OAuth with Azure:
Main parameters:
authorizationServerUrl(from Step 4 in the previous section)clientId(from Step 3 in the previous section)clientSecret(from Step 5 in the previous section)
Custom parameters:
scope (for the Client Credential flow, this value for Azure is api://{{clientId}}/.default —just replace {{clientId}} with your client ID from Step 3 in the previous section)
For custom parameters, if you were to add any additional custom parameters beyond what is required, you’ll want to avoid naming custom parameters the same as parameters already being included by Docusign (such as grant_typeand client_secret).
Set up OAuth for Docusign Connect through the UI
In your Docusign account, navigate to Settings > Connect.
Don’t see the Settings menu? In that case, you may not be an account administrator. Only account administrators can see the Settings menu.
Don’t see Connect under Settings? Connect may not be enabled for your account. You can create a Docusign Support case to confirm whether Connect is enabled for your account.
On the Connect page, select the OAuth 2.0 tab. You’ll be entering the information from Azure as shown below: Enter your information and save.
Set up OAuth for Docusign Connect through the API
The same configuration information can be sent to Docusign through the following API call:
POST {{baseUrl}}/v2.1/accounts/{{accountId}}/connect/oauth

{
    "authorizationServerUrl": "https://login.microsoftonline.com/{{tenantId}}/oauth2/v2.0/token",
    "clientId": "{{clientId}}",
    "clientSecret": "{{clientSecret}}",
    "customParameters": {
    "scope": "api://{{clientId}}/.default"
    }
}
Enabling OAuth for Docusign Connect for a Connect configuration
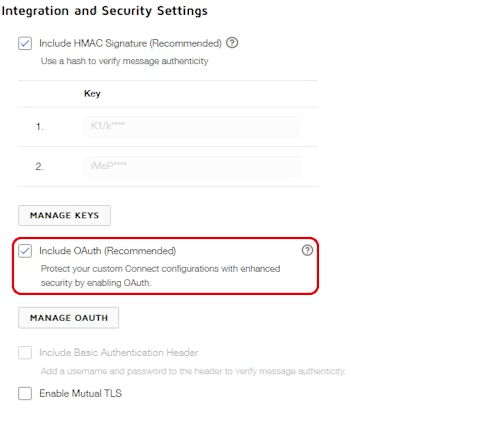
Now that OAuth 2.0 for Docusign Connect is set up in your account, you can enable that security method on new and existing custom Connect configurations. On the Connect page under Settings in your Docusign account, select the Configurations tab. Whether you add a new configuration or edit an existing one currently on that page, you can add OAuth on the Edit Custom Configuration page by selecting the checkbox next to “Include OAuth”:
Final result
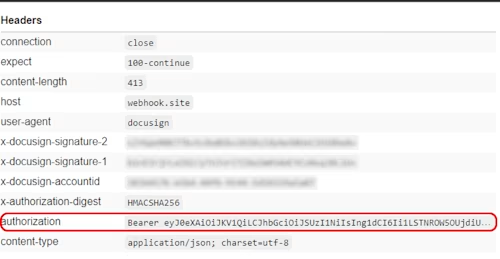
The Connect messages your listener receives should now contain an access token in an authorization header:
Additional resources

Andy Singh is a developer support engineer at Docusign, helping developers solve problems with their Docusign integrations.
Related posts

 DevelopersPublished Mar 21, 2025
ISV developers: Enhance your product by building a Docusign connector
 DevelopersPublished Mar 13, 2025
Docusign eSignature Integration 101: Setting the foundation

ISV developers: Enhance your product by building a Docusign connector

Docusign eSignature Integration 101: Setting the foundation
Discover what's new with Docusign IAM or start with eSignature for free


