
From the Trenches: Clicky Clicky!
Matt King shows you some of the advanced features of the Click API.

If you’ve ever signed up for an online account, chances are you’ve at some point come across a situation to introduce a Clickwrap. Clickwraps are small agreements that can be embedded onto a web page or in a modal window for accepting items like Terms and Conditions, supplemental documents with required agreements, and other things.
Clickwraps are used widely across the internet in a variety of different industries and ways—including with eSignature! While Docusign has supported Clickwraps for some time, we do have some advanced features and functionalities coming down the pipeline which augment Clickwraps in a few interesting ways.
First: The basics
At a high level, you can see that setting up a Clickwrap is fairly straightforward. You can supply a number of documents, alter the formatting, and change how the completed agreement is returned to the recipient.
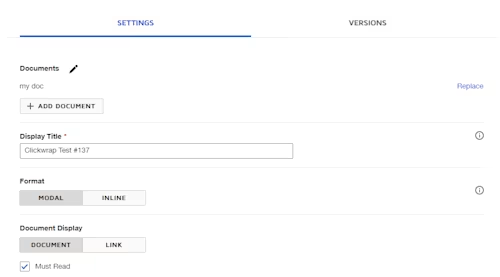
Once the Clickwrap is created, you’ll be prompted to activate it. Once active you can click the Copy Code button to retrieve either an embeddable script that you can host on your page, or a URL that the end-user can be directed to in a new tab or window. Note that the clientUserId can be a combination of letters and numbers, each clientUserId as a general rule should be unique.
For some basic ideas and concepts, please see our Click API 101 guide on the Developer Center.
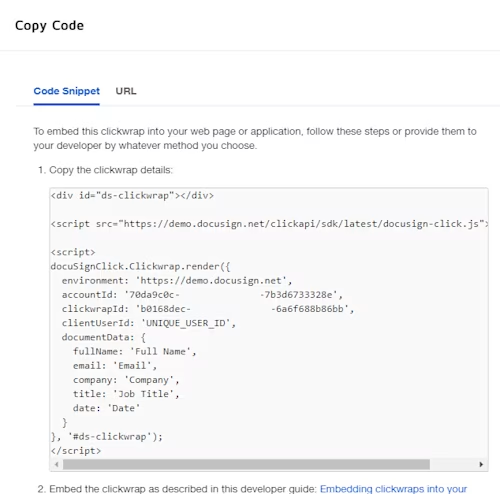
Wait, what’s that documentData object?
That’s a good question, which brings us to our first enhancement: Dynamic content.
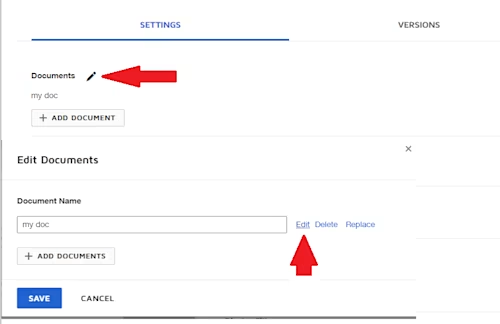
If you go back to edit your Clickwrap, you may notice a pencil icon. If you click this icon followed by the edit button, you’ll see a new interface appear:
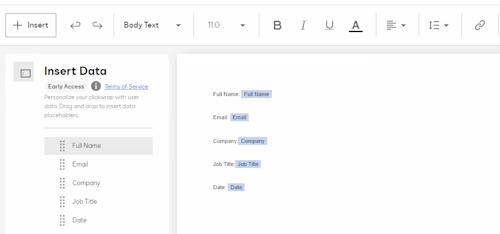
As you can see, Click’s new editing UI is presently in Early Access in the Demo environment. Following this series of clicks will bring you to a new text editor where the document text can be manipulated, but more importantly there are five new tabs on the left side which you can drag directly into the document.
You may have already noticed there’s a correlation between the documentData object and the tabs available on this UI. The reason for that is the values that you supply for the Clickwrap can be dynamically embedded into the actual agreement, replacing the tabs with your values. This will allow you to supply a name, email address, job title, company, or specific date without having to manipulate the agreement directly. This is an excellent case for forms that see repeated use like terms and conditions, intake, quarterly business agreements, and more.
Further enhancements to Click are in the pipeline including the ability to specify specific custom tab/field values.
Awesome, anything else to look forward to?
Indeed, presently scheduled with our next Connect release is the ability to add Clickwrap-related data to your Connect writebacks. This will relieve you from having to poll for responses or be required to download the individual agreements; Docusign will provide the option to send them to you! The current release schedule has this system set to debut in March of 2022, look for the announcement!
Until then, we do have another option for automatically retrieving and reacting to Clickwrap agreements: Click-related callbacks.
Now, when you’re embedding a Clickwrap within your web app, you can select from a number of optional triggers that are related to specific Click events. As of February of 2022, the supported callback triggers are:
onAgreed: When a user is prompted with a Clickwrap that they have already agreed to.onDeclined: When a user is prompted for a Clickwrap that they have already declined.onAgreeing: When a user clicks the Agree button for your ClickwraponDeclining: When a user clicks the Decline button for your ClickwraponError: When an error occurs during the workflowonMustAgree: This is called before a user is presented with a Clickwrap. This will only take place if the user has not previously agreed to the Clickwrap or if there’s a new version available since the last time they viewed it.
From the example on our Developer Center, we’ve provided these triggers as options for your Click integration. It is worth noting however, that an integration is not necessarily meant to use all of these triggers, and depending on the way your logic is set up, there will be cases where you may see multiple triggers.
For example, if I were to load a new Clickwrap I’ve never seen before and agreed to it, the operation would play out like this:
onMustAgreewould be invoked as the Clickwrap is required and I had not previously agreed to it.When I agree or decline the Clickwrap, the
onAgreeing/onDecliningtrigger will be invoked, giving an indication to your system of how I reacted to the Clickwrap.Once the agreement is done processing,
onAgreedoronDeclinedwill be invoked, as the agreement state will have been shifted from never having been prompted to previously agreed or declined. This trigger takes place after the interaction is finalized and the agreement is stored within Docusign.
You can program logic around this, but each customer will need to explore the options we have available and decide which triggers work specifically for them.
Got the triggers, so what can I do with them?
Also a good question! We do realize that not all integrations will have the envelope velocity to justify setting up a Connect listener to handle these interactions. You’ll notice fairly quickly when making API requests through JavaScript that Docusign does not support Cross Origin Resource Sharing (CORS), so making a direct call from the web app to the Docusign APIs isn’t going to work. However, you can use these triggers to relay information related to the Clickwrap to your own internal system. That being said, let’s get practical.
In my case, I’m embedding a Clickwrap onto my own page following guidance from the Developer Center. Since I’m doing repeated tests, I’m putting in a randomized variable to act as a clientUserId so that I can repeatedly interact with the Clickwrap without having to reach in to change the ID while I’m testing. I’m looking to take advantage of both of these new functionalities, so I’m going to set it up with some dynamic content to start with:
     <script src="https://demo.docusign.net/clickapi/sdk/latest/docusign-click.js">  </script><script>

mustAgree = false;
CUID = Math.floor(Math.random() * 123456789);
docuSignClick.Clickwrap.render({
    environment: 'https://demo.docusign.net',
    accountId: '70da9c0c-xxxx-xxxx-xxxx-7b3d6733328e',
    clickwrapId: 'b0168dec-xxxx-xxxx-xxxx-6a6f688b86bb',
    clientUserId: CUID,
    documentData: {
        fullName: 'Matt King',
        email: 'mattkingdemo2+test@gmail.com',
        company: 'Docusign',
        title: 'DevSupport Guy',
        date: '2/8/2022'
    },
</script>
Looking at the Clickwrap upon render, I can see that my values have been correctly applied:
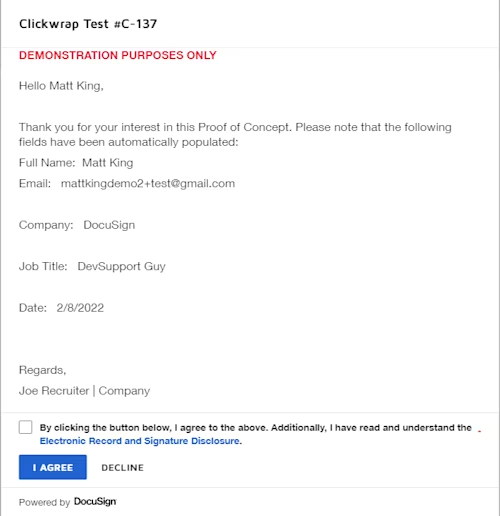
Now that I have the Clickwrap agreement populating my dynamic content, the next thing I need to look at are going to be my JS triggers.
For the purpose of this proof of concept, I added a basic PUT call to the onAgreeing trigger.
    // Called immediately upon user clicking ‘Agree’
    // Any calls to download will not work until onAgreed has been called
    onAgreeing: function (agreementData) {
        console.log("The user has Agreed to the Clickwrap agreement");

        const Http = new XMLHttpRequest();
        url = 'http://localhost:801?status=agreed';
        Http.open("PUT", url);
        Http.setRequestHeader("Accept", "Application/JSON");
        Http.setRequestHeader("Content-Type", "Application/JSON");
        Http.send(JSON.stringify(agreementData));

        Http.onreadystatechange = (e) => {
            console.log(Http.responseText)
        }
    },
The PUT request takes the agreementData object and passes it along to the local system—in this case, to http://localhost:801?status=agreed with the following payload:
{
	"accountId": "70da9c0c-xxxx-xxxx-xxxx-7b3d6733328e",
	"clickwrapId": "a7bd9b94-xxxx-xxxx-xxxx-b260c60b5165",
	"clientUserId": "22763069",
	"agreementId": "495f878f-xxxx-xxxx-xxxx-788a2076d651",
	"consumerDisclosureHtml": "<user disclosure agreement goes here>",
	"createdOn": "2022-02-15T21:07:11.177603Z",
	"status": "created",
	"versionId": "14d45662-xxxx-xxxx-xxxx-4e569d81e914",
	"versionNumber": 1,
	"settings": {
		"displayName": "Clickwrap Test #137",
		"hasDeclineButton": false,
		"actionButtonAlignment": "left",
		"mustRead": true,
		"mustView": true,
		"requireAccept": true,
		"downloadable": true,
		"sendToEmail": false,
		"consentButtonText": "I Agree",
		"format": "modal",
		"documentDisplay": "document"
	},
	"documentData": {
		"fullName": "Matt King",
		"email": "mattkingdemo2+test@gmail.com",
		"company": "Docusign",
		"title": "DevSupport Guy",
		"date": "2/8/2022"
	}
}
</user>
Based on this, I can take the fact that the Clickwrap agreement was agreed to, relay the data to my local database for storage, and at the same time completely eliminate the need to poll for successfully completed Clickwrap agreements.
The implementation and logic will need to be explored to ensure that it meets the needs for your business. If you have any questions regarding Click implementation or using this how-to to set up your JavaScript triggers, feel free to reach out to the Support team for assistance. I or another member of my team would be happy to assist you in getting started with Docusign Click.
Additional resources

Matt King is a senior member of the Developer Support team and has been with Docusign for about 5 years. He specializes in assisting customers with our various APIs, SDKs, and code examples.
Related posts

 DevelopersPublished Mar 21, 2025
ISV developers: Enhance your product by building a Docusign connector
 DevelopersPublished Mar 13, 2025
Docusign eSignature Integration 101: Setting the foundation

ISV developers: Enhance your product by building a Docusign connector

Docusign eSignature Integration 101: Setting the foundation
Discover what's new with Docusign IAM or start with eSignature for free


