
Salesforce: send an envelope after an event trigger
See how to use the Docusign Apex Toolkit to send envelopes based on Salesforce Triggers.
Table of contents

Let’s suppose your company has installed Docusign E-Signature for Salesforce and it’s working well. Next, your business team is asking for a Docusign envelope to be sent out automatically when a new account is added, and also when an opportunity is updated to ClosedWon. What’s the best way to implement these use cases?
The answer is to use Salesforce Triggers to initiate an Apex class to send out the envelopes. A Trigger can initiate a method on an Apex class before or after a Salesforce object is added, deleted, or updated.
In this post, I’ll demonstrate how to send a Docusign envelope when an opportunity is updated to Closed Won. The envelope will be sent to the primary contact for the opportunity object. This tutorial presumes that Docusign For Salesforce is installed and configured in your Salesforce instance. If you have not done this, see my prior blog post Hello world with the Apex Toolkit.
To add a trigger, open the Developer Console in your Salesforce organization. Then select File > New > Apex Trigger.
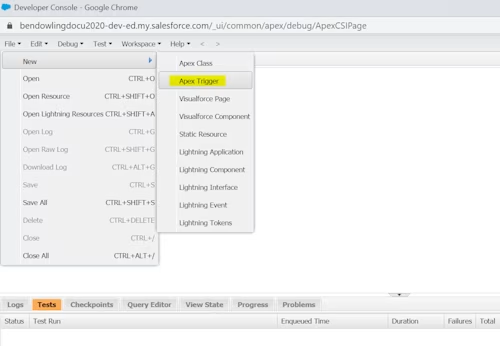
Once the Apex Trigger opens, copy and paste the following code into the window:
trigger opptConversion on Opportunity (before update) {
    for(Opportunity opp : trigger.new) {
        if(opp.StageName == 'Closed Won') {
        sendEnvelope.sendEnvelopeMethod(opp.accountId,opp.ContactId);
        }
    }
}
You now need to add the sendEnvelope class, which will send an envelope via Docusign.
I will use a template created via the Docusign web console for this demonstration. For more info, see Create Templates in Docusign Support.
Templates include one or more roles, which serve as placeholders for the name and email or SMS information for each recipient. For this example, create a role named customer. Do not include a name or email address for the role.
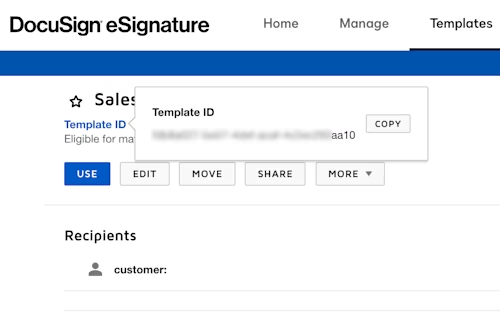
The sendEnvelope class will need the Template ID. Open the template, then click the Template ID link. The Template ID will then be shown in a popup window:
To add an Apex class from the Developer Console, select File > New > Apex Class.
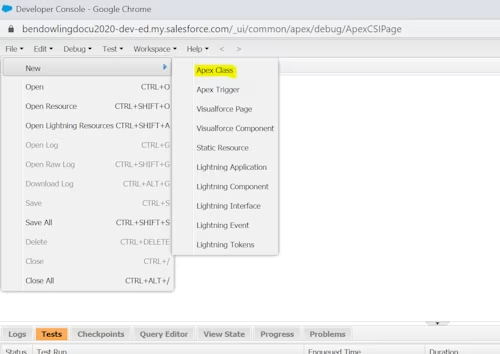
Copy and paste the following code:
public class sendEnvelope {

	@future(callout=true)
	//add comments about source
	public static void sendEnvelopeMethod(Id accountId,Id ContactId) {

    	Final String templateGuid = '36720228-6b42-45ce-a202-73a139bd549b';
     	//TemplateId contains the Docusign Id of the Docusign Template
    	Final dfsle.UUID TemplateId = dfsle.UUID.parse(templateGuid);

    	Account account = [SELECT Id FROM Account WHERE Id = :accountId
    		LIMIT 1
    	];

    	// Create an empty envelope with Account Id as the source Id
    	dfsle.Envelope envelope = dfsle.EnvelopeService.getEmptyEnvelope(
        	new dfsle.Entity(account.Id));

    	//Find your contact to add
    	Contact Contact = [SELECT Id, Name, Email FROM Contact
        	WHERE Id = :ContactId
        	LIMIT 1
    	];

    	//use the Recipient.fromSource method to create the Recipient
    	dfsle.Recipient Recipient = dfsle.Recipient.fromSource(
        	Contact.Name, // Recipient name
        	Contact.Email, // Recipient email
        	null, //Optional phone number
        	'Customer', //Role Name. Specify the exact role name from template
        	//source object for the Recipient - Account
        	new dfsle.Entity(Contact.Id));

    	//add Recipient to the Envelope
    	envelope = envelope.withRecipients (
    		new List<dfsle.recipient> { Recipient });

    	//create a new document for the Envelope
    	dfsle.Document myDocument = dfsle.Document.fromTemplate(
    	TemplateId, // templateId in dfsle.UUID format
    	'closedWonTemplate'); // name of the template

    	//add document to the Envelope
    	envelope = envelope.withDocuments(
        	new List<dfsle.document> { myDocument });

    	// Send the envelope.
    	envelope = dfsle.EnvelopeService.sendEnvelope(
        	envelope, // The envelope to send
        	true); // Send now parameter not actually part of this method.
	}
}
</dfsle.document></dfsle.recipient>
Once you have added the code, remember to save it!
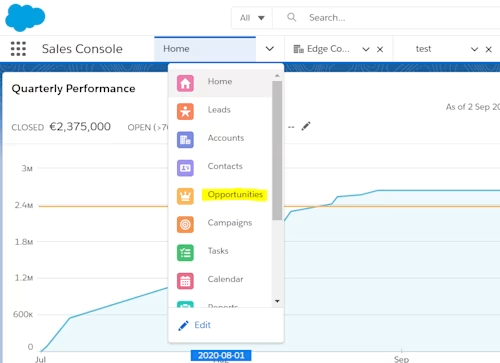
To test the class and trigger, create an opportunity. Navigate to your Sales Console and select Opportunities in the dropdown menu:
On the Opportunity page, click New at the upper right and then fill out the opportunity data to create an opportunity.
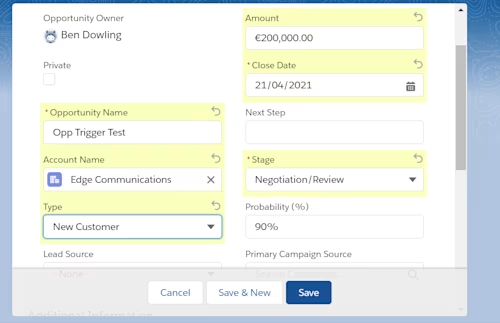
You will also need to create a primary contact for this opportunity; see how to do so in the Salesforce documentation.
For the purposes of testing you can simply navigate to the very last stage, which is “Closed”, and then click the Select Closed Stage button.

Your envelope will now be delivered to the intended recipients’ email addresses.
Summary
Salesforce triggers are a powerful feature that can solve many use cases when combined with the Docusign Apex Toolkit. If you have any issues, please post on the community Stack Overflow with the tag docusignapi or contact us via Docusign Support.
Additional resources

Ben is a part of the Docusign Developer Support group, which helps developers integrate their applications with Docusign.
Related posts

Beyond e-signatures: Unlocking the full potential of Docusign extension apps
Discover what's new with Docusign IAM or start with eSignature for free


