A new kind of Quickstart: Introducing the JWT Grant remote signing example
Learn how to authenticate with Docusign using our newest Quickstart: the JWT Grant remote signing example.
Table of contents

The Docusign Quickstart is known for being the easiest way to get started with our APIs. With just a few clicks, it lets you download a preconfigured project containing the code you need to authenticate and run our examples in the programming language of your choice. Today I’m excited to announce a new kind of Quickstart that will simplify even further the process of setting up your first Docusign integration: the JWT Grant remote signing project.
The new JWT Grant remote signing project gives you everything you need to authenticate with JWT and run our remote signing code example. So how is this different from our original Quickstart? While the Quickstart provides you with multiple methods of authentication and all of our code examples, the JWT Grant remote signing project gives you only the files that you will use to run the project and nothing extra. The project also strips away any front-end code and removes the dependency on a web server, enabling you to run the project from your command line. The end result is a more lightweight example for you to get started with Docusign.
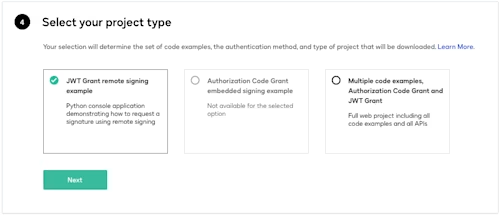
To download the JWT Grant remote signing project, go to the Quickstart page on the Docusign Developer Center. Log in with your developer account, give your application a name, and pick a language, just like you would when downloading the original Quickstart. After doing that, you will see a new step prompting you to “Select your project type.” Choose “JWT Grant remote signing example” as shown in the screenshot below.

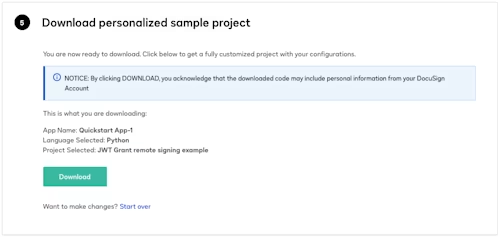
Continue to the next step to download the project as shown below.

This will also create an integration key in your developer account that matches the information in the downloaded configuration file. Now that you have downloaded the project, you’re ready to run it. Each language has unique instructions to run it. You can find the instructions in the Quickstart overview on the Developer Center. Under the Configuration and setup section, go to the tab for your selected language and look for the installation instructions. When you run the example, you will be prompted to grant consent in your browser. After granting consent, you will be redirected to the Developer Center. Return to your terminal to finish running the example by following the prompts as demonstrated in the screenshot below.

In just a few minutes I was able to authenticate and send an envelope with the eSignature REST API. Now head over to Quickstart and see if you can do it even faster!
Additional resources

Paige has been working for Docusign since 2020. As a Sr. Programmer Writer on the Developer Content team, she writes content and code to help developers learn how to use Docusign APIs.
Related posts

 DevelopersPublished Mar 21, 2025
ISV developers: Enhance your product by building a Docusign connector
 DevelopersPublished Mar 13, 2025
Docusign eSignature Integration 101: Setting the foundation

ISV developers: Enhance your product by building a Docusign connector

Docusign eSignature Integration 101: Setting the foundation
Discover what's new with Docusign IAM or start with eSignature for free


