
Expanding Power Automate Series: Send an envelope through a custom Power App

In this blog post, I’ll explore how to use Microsoft Power Apps to create a custom mobile application to pre-populate envelope information through the Docusign Connector for Microsoft Power Automate. For the first post in this series, see Expanding Power Automate Series: Send an envelope.
Users of Power Automate may already be aware of how valuable of a tool it is in streamlining business processes by creating custom automated workflows. With Power Apps, users can write applications to transform paper-based, manual business processes to paperless, digital experiences.
Best of all, Power Apps offers a low-code environment so business users can build apps without the intervention of a professional developer. Build seamless intake forms to pre-populate documents before collecting signatures, or launch Docusign eSignature workflows with the click of a button.
Let’s go ahead and see how it works!
Example: Create an app to pre-populate an envelope and tabs
In this example, the Power Automate workflow is triggered when a button is clicked in Power Apps after entering a recipient’s information. Once the workflow is triggered, the prebuilt Docusign connector in Power Automate will read the recipient data input from Power Apps and send for signature.
This workflow can be applied to various use cases to meet specific business needs.
Some examples:
In real estate, when a leasing agent prepares an agreement for a new tenant, the tenant could input their information in a Power App and receive pre-populated documents ready for signature.
In healthcare, when a patient checks in for an appointment or fills out hospital discharge paperwork, they could input their information in a Power App and receive pre-populated documents ready for signature.
The final app and workflow should look like this:
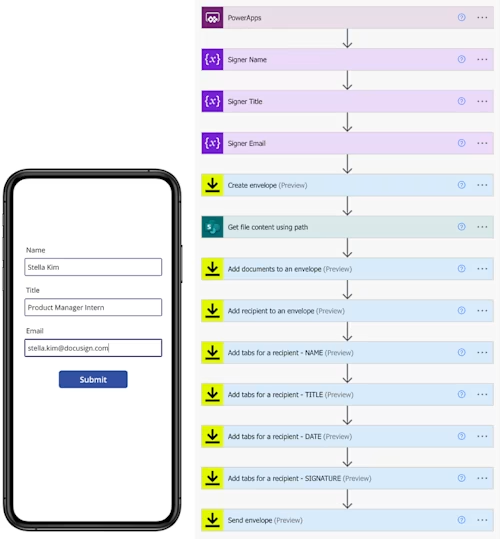
Step 1: Create a Power App and initialize variables
Log in to Power Apps.
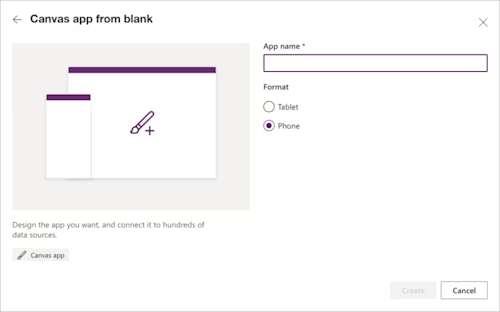
Create a new Blank Canvas App and choose the format type. For this example, choose the Phone format.
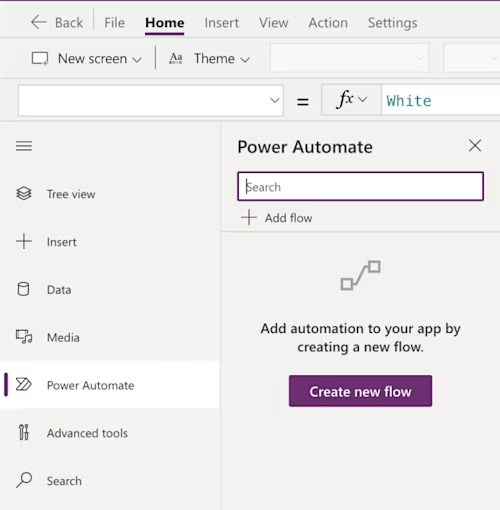
Expand the left-hand menu bar, select Power Automate, and select Create New Flow.
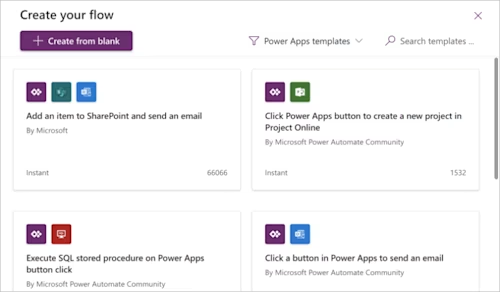
Select Create From Blank.
Enter a name for the Flow. Notice that Power Apps has automatically been selected to trigger the Flow.
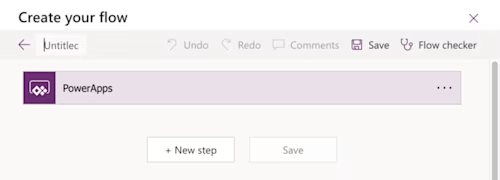
Add New Step: Select the variable action Initialize Variable.
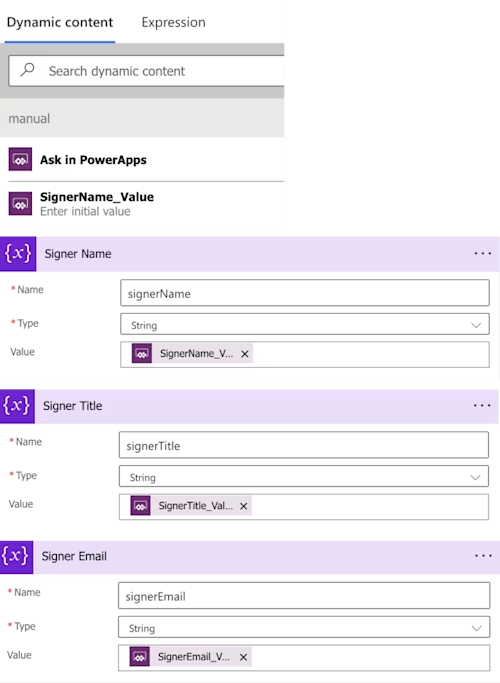
Quick Tip! Select the three dots and Rename this step according to the variable name (for example, Signer Name) before filling out any of the required fields. This will properly name the variable’s Dynamic Content value later on. If the step is not renamed, the value will automatically be named as “InitializeVariable_Value.”
Enter the variable Name.
Use the Type drop-down menu and select String as the variable type.
Click in the Value field and select Ask in PowerApps from the Dynamic Content list. This will allow us to pass in a parameter associated with this variable in Power Apps.
Repeat these steps to initialize variables for the Signer Title and Email.
Step 2: Create the Docusign envelope flow
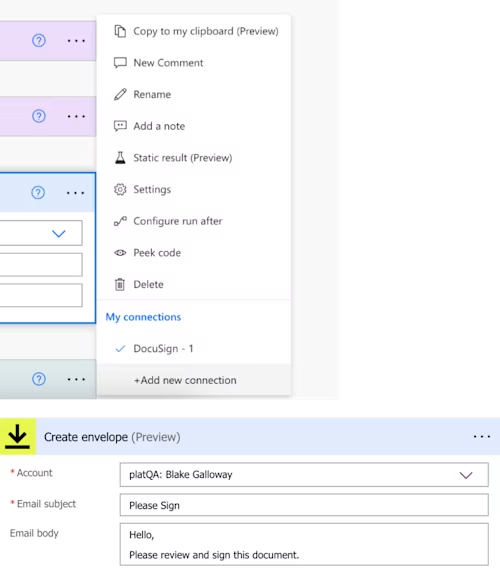
7. Add New Step: With the Docusign Connector for Power Automate, select the Action Create Envelope.
Select a Docusign account from the drop-down menu. If there are none available, authenticate with Docusign by selecting the three dots, then +Add new connection. Proceed to log in to your Docusign account.
Enter an email subject and optional text for the email body.
At this point, you will be adding a document to send for signature. For this example, I will retrieve a document stored in SharePoint, but it may be from any source depending on the use case.
8. Add New Step: Select the SharePoint action Get file content using path.
Select the Site Address from the drop-down menu.
Enter the File Path for the desired SharePoint document to be sent and signed. (See Flow Example - Create an Envelope for more on adding SharePoint documents to an envelope.)

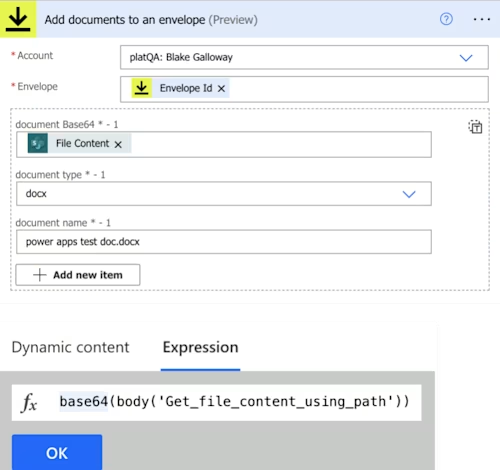
9. Add New Step: Select the Docusign action Add documents to an envelope.
Select the Account from the drop-down menu.
Select the Envelope ID from the Dynamic Content list.
Docusign APIs require that the document file you add to the flow be Base64-encoded. To add the results of the Get file content using path step, click in the document Base64 field.
In the Dynamic Content list, select the Expression tab, enter base64(body('Get_file_content_using_path')) and press OK.
Select the document type from the drop-down menu: in this case, docx.
Enter the document name.
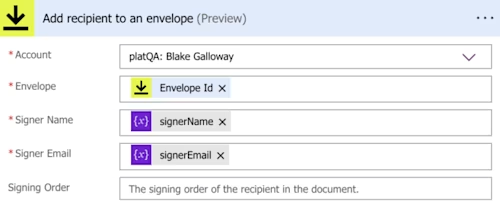
10. Add New Step: Select the Docusign action Add recipient to an envelope.
Select the Account from the drop-down menu.
Click in the Envelope field and select Envelope ID from the Dynamic Content list.
Click in the Signer Name field and select the signerName variable from the Dynamic Content list. This will allow us to pre-populate the envelope recipient information with input from the Power Apps user so that they can receive and sign the envelope.
Click in the Signer Email field and select the signerEmail variable from the Dynamic Content list.
In this example, you will not be assigning a signing order, so it is left blank.
At this point, you will now pre-populate fields (also referred to as tabs) in the document with data from Power Apps.
11. Add New Step: Select the Docusign action Add tabs for a recipient. This allows Docusign to detect where to place the signature field on the document through a text placeholder referred to as an anchor string, or AutoPlace Text. This text is often colored white so that it remains invisible to the end user, but detectable by Docusign. (See Configure a Document for Adding Tabs to create anchor strings.)
Quick Tip! Rename this step to indicate which tab is being added (such as Name, Title, Date, or Signature). This will make it easier to identify which tab this step is addressing when the step views are collapsed or if any errors occur in the flow.
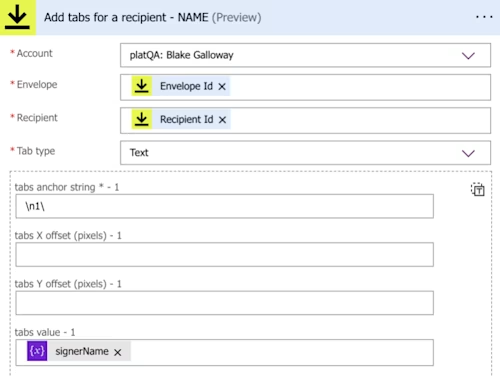
Select the Account from the drop-down menu.
Select the Envelope ID from the Dynamic Content list.
Select the Recipient ID from the Dynamic Content list.
Select the Tab type from the drop-down list. Choose the tab type Text for the Signer’s Name.
In the tabs anchor string field, enter the same value as the AutoPlace Text in the document. IMPORTANT: If the tabs anchor string does not match the AutoPlace Text in the document, Docusign will not be able to detect where to place the tab, and this step will fail.
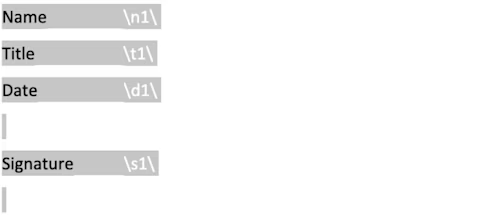
Adjusting the X and Y offsets is optional.
Click in the tabs value field and select the signerName variable from the Dynamic Content list. This will pre-populate this tab value with text input from Power Apps.
12. Add New Step:
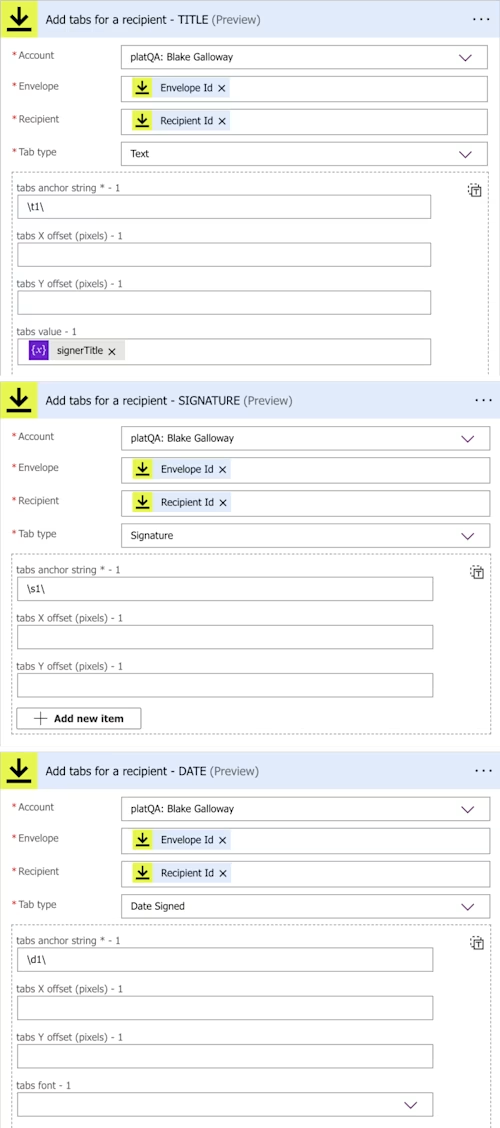
Repeat Step 11 to assign the signerTitle variable to the Title tab type.
Repeat Step 11 to add the Signature tab type.
Optional: Repeat Step 11 to add the Date Signed tab type.
Note: There will be no tabs value field for the Signature or Date Signed tab type, as the date is automatically added and the signature must be entered at the time of signing.
13. Add New Step: Select the Docusign action Send envelope.
Select the Account from the drop-down menu.
Click in the Envelope field and select Envelope ID from the Dynamic Content list.

14. Select Save and navigate back to Power Apps.
Step 3: Tie everything together!
15. Now back in the Power Apps environment, select Insert in the top menu bar and then select Label.
Change the Text value of this label to “Name.” This can be done in either the top function bar or through the Text property in the right-hand menu.
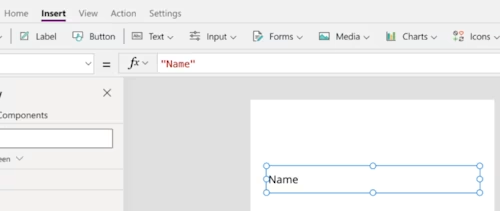
16. Select Input from the top menu bar and select Text input from the drop-down menu.
Quick Tip! Select the text input bar. Notice the element name has been highlighted in the left-hand Tree view. Click the three dots on this element and Rename this element to match the text label. In this case, “Name.” This will enable you to identify this element easily later on when you refer to this input’s value to trigger the Flow.
Optional: Remove the “Text input” text inside the input bar.
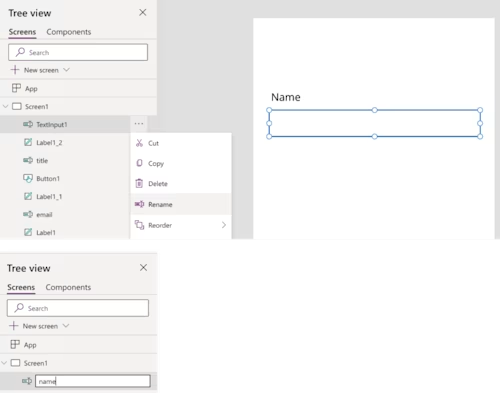
17. Repeat Steps 22-23 to create Title and Email text input fields.
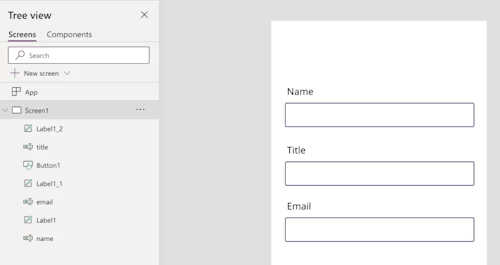
18. Select Button from the top menu bar.
Enter Submit in the Text property on the right-hand menu.
Position this button below the text input fields.
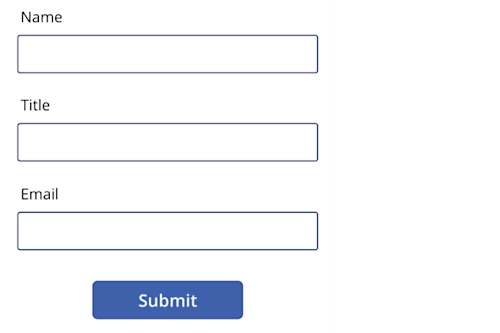
19. Select the newly created Submit button.
Select OnSelect from the drop-down menu in the upper left-hand corner.
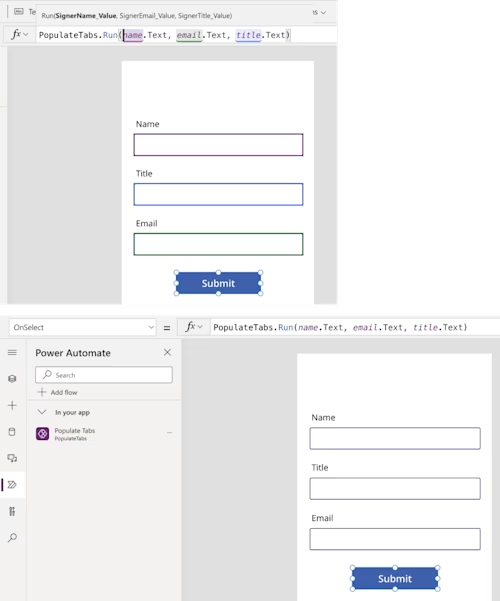
In the function bar, enter: FlowName.Run(name.Text, email.Text, title.Text). This allows us to trigger the Power Automate Flow and pass in the text input fields as parameters that reference the variables initialized in the Flow.
WARNING: Power Apps expects a certain order for the parameters to be passed in and displays an example .Run() function call with the variable names as parameter placeholders. Make sure the order of the parameters match the expected order by Power Apps to prevent invalid argument errors.
Note: Notice that by renaming the text input field elements in Step 23, you can easily reference them when passing them into the .Run() function as parameters. Power Apps has also color-coded each text input field to its corresponding parameter value.
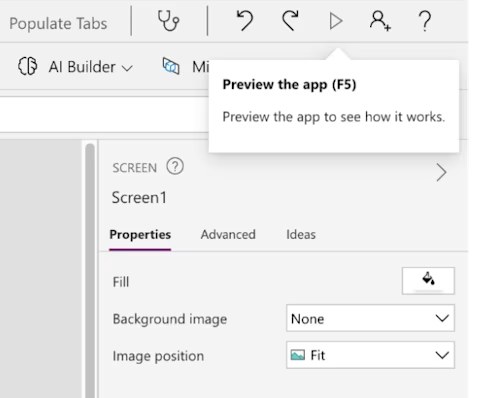
20. Select the Preview button in the upper-right hand corner to fill out the text input fields with recipient information and trigger the Flow by clicking the Submit button.
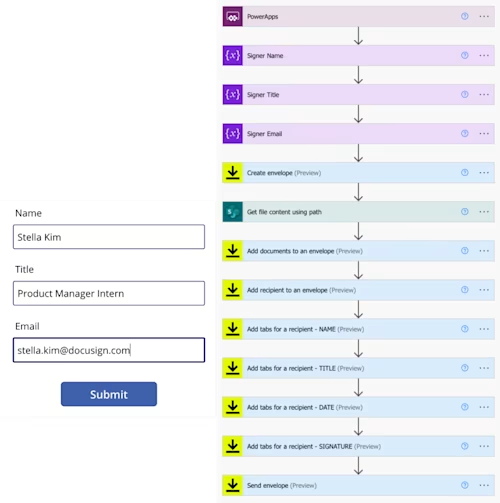
And you’re done!
Although we only created one workflow in this example, additional flows can be made with the Docusign trigger to listen for envelope status changes and take actions based on these changes. For example, when all recipients have signed an envelope and its status changes to “Complete,” the sender can be notified by a message in Microsoft Teams.
While this blog post only scratched the surface of what can be done with Docusign, Power Apps, and Power Automate, the possibilities are limitless! Check out more in our Power Automate Connector and User Guide.
Additional resources

Stella Kim joined Docusign as a Product Manager Intern on the eSignature Partner Apps team in 2022. During her summer internship, she worked on eSignature integrations for Microsoft, focusing on the Microsoft Power Platform. She is currently studying Psychology and Informatics with a focus in Human-Computer Interaction at the University of Washington. You can find Stella on LinkedIn.
Related posts

 DevelopersPublished Mar 21, 2025
ISV developers: Enhance your product by building a Docusign connector
 DevelopersPublished Mar 13, 2025
Docusign eSignature Integration 101: Setting the foundation

ISV developers: Enhance your product by building a Docusign connector

Docusign eSignature Integration 101: Setting the foundation
Discover what's new with Docusign IAM or start with eSignature for free


