Enhancing Sales Success with Strategic Insights from Salesforce and Docusign AI
See how to integrate Docusign AI’s contract data extraction with Salesforce Data Cloud and use AI-extracted data through Agentforce to empower sales operations.

Navigating contract terms and clauses has become a crucial yet complex responsibility for sales and revenue leaders in the dynamic environment of modern business. Without precise insights into contract language, sales teams often face prolonged deal cycles, missed compliance requirements, and revenue leakage. Traditional contract management processes are manual and error-prone, creating bottlenecks in high-stakes industries where speed and accuracy are critical. Docusign AI addresses these challenges by extracting detailed contract data—such as terms, clauses, and obligations—and transforming it into actionable insights. Paired with Salesforce’s Agentforce actions, this data enables automated workflows that streamline contract reviews, ensure compliance, and accelerate deal closures, giving businesses a competitive edge.
In the previous post of this series, we explored how legal teams and contract managers leverage Docusign AI–powered clause extraction to ensure compliance and mitigate risks. In this segment, we’ll shift focus to how Docusign AI’s contract data extraction integrates with Salesforce Data Cloud and is used through Agentforce to empower sales operations. This integration enables sales and revenue leaders to automate key tasks, gain real-time insights into contract risks and opportunities, and streamline deal processes. By adopting this AI-powered approach, businesses can achieve shorter sales cycles, enhanced operational efficiency, and a sharper focus on driving revenue growth.
The hidden cost of trapped agreement data
When agreement data remains siloed or buried in unstructured formats, it can significantly delay strategic decision-making, a problem Docusign calls the "Agreement Trap”, leading to missed compliance requirements and revenue leakage. For instance, consider a sales agreement containing an auto-renewal clause that requires notice of cancellation 60 days before renewal. Without visibility into this critical term, sales leaders and account executives might overlook the deadline, inadvertently committing the company to unfavourable terms or higher costs. For chief revenue officers, this oversight can disrupt revenue forecasts and erode profitability, as the unexpected renewal ties up budgeted resources.
Such delays and missed insights not only impact operational efficiency, but also create reputational risks, particularly in industries with stringent compliance standards, such as financial services or healthcare. Trapped data limits the ability of decision-makers to act proactively, forcing them into reactive responses that can hinder growth and strain customer relationships. By extracting and surfacing these crucial details using Docusign AI, businesses can ensure timely actions, mitigate risks, and unlock the full value of their contracts.
Implementing a solution to extract and act on trapped agreement data presents several technical challenges as well. First, agreements often exist in diverse formats—PDFs, scanned documents, or legacy systems—making it difficult to standardize and extract structured data. Advanced AI models must be trained to recognize complex legal language, varying terminologies, and nuanced contract clauses, ensuring accuracy and contextual understanding. Integration with existing CRM systems adds another layer of complexity, requiring seamless data pipelines to move extracted insights into actionable workflows without disrupting existing processes. These technical hurdles demand a robust, scalable solution that not only extracts data accurately but also integrates it effectively with tools like Salesforce to drive real-time, actionable insights.
Solution approach: Unlocking the power of Docusign CLM Data
Docusign Intelligent Agreement Management (IAM), powered by AI-driven data extraction, revolutionizes the way businesses manage agreements by tackling the challenges of trapped contract data. This solution automatically identifies and extracts key clauses—such as termination, renewal, and jurisdiction—from contracts, presenting them in a structured and actionable format. Through its applications, such as Docusign Navigator or Docusign Contract Lifecycle Management(CLM), organizations can centralize their contract processes, enabling streamlined reviews and efficient management of critical contract elements without the inefficiencies of manual effort.

The transformative power of this data becomes fully realized when it is integrated into Salesforce Data Cloud, where it is ingested, organized, and enriched to provide actionable insights. Salesforce's low-code and no-code tools further simplify the process of transforming this data into strategic advantages. Using Agentforce Actions, organizations can automate workflows, track agreement metrics, and create proactive systems that respond to real-time triggers. For instance, Agentforce can monitor deadlines for auto-renewal clauses, alert teams about impending actions, and even initiate the next steps, such as sending renewal notices or preparing negotiation documents.
Practical guide to implementing Docusign AI with Salesforce Data Cloud and Agentforce
Implementing a solution that integrates Docusign AI–powered data extraction with Salesforce Data Cloud and Agentforce requires a structured approach, combining technical integrations with process optimization. This part of the blog series outlines the steps needed to leverage Docusign Contract Lifecycle Management (CLM) data that is extracted in CSV format (as with steps mentioned in the previous post), enhance it using Salesforce Data Cloud, and automate actions using Salesforce Agentforce.
Step 1: Integrate Docusign agreement data into Salesforce Data Cloud
The first step in effectively managing and analyzing agreement data is integrating it into Salesforce Data Cloud. Organizing the data in a clear format, such as YAML, facilitates the seamless import of key agreement-related fields, including account details, document metadata, and critical flags.
Defining the data schema in YAML not only enhances clarity but also ensures precise mapping of fields such as Effective_Date, Expiration_Date, and Automatic_Renewal_Flag.
This post highlights the use of Salesforce Data Cloud’s Ingestion API to push data from DocuSign CLM in CSV format into Data Cloud. The Ingestion API, a REST-based solution, supports bulk interaction patterns and efficiently handles CSV file uploads.
This structured approach simplifies integration with DocuSign CLM, streamlining data management and enabling more efficient workflows. For a comprehensive guide, refer to the Salesforce Data Cloud Ingestion API Documentation for additional details.
1: Set up the Ingestion API connector
Navigate to Data Cloud Setup:
Go to Data Cloud Setup in Salesforce and select Ingestion API.
Create a connector:
Name the connector. For example: Docusign CLM Connector.
Upload schema (YAML file):
Define the schema in YAML format, specifying the data fields and event types (for example, Agreement Data with fields such as Account, Agreement Number and Document ID).
Upload the schema to the connector. Salesforce will create corresponding objects for each event type in the schema.
2: Create and deploy a data stream
Go to Data Streams:
In the Data Cloud App, select Data Streams and then New and Select Ingestion API.
Choose the connector:
Select the previously created connector (for example, Docusign CLM Connector).
Select objects:
Choose objects (for example, Agreement Data).
Set Object Category and Primary Key:
Category: Choose from Engagement, Profile, or Other. For Agreement Data, use Engagement.
Primary Key: Specify the key field (for example, Document ID).
Specify a timestamp field for engagements (for example, Creation Date).
Deploy the stream:
Deploy the stream. A corresponding Data Lake Object is automatically created.
3: Create a connected app
Set up the connected app:
Navigate to Salesforce Setup → App Manager → New Connected App.
Configure OAuth flows (such as JWT).
Specify OAuth scopes:
Add scopes: CDP Ingest API, API, and Refresh Token.
4: Call the Salesforce Data Cloud Ingestion API
Authenticate using Postman:
Use Postman to set variables such as Client ID, Client Secret, and Private Key (for JWT Grant flow).
Obtain an OAuth token using Salesforce's supported flow.
Create a job:
Use the Create Job endpoint and specify:
Connector Name: for example, Docusign CLM Connector.
Object Name: for example, Agreement Data.
Capture the Job ID from the response.
Upload CSV data:
Use the Upload Job endpoint:
Add the Job ID to the URL.
Attach the CSV file (headers must match the schema).
Make sure the response has been accepted: true.
Close the job:
Call the Close Job endpoint to start processing.
Monitor job status:
Use the Get Job Info endpoint to check the status. It should eventually show Job Complete.
5: Validate and explore data
Verify data in Data Explorer:
Navigate to the Data Explorer tab in Data Cloud.
Query the Data Lake Object corresponding to the data stream (for example, Agreement Data).
Step 2: Automate agreement data retrieval and upsert into Salesforce
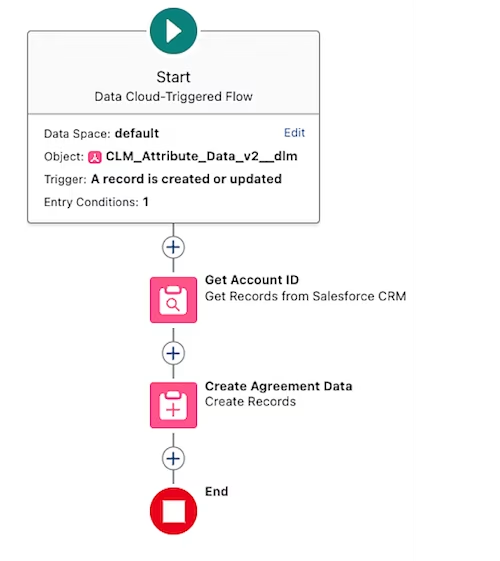
This flow automates the process of retrieving agreement data from the Agreement Data Model Object (DMO) in Salesforce Data Cloud and upserting it into a Salesforce custom object (for example, Agreement Data) for efficient management.
Salesforce Data Cloud supports autolaunched flows based on data changes, which are leveraged to extract the required data from the DMO and update the custom object in Salesforce. While this example focuses on custom objects with field indications, the same approach can be applied to update standard objects. Additionally, data elements can be extended based on CLM data points tailored to business requirements.
By implementing this step, organizations ensure data consistency and synchronization across systems, significantly reducing manual effort while enhancing data reliability.
1. Create a Salesforce object to store agreement data
Log in to your Salesforce instance.
Navigate to Setup > Object Manager by selecting the gear icon in the upper right corner
Click Create in the top-right corner and select Custom Object.
Fill in the object details (for example, Label: Agreement Data) and Save
In the object detail page, go to the Fields & Relationships section and select New.
Add the appropriate fields (such as Agreement Number, Document ID) based on your business requirements.
Once all fields are added, configure the Page Layout:
Drag and drop fields to organize them logically.
Include related lists if needed for associated objects (e.g., related documents or notes).
2: Create a flow to retrieve data from Agreement DMO
To retrieve data from the Agreement Data Object (DMO) and update the Salesforce object created earlier, follow these steps:
Access Flow Builder:
From Setup, enter Flows in the Quick Find box and then select Flows.
Select New Flow.
Select the flow type:
Choose Start from Scratch and then select Next.
Select Data Cloud-Triggered Flow as the flow type and then select Create.
Add a Get Records element:
Drag and drop the Get Records element onto the canvas.
Configure it to retrieve records from the Agreement Data Object (DMO). For example:
Object: Agreement Data Object
Filter Conditions: Define conditions to fetch only the relevant or newly created records.
Sort Order: Specify sorting if necessary (for example, by creation date).
Map data to Salesforce Objects:
Add a Create Records element to the flow.
Map the retrieved data from the DMO to the corresponding fields in the Salesforce object created in Step 1.
Make sure the mappings align with your business requirements (such as agreement details, parties involved, or status).
Connect and save:
Connect the flow elements in the desired order (for example, Start → Get Records → Create Records).
Save the flow with an appropriate name (for example, "Agreement Data Integration Flow").
Activate the flow:
Test the flow to make sure it retrieves and processes data as expected.
Once validated, activate the flow to enable its execution.
Step 3: Enhance Agentforce to act on agreement data with conversation language
To automate the retrieval of specific agreement statuses from the Salesforce Agreement Data Object using Agentforce, follow the steps outlined below. This process enables the system to fetch and present key agreement details automatically through conversational AI, streamlining agreement-related queries. Users will benefit from real-time, automated access to agreement data, improving both customer support efficiency and decision-making capabilities.
1. Build an automated flow in Flow Builder
Access Flow Builder:
From Setup, enter Flows in the Quick Find box and select Flows.
Select New Flow.
Select the flow type:
Choose Start from Scratch and then select Next.
Select Autolaunched Flow as the flow type and then select Create.
Add a Get Records element:
Drag and drop the Get Records element onto the canvas.
Configure the element to fetch data from the Agreement Data Object:
Object: Agreement Data Object.
Filter Conditions: Add conditions such as filtering by Contract Number or Agreement ID to identify the relevant record.
Store Records: Select All Records for flexibility.
Assign retrieved data to a variable:
Add an Assignment element to store the fetched data.
Create a Collection Variable (such as AgreementRecordCollection) to hold the retrieved records.
Map fields such as Agreement Status and Agreement Name to this variable for use in subsequent actions.
Save and activate the flow:
Save the flow with a descriptive name, such as "Fetch Agreement Status Flow."
Test the flow to confirm that it retrieves and processes agreement data correctly.
Activate the flow for use in Agentforce.
This flow serves as a guideline for automating the process of retrieving agreement data from Salesforce Objects and storing them in a record set, enabling the delivery of strategic insights upon inquiries from Agentforce.

2. Create an Agentforce Action
Before configuring the Agentforce Actions, ensure that Agentforce is enabled. Steps 1 through 2 cover the process of enabling Agentforce. If Agentforce is already enabled, you can skip these steps and proceed directly to Step 3.
Enable Einstein:
Open the Setup Menu and selectclick Setup.
In the Setup Quick Find, search for Generative AI and select Einstein Setup.
Toggle the Turn on Einstein switch to enable Einstein features.
Enable Agentforce for Agents:
Open the Setup Menu and selectclick Setup.
In the Quick Find, search for Agents and select Agents (under Agent Studio).
Toggle the Agentforce switch to enable it.
In the list of agents at the bottom of the screen, locate and select Agentforce (Default) (this will be the only item in the list).
Select Open in Builder in the upper-right corner to access the Agentforce configuration interface.
Create a new topic:
Remove the Default Topic.
Create the New Topic (for example, Topic Label: AgreementDataTopic) along with other relevant details and then select Next.
Check the checkbox to the left of Agent Action Label to select all available standard actions and then select Finish to save the topic.
Select Activate in the upper-right corner to enable the agent.
Navigate to Agent Actions:
In Setup, search for Agent Actions and select New Action.
Create a new action from the flow:
Choose Flow as the action type.
Select the previously created flow ("Fetch Agreement Status Flow").
Configure the action:
Input: Check Require input.
Output: Check Show in conversation.
SelectClick Finish to save the action.
3. Add the Action to Agentforce
Access Agent Builder:
From Setup, search for Agents and select Agetforce(Default).
Select Open in Builder.
Update assistant configuration:
Make sure the assistant is inactive:
If the button shows Deactivate, click it to deactivate the assistant.
From Topics, select, for example,AgreementDataTopic.
Go to This Topic’s Actions and select New.
Choose Add from Asset Library and select the newly created Agentforce Action.
Check the box and select Finish.
Activate the Assistant:
Select Activate to enable the assistant and the action.
4. Test the integration
Return to the Sales app.
Test the assistant to confirm it retrieves the agreement status or other agreement-related information as per Agent configuration using the action.
Additional key considerations
To ingest Docusign CLM data in CSV format into Salesforce Data Cloud, an alternative to using the Data Ingestion API is leveraging the Google Cloud Storage connection with Salesforce Data Cloud, as outlined in the details provided on the Salesforce Developers Blog.
SFTP is a widely adopted solution for automating the exchange of documents and data in CSV between DocuSign CLM and other systems, such as ERPs, CRMs, or third-party applications. By leveraging Secure File Transfer Protocol (SFTP) for DocuSign CLM, you can ensure secure and reliable file transfers, maintaining the integrity and confidentiality of documents throughout the transfer process. This method effectively safeguards sensitive contract data while streamlining document workflows across integrated systems.
Key benefits of the workflow
This practical solution approach leverages AI-powered insights, real-time data processing, and automation to enhance contract management, enabling sales and legal teams to make data-driven decisions with ease. At a high level, this integrated approach offers the following benefits:
Enhanced decision-making with data: Salesforce Data Cloud ingests agreement data from Docusign and enhances it with actionable insights, providing a comprehensive view of customer agreements. Sales leaders and account executives can use these insights to make informed decisions, prioritize renewals, and mitigate compliance risks.
Efficient clause identification and tracking: The AI quickly identifies and organizes complex clauses buried within lengthy agreements, enabling legal and sales teams to locate essential terms without delay. By tracking key contract obligations and risks in real time, teams can proactively manage compliance and deadlines.
Proactive automation with agents:Salesforce Agentforce automates workflows based on agreement data, such as triggering renewal reminders, scheduling approval processes, or notifying teams of potential risks. This reduces administrative overhead and ensures timely actions, freeing up resources for higher-value tasks.
Increased revenue opportunities: By leveraging enriched contract data, sales teams can identify upsell or cross-sell opportunities, forecast revenue risks, and optimize strategies. Real-time updates and insights help prevent revenue leakage and missed opportunities.
This integrated approach not only streamlines contract management processes but also empowers sales and revenue teams with actionable insights. By automating labor-intensive tasks, improving compliance, and driving efficiency, the combined power of Docusign AI, Salesforce Data Cloud, and Agentforce transforms agreement data into a strategic asset for decision-making and revenue growth.
Additional resources

Subbarao Pydikondala is a Principal Partner Solution Architect specializing in enterprise app integrations and AI readiness. With expertise in Salesforce and Docusign, he drives innovation in Revenue Cloud, Data, and AI solutions, collaborating with partners to create impactful joint solutions.
Related posts
- DevelopersPublished Apr 16, 2025
Introducing private extension apps
- DevelopersPublished Apr 16, 2025
Seamlessly integrating Maestro with data systems using data IO extensions


Introducing private extension apps
Seamlessly integrating Maestro with data systems using data IO extensions
Discover what's new with Docusign IAM or start with eSignature for free