Document generation with composite templates
See how easy it is to generate an agreement within the highly flexible composite template REST API method
Table of contents

Co-author: Robert Schendle
In this blog post, I’m going to explore just how easy it is to generate an agreement that is part of a combined composite envelope, including an existing eSignature template.
But first, why use document generation in general? Like many teams, you probably spend up to 30 minutes to prepare new documents for signature. This multistep process typically includes locating the correct template version, manually editing that template using Microsoft Word or a PDF editing tool, and entering in custom information, such as personalized details or location-specific terms that often need to be inserted before an agreement is ready to be delivered. Existing workflows don’t scale enough to customize high volumes of agreements, leaving your team stuck with manual busy-work. Docusign document generation does this customization for you.
Equally important: Why use composite templates? Composites allow for full flexibility and all options available in Docusign. The simple templateId and templateRoles model is limiting in a few ways:
Only one template can be put in an envelope
templateRoles do not provide all the options the recipients/signers model does.
You cannot combine multiple document sources (a doc from another system, a static PDF, or other) into the same createEnvelope call.
I’m also excited to include dynamic tables into this example below.
Here are a few scenarios to get your wheels turning:
HR: Generate an offer letter along with a compensation plan that may include multiple documents and a comp plan table.
Sales: A quote-to-cash scenario where Docusign can help with the generation of an agreement combined with an existing terms document or brochure.
Customer onboarding: An application website creates an embedded experience for an agreement being dynamically generated for signing
Note: Document generation is available as a separate add-on for Docusign eSignature and Docusign IAM Core. To add this feature to your account, contact the Docusign Sales team. Visit Contact Sales for options to reach our team. For development purposes, this feature is already enabled on your developer account.
Example
Generate an offer letter, a Compensation plan (dynamic table) and some other document combined into a single envelope to send for signing.
Preparation: Create a document generation template
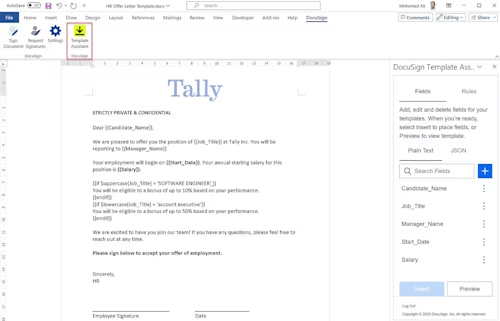
Create a document generation Word template
You will need to create a document generation template for use with Docusign. This will be created in Microsoft Word, using the Docusign Template Assistant.

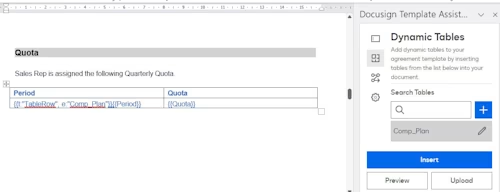
Optionally, you can also add dynamic tables:

Add signing auto-place text
You only need to make minor changes to the document you want signed, to flag where the Docusign tabs should appear. Simply enter the special auto-place text anywhere in the document that you want those fields to appear. This will be important with generated documents, as the signing tabs need to be aligned with the document as it grows and shrinks dynamically based on conditions (for example, if “travel = yes” , add the section on candidate travel requirements).
In the example below, the image shows the same Word document with the following auto-place text: “/sign1/” for the first signer and “/date1/” for the date of signing.

Just remember, in your final version, make the auto-place text white (so it’s hidden from view)!
Create Template(s)
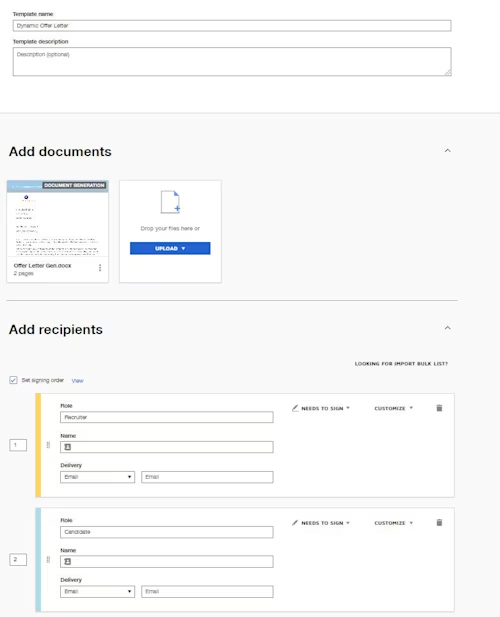
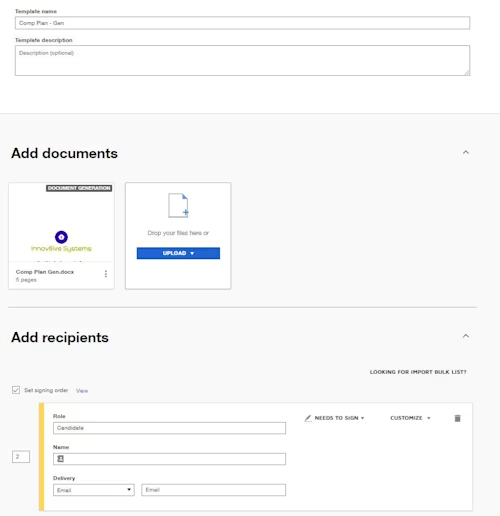
Take the Word document and upload it to Docusign as a new template. Add the appropriate tabs based on the auto-place text created in the previous step. Repeat this for the number of templates you wish to create. In my example there are two templates.
This blog won’t have the step-by-step guide on creating the template, but if you’d like to see this I've covered it in detailed in this video: Deep Dive: Document Generation for eSign.
Example: Template 1 (Dynamic Offer Letter)

Example: Template 2 (compensation plan)

Step 1: Create Composite Template
POST: https://demo.docusign.net/restapi/v2.1/accounts/{{Account ID}}/envelopes
{
    "emailSubject": "Please Sign Your Offer Letter and Comp Plan",
    "emailBlurb": "Please let us know if you have any questions.",
    "status": "created",
    "compositeTemplates": [
        {
            "serverTemplates": [
                {
                    "sequence": "1",
                    "templateId": "0dddxxxx-xxxx-xxxx-xxxx-xxxxbafc612"
                }
            ],
            "inlineTemplates": [
                {
                    "sequence": "1",
                    "customFields": {
                        "textCustomFields": [
                            {
                                "name": "customerID",
                                "value": "0980981",
                                "show": "true"
                            }
                        ]
                    },
                    "recipients": {
                        "signers": [
                            {
                                "email": "{{Recruiter Email}}",
                                "name": "{{Recruiter Name}}",
                                "roleName": "Recruiter",
                                "recipientId": "1"
                            },
                            {
                                "email": "{{Candidate Email}}",
                                "name": "{{Candidate Name}}",
                                "recipientId": "2",
                                "roleName": "Candidate"
                            }
                        ]
                    }
                }
            ]
        },
        {
            "serverTemplates": [
                {
                    "sequence": "1",
                    "templateId": "a149xxxx-xxxx-xxxx-xxxx-xxxxf152f397"
                }
            ],
            "inlineTemplates": [
                {
                    "sequence": "1",
                    "recipients": {
                        "signers": [
                            {
                                "email": "{{Candidate Email}}",
                                "name": "{{Candidate Name}}",
                                "recipientId": "2",
                                "roleName": "Candidate"
                            }
                        ]
                    }
                }
            ]
        }
    ]
}
Step 2: GET Document docGenFormFields
POST: https://demo.docusign.net/restapi/v2.1/accounts/{{Account ID}}/envelopes/{{Envelope ID}}_/_docGenFormFields
This will return the documentId for each document within the template.
In Postman, you can save these variables in the Test tab as follows:
var jsonData = JSON.parse(responseBody);
postman.setEnvironmentVariable("Document ID", jsonData.docGenFormFields[0].documentId);
postman.setEnvironmentVariable("Document ID 2", jsonData.docGenFormFields[1].documentId);
Step 3: Add Merge Fields
PUT: https://demo.docusign.net/restapi/v2.1/accounts/{{Account ID}}/envelopes/{{Envelope ID}}/docgenformfields?update_docgen_formfields_only=false
{
  "docGenFormFields": [
      {
          "documentId": "{{Document ID}}",
          "docGenFormFieldList": [
              {
                  "label": "Candidate Name",
                  "name": "employeeName",
                  "required": true,
                  "type": "TextBox",
                  "value": "Candidate Carl"
              },
              {
                  "label": "Start Date",
                  "name": "hireDate",
                  "required": true,
                  "type": "TextBox",
                  "value": "12/1/22"
              },
              {
                  "label": "Starting Salary",
                  "name": "baseSalary",
                  "required": true,
                  "type": "TextBox",
                  "value": "$40,000"
              }
          ]
      },
      {
          "documentId": "{{Document ID 2}}",
          "docGenFormFieldList": [
              {
                  "label": "employeeName",
                  "type": "TextBox",
                  "required": "True",
                  "name": "employeeName",
                  "value": "Sally Salesy"
              },
              {
                  "label": "baseSalary",
                  "type": "TextBox",
                  "required": "True",
                  "name": "baseSalary",
                  "value": "$50,000"
              },
              {
                  "label": "totalVariable",
                  "type": "TextBox",
                  "required": "True",
                  "name": "totalVariable",
                  "value": "$50,000"
              },
              {
                  "label": "Comp_Plan",
                  "type": "TableRow",
                  "required": "True",
                  "name": "Comp_Plan",
                  "rowValues": [
                      {
                          "docGenFormFieldList": [
                              {
                                  "label": "Period",
                                  "type": "TextBox",
                                  "required": "True",
                                  "name": "Period",
                                  "value": "Q1"
                              },
                              {
                                  "label": "Quota",
                                  "type": "TextBox",
                                  "required": "True",
                                  "name": "Quota",
                                  "value": "$200,000"
                              }
                          ]
                      },
                      {
                          "docGenFormFieldList": [
                              {
                                  "label": "Period",
                                  "type": "TextBox",
                                  "required": "True",
                                  "name": "Period",
                                  "value": "Q2"
                              },
                              {
                                  "label": "Quota",
                                  "type": "TextBox",
                                  "required": "True",
                                  "name": "Quota",
                                  "value": "$300,000"
                              }
                          ]
                      },
                      {
                          "docGenFormFieldList": [
                              {
                                  "label": "Period",
                                  "type": "TextBox",
                                  "required": "True",
                                  "name": "Period",
                                  "value": "Q3"
                              },
                              {
                                  "label": "Quota",
                                  "type": "TextBox",
                                  "required": "True",
                                  "name": "Quota",
                                  "value": "$400,000"
                              }
                          ]
                      },
                      {
                          "docGenFormFieldList": [
                              {
                                  "label": "Period",
                                  "type": "TextBox",
                                  "required": "True",
                                  "name": "Period",
                                  "value": "Q4"
                              },
                              {
                                  "label": "Quota",
                                  "type": "TextBox",
                                  "required": "True",
                                  "name": "Quota",
                                  "value": "$500,000"
                              }
                          ]
                      }
                  ]
              }
          ]
      }
  ]
}
Step 4: Send Envelope
PUT: https://demo.docusign.net/restapi/v2.1/accounts/{{Account ID}}/envelopes/{{Envelope ID}}
{
    "status": "sent"
}
That’s all there is to it. Now take it for a spin!
Additional resources

Mo is a Principal Solution Architect with over 20 years of experience working with companies of all sizes, helping them realise their digital strategies. Mo is based on Australia, loves all things low-code, architecture, and is currently attempting to master the art of dad jokes.
Related posts

 DevelopersPublished Mar 21, 2025
ISV developers: Enhance your product by building a Docusign connector
 DevelopersPublished Mar 13, 2025
Docusign eSignature Integration 101: Setting the foundation

ISV developers: Enhance your product by building a Docusign connector

Docusign eSignature Integration 101: Setting the foundation
Discover what's new with Docusign IAM or start with eSignature for free


