Customize your clickwraps with client-side coding
New JavaScript properties in the Click script let you apply CSS attributes to your clickwrap.
Table of contents

We are thrilled to announce a new addition to our Click code snippet, clickwrap customization. Gone are the days of generic clickwraps that don’t fit your website’s theme. You can now use CSS styling to further integrate your clickwrap with your web design and create a more cohesive experience for your users.
This feature is already available in production as an early access feature (as defined in our Sites and Services Terms and Conditions) for click customers and you can get started using it with a free developer demo account right now. Here is a quick introduction on how you can start working with clickwrap customization.
Customizing your clickwrap
To start, you’re going to need to create a clickwrap. You can create one in your developer account, or if you feel like getting your hands dirty, you can use the Click API to create one by following our how-to. Once you have one created, you’re going to want to follow the guide on embedding the clickwrap in your website.
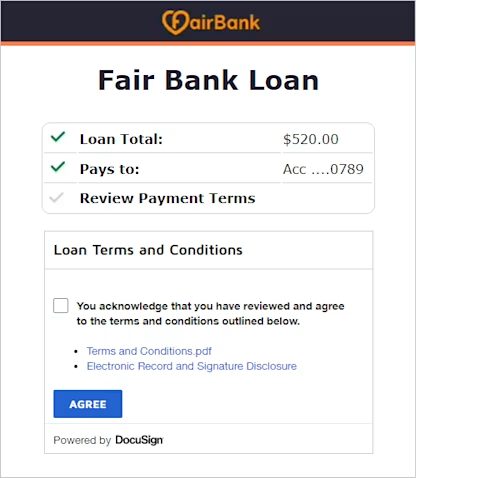
Now that you have all the setup done, you should have a clickwrap ready to go and embedded in your site. It should look something like the following screenshot.

While there’s nothing wrong with typical Docusign design, it might not fit with the scheme of your website. So let’s have some fun with it by adding some code to the clickwrap. Luckily, if you know CSS, you already know how to do this.
All you have to do is add the style attribute to the clickwrap, with some predetermined CSS properties that you want to change. You can find a full list of which properties you can change in our API 101 for customizing clickwraps. The following code changes the clickwrap to be a little cleaner, and changes the colors to be more inline with the Fair Bank colors.
<div id="ds-clickwrap"></div>
<script src="https://demo.docusign.net/clickapi/sdk/latest/docusign-click.js"></script><script>
  docuSignClick.Clickwrap.render({
    environment: 'https://demo.docusign.net',
    accountId: 'xxxxxxxx-xxxx-xxxx-xxxx-xxxxxxxxxxxx',
    clickwrapId: 'xxxxxxxx-xxxx-xxxx-xxxx-xxxxxxxxxxxx',
    clientUserId: 'UNIQUE_USER_ID',
    documentData: {
      fullName: 'Full Name',
      email: 'Email',
      company: 'Company',
      title: 'Job Title',
      date: 'Date'
    },
    style: {
      agreeButton: {
        color: "white",
        backgroundColor: "#fa9202",
        width: "100%",
        borderRadius: "10px"
      },
      header: {
        display: "none",
      },
      container: {
        borderRadius: "10px"
      },
    }
  }, '#ds-clickwrap');
</script>
Just like that, adding those simple CSS properties turns the clickwrap into something a little more inline with the website that it’s a part of.

Now just imagine what someone with some actual design experience could accomplish with this new feature! ;-) If you would like to learn more about customizing clickwraps, check out the how-to and our API 101 guide.
Additional resources

Connor Lunsford joined Docusign in 2021 as a software engineer in the Rotation Program. Since joining Docusign he has worked with the Developer Content team on several internal projects as well as the code launchers, and he is currently working with the Click team on features for the Click API. You can reach Connor on Linkedin.
Related posts
Docusign IAM is the agreement platform your business needs


