
Blog series: Building a CLM–Power Automate custom connector: Building a connector
In part 3 of his series, Marty Scholes walks you through the process of creating a custom Power Automate connector to Docusign CLM.

This is it: the moment you have been waiting for. By the end of this post, you will have built a safe and reliable Power Automate custom connector that you can take into the real world and start using immediately to interact with CLM through Power Automate flows.
Introduction
As noted in my previous post, Power Automate custom connectors do not support the Docusign JWT Grant flow, and the Docusign Authorization Code Grant flow requires regular reauthorization by the user. This post will provide solutions to overcome those limitations.
First, let’s discuss Power Automate custom connectors.
Overview of custom connectors
Power Automate custom connectors provide a simplified facility for interacting with other systems using Power Automate flows. By providing some parameters during the connector definition, you can make the connector immediately available for use.
Integration type
The Authorization Code Grant flow works reasonably well for per-user integrations with Power Automate, but system-wide JWT integrations do not have native Power Automate support. You are going to build a connector that will work for a system-wide integration, using Authorization Code Grant flow, but with a twist. Before starting, make sure that you have created an integration key as detailed in the Docusign eSignature Admin Guide: Apps and Keys.
When you create the integration key, you will need to assign the redirect URI, but you do not have that defined yet. Use a placeholder, such as “https://localhost” for now. Securely store the following information somewhere because you will not have the chance to retrieve this information after the integration key is created:
RSA private key
Secret key
Make sure that you have an integration user defined. For this blog post, you can use your own user ID, but for a real deployment, a dedicated integration user should be defined. Make sure that the user has granted consent to the integration key, as outlined in our blog post OAuth JWT: Granting Consent.
For the consent grant, make sure you use the scope defined in the Security section below.
Build the connection
When building a Power Automate custom connector for Docusign CLM, be aware that Power Automate custom connectors assume a single host for all calls through the connector. This means that the three different hosts for CLM API calls—general, upload, and download—will each need their own custom connector.
Creating a custom connector involves the following steps.
Start
General
Security
Definition
Code (Preview)
Test
Start
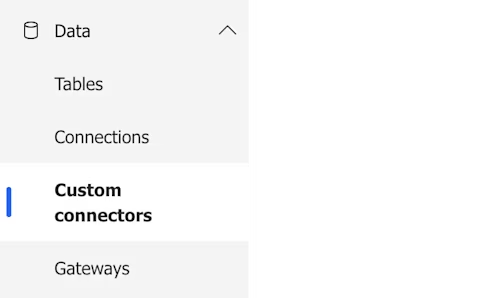
To get started, log into Power Automate. On the left menu, select Data > Custom connectors.
In the upper right corner, select the option + New custom connector to see the below dropdown list of options.
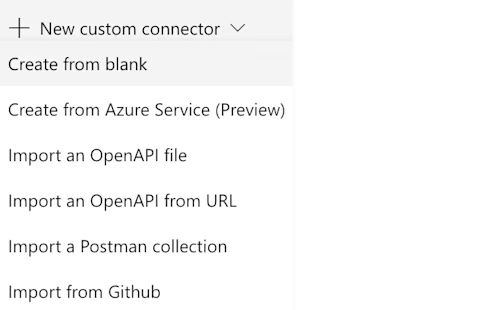
There are several approaches to defining the API calls used in the connector. If you have a Postman collection for CLM, you might try to import it, but my experience is that the import process creates more problems than it solves. Instead, select Create from blank to see the dialog box asking for a connector name. In the example below, I named the connector “Blog Test ACG.”

Select Continue to see the General tab.
General
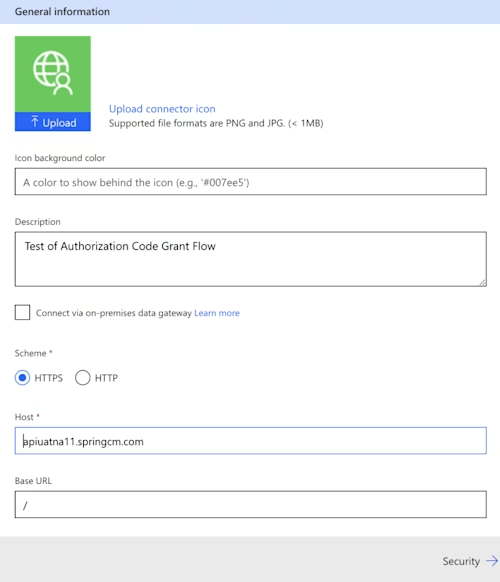
The General tab collects general information about the custom connector. Here you can customize the image and colors of the connector and give it a description. Choose the default scheme of HTTPS. For the host, recall that three hosts are used for CLM API calls. The three hosts are listed in the Base URLs API call. In my development environment, the three hosts are:
The first URL is used for most operations. The download and upload URLs are used for downloading and uploading document content. For this example, you are going to use the general URL: the first one. Perform the Base URL API call above to identify the base URLs for your environment. From the API response, identify the URL corresponding to ApiBaseUrl and place the hostname into the Host field. Do not include the leading “https://” portion of the URL. The final field, labeled Base URL, contains the path prefix for API requests. Leave the default slash. An example of the definition is in the image below.
Next, move to the Security tab.
Security
The Security tab defines which authentication mechanism the custom connector will use. Authorization Code Grant is the only mechanism Docusign and Power Automate have in common, so you will use it. Select the authentication type of OAuth 2.0.
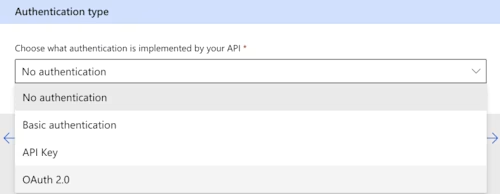
The OAuth 2.0 form takes several parameters as shown in the image below:
Identity Provider
Client id
Client secret
Authorization URL
Token URL
Refresh URL
Scope
Redirect URL
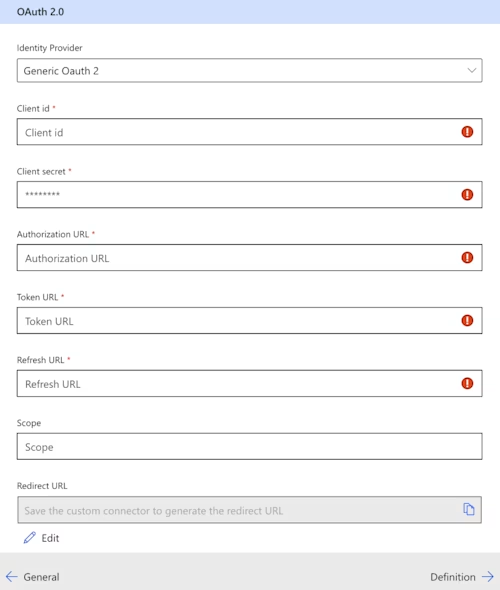
Identity Provider
The Identify Provider parameter enables shortcuts for common identity providers. Docusign is not on the list, so select Generic Oauth 2.
Client id
The Client id is the GUID of the integration key you defined in Docusign.
Client secret
The Client secret is the Secret Key you recorded when you defined the integration key in Docusign.
Authorization URL
The Authorization URL varies between production and demo, as detailed in the below page:
https://developers.docusign.com/platform/auth/authcode/authcode-get-token/
For Demo accounts: https://account-d.docusign.com
For Production accounts: https://account.docusign.com
Token URL
The Token URL is the Authorization URL with additional path components of /oauth/token.
For Demo accounts: https://account-d.docusign.com/oauth/token
For Production accounts: https://account.docusign.com/oauth/token
Refresh URL
The Refresh URL is the same as the Token URL.
For Demo accounts: https://account-d.docusign.com/oauth/token
For Production accounts: https://account.docusign.com/oauth/token
Scope
Scope controls what capabilities the user consents granting to the integration. A complete list is here:
https://developers.docusign.com/platform/auth/reference/scopes/
For testing purposes, use the following scope, which is too permissive for a real application, but allows for many operations in testing:
impersonation signature spring_read spring_write organization_read user_read account_product_read content extended
Scope is a single string of scope names, separated by spaces. The above scope has nine scope names listed. All are important, but the final scope name, “extended”, is critical for this connector to continue to work unattended.
Note: The scope you enter here must correlate to the scope used for the user consent grant above. In particular, the user consent grant must have at least the scope names used in the integration. If the integration attempts to authenticate with a scope name for which the user did not grant consent, then the integration will not be able to authenticate with Docusign. If you need the user to grant more scope names, simply perform the consent grant again with the complete list of scope names.
Redirect URL
The Redirect URL is defined for you, but must be added to the integration key information in Docusign. Copy the Redirect URL, and then add that to the integration key redirect URI in Docusign.
Next, move to the Definition tab.
Definition
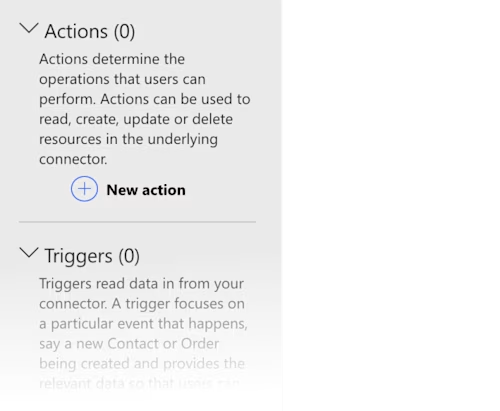
You will define the API calls in the Definition tab. For each API call you use, the first step is to add a new action by selecting + New action as shown in the image below.
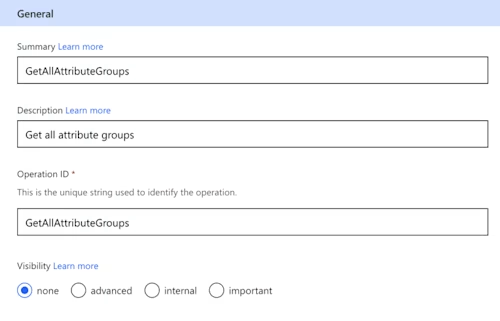
Fill out the form to specify the API call you’re using in this action. For now, fill in the fields as shown in the image below to define an API call that will list all attribute groups. You’ll need to repeat this process for each API call you use in your connector.
The next step is to define the request. Defining the request for CLM API calls is a little unusual because the API request path contains parameters. Select + Import from sample as shown below.

Complete the form as shown below. The HTTP verb is GET. Other CLM API requests use POST, PUT, or PATCH. The URL is the URL of the API call, and the host portion must match the host defined above. Note that the path contains “{AccountId}”, telling Power Automate that the path of the request contains a parameter named AccountId. Leave the Headers section blank then select Import.
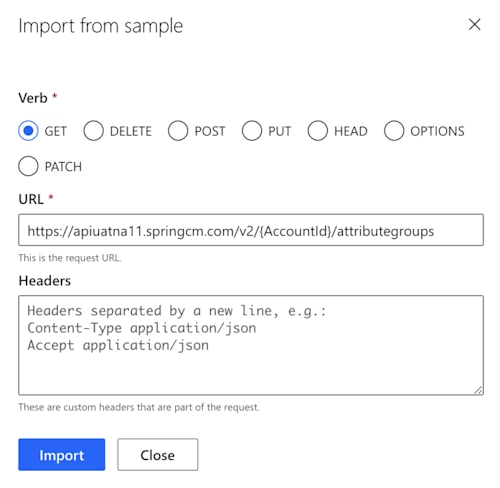
You have defined an action that should look like the image below. Note that AccountId was recognized and identified as a parameter.
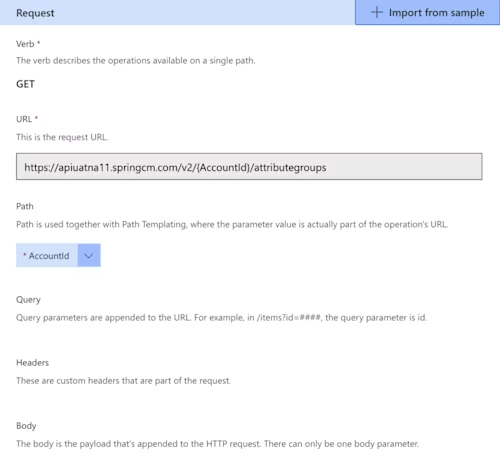
You have defined the first API request. Continue to Code (Preview)
Code (Preview)
For our purposes, this tab is unnecessary. Continue to Test.
Test
This is where you can test your connector and action. Before testing, select Create Connector to define it within Power Automate. If you test the connector, it will fail, even if it is working correctly. It is unclear why Power Automate CLM connector tests fail, but you can test it by creating a flow.
Select Update Connector to persist any changes, and then select My flows on the left navigation pane. Select + New Flow up top, and then select Instant cloud flow as shown below.
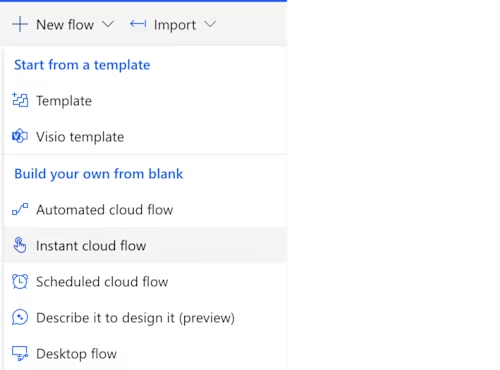
Give your flow a name and select Manually trigger a flow, as shown in the image below. Select Create.
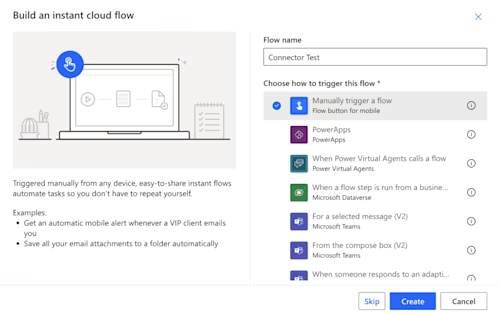
You should see the flow designer with an empty flow, as shown below.

Select + New Step to see the Choose an operation dialog box, as shown below. Select the Custom tab to see your custom connectors. I have three listed.
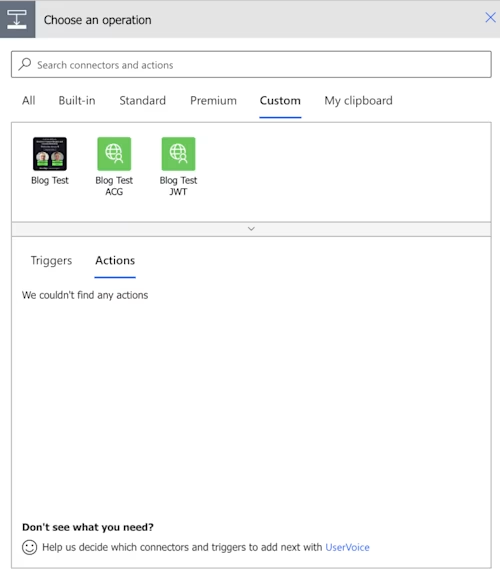
Select the name of your connector to see the action that you defined above.
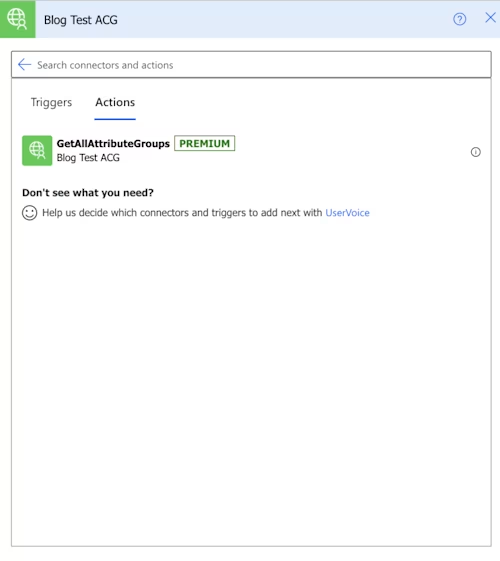
Select GetAllAttributeGroups to be prompted to sign in to Docusign.

Select Sign in to authenticate with Docusign. When you’re authenticated, the step will prompt for an Account ID.

Populate this with your Account ID GUID, and then select Save. After the flow is saved, select Test in the upper right corner to see the testing options
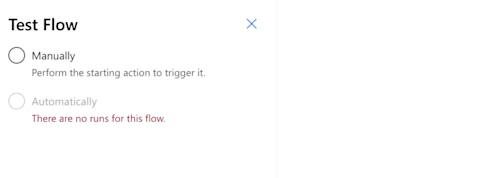
Since the only option is Manually, select that, and then select Test. Power Automate will display the connection information to confirm that this is the connection you intend to use.
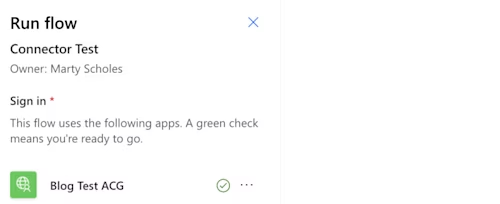
Select Continue. A confirmation dialog will confirm that the test has been started.

Select the link for Flow Runs Page to see the run history.

You can see that the test succeeded. Select the Start time to see the run summary.

Despite the test failing in the custom connector definition, it worked here. To see the information retrieved by the API request, select GetAllAttributeGroups. The flow step will expand to show the inputs and outputs. You can confirm that the outputs list your attribute groups.
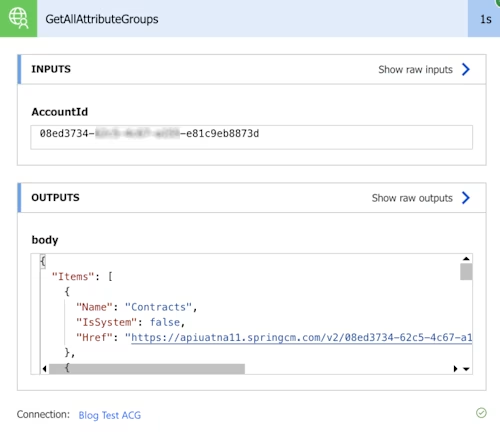
You have just created a connector with one API request defined and confirmed that it is connecting to CLM using the Authorization Code Grant flow. Your connector and connection will work well until the access token expires in 30 days. The next section explains how to avoid access token expiration.
Heartbeat
You may recall from my previous post that adding “extended” to the scope list gives the access token a lifetime of 30 days and a refresh token that will allow new access tokens indefinitely. In theory, once a connection is established, Power Automate should correctly manage the refreshes forever. In my experience, the connections can still become invalid given enough idle time.
The secret, then, is to minimize idle time so that the connection stays fresh. The way to do this is with a heartbeat process, also known as a tickler or keep-alive process. All you need to do is make sure that the connection is used regularly. To make this happen, set up an automated cloud flow with only one step: a single API call to CLM, using the same connection that your integration uses. Set this flow to run regularly; for example, daily. The flow will consume one or two seconds of CPU time per day, adding effectively zero overhead to the process, but ensuring that the connection does not become stale.
In case the connection does expire, monitor the mailbox associated with the Power Automate user who established the connection. Power Automate is kind enough to send an email that the connection has a problem.
Conclusion
This post walked you through the process of building a Power Automate custom connector that can be reused in multiple applications. Once established, the connection will persist indefinitely through a heartbeat process and you will be notified if the connection has errors.
As promised in the first post, in the next and final post, you will build multiple real-world integrations that will:
Trigger the Wait for Signal workflow step from within CLM
Move documents and metadata in and out of CLM
Start a Doc Gen form, possibly with prefilled values
Start a workflow, with or without data in Params
Query CLM directly from a chatbot
Additional resources

Marty Scholes has over 20 years of broad experience in the development and administration of database, storage, network systems, applications, and service management. He leads a team of Docusign Partner Success Architects who assist Docusign partners to design and deliver solutions that delight clients. Marty helps people master deep technical concepts so that they can make the most of technology.
Related posts

 DevelopersPublished Mar 21, 2025
ISV developers: Enhance your product by building a Docusign connector
 DevelopersPublished Mar 13, 2025
Docusign eSignature Integration 101: Setting the foundation

ISV developers: Enhance your product by building a Docusign connector

Docusign eSignature Integration 101: Setting the foundation
Discover what's new with Docusign IAM or start with eSignature for free


