
Beyond eSignature for Salesforce, part 2: Clever Send
The Docusign Apex Toolkit lets you implement complex workflows on Salesforce.

In my previous blog post, I shared a useful approach (Smart Send) to minimize the number of buttons on an object layout and ensure the correct envelope template was selected. This benefited users by reducing UI clutter and human error, giving them a better user experience. Smart Send takes a click-not-code approach to extend beyond the standard eSignature for Salesforce capability and works great for non-technical users.
For businesses with more advanced workflows and who have technical expertise, Apex Toolkit might be what you’re looking for. It is part of our Docusign eSignature for Salesforce package.
Why Clever Send?
Clever Send was born from a customer problem which required dynamic supplementary documents added to envelopes via Salesforce based on very specific conditions and then sent out quickly.
I have taken into account privacy considerations of the customers and adapted the example I am about to share. For instance, the customer required a standard application form to be sent to different countries. Together with each of these application forms, terms and conditions (T&C) documents would have to be attached as supplementary documents, and these T&Cs were different across countries. The standard out-of-the box-solution or Smart Send could work. However, it was not sustainable to create multiple envelope templates if it was one standard document and only the supplementary T&C documents changed. What if there were 200 countries to send to? Am I going to create 200 envelope templates or manually attach T&C one at a time? No way!
Introducing Clever Send! First, Clever Send is a one-click wonder and saves the sender effort and time skipping the step-by-step envelope preparation wizard. In addition, the sender does not need to manually manage similar envelope templates and add supplementary documents. Clever Send goes one step further to reduce a lot of time and human error by automatically adding personal access codes to the envelopes on the fly.
Example
In the example above, you saw a custom Lightning component (Clever Send):
Provide flexibility by populating envelope templates into a dropdown so that users can select the template of choice
Reduce envelope preparation time with a one-click to send envelopes out
Enhance security by authenticating the signer by adding a personal access code using the signer’s date of birth
Reduce time and effort for the signer by merging field values from Salesforce to complete the application form
Ensure that signer views and accepts dynamically added supplementary document(s) from the Salesforce Content store
Allow the sender to track the envelope at different stages, when it was sent as well as signed
The setup
Note: This section onwards is more relevant for technical developers.
I highly recommend anyone working on Apex Toolkit to attend a course from Docusign University: Build Docusign eSignature Solutions with the Apex Toolkit. As a developer, you’ll learn about:
Apex Toolkit
Lightning Web Components
Flow and Process Builders
Salesforce Developer Experience (SFDX)
Deployment of Dev code to Prod environment
The greatest takeaway I had was learning about SFDX. Before learning about SFDX, I was using the Salesforce Developer Console and found it extremely difficult to troubleshoot and, needless to say, develop. To find out more about SFDX, sign up for the course.
Tips and tricks
Instead of reiterating what was taught in the course, I figured I would share tips and tricks with the aim to:
Add value to the Salesforce developer community to save developers time
Reassure developers and customers on the power and flexibility of Docusign Apex Toolkit to achieve complex requirements
The full sample project can be found on the Docusign GitHub.
Tip 1: Salesforce Developer Experience
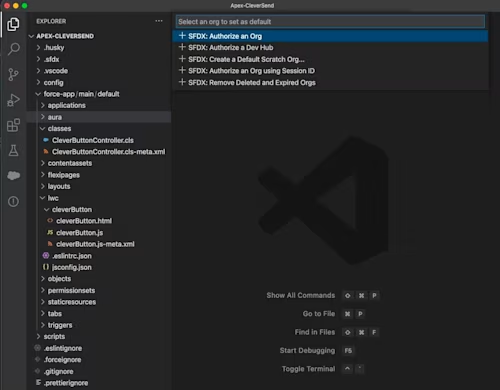
Unless you are developing a quick win, I recommend you to leverage the Salesforce Extension Pack for Visual Studio Code. It gave me a much better Salesforce Developer Experience (SFDX) than manually creating classes on Salesforce and coding them using Developer Console. After authorizing my Salesforce Organization, deployment of code became seamless and troubleshooting time was significantly reduced. I also appreciated the organized project structure that generated boilerplate folders so that I know where different components should go. From this, I learned how critical it was to use the right tool for the right job.
Tip 2: Salesforce Apex and Apex Toolkit (back end)
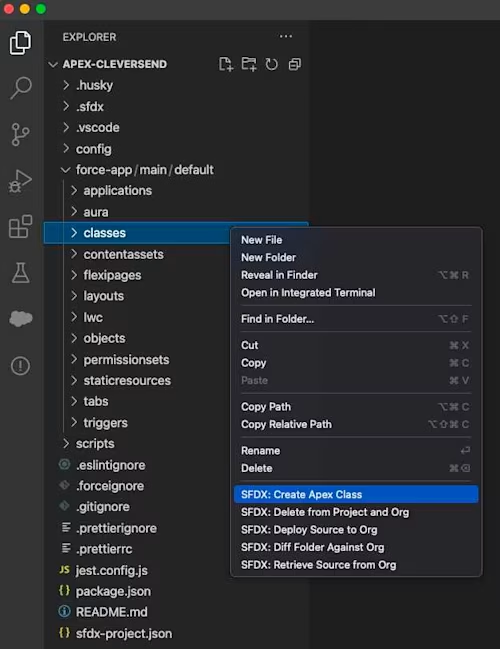
As a preference, I prefer working off the back end first. Salesforce Apex is similar to Java: it is strongly typed and object-oriented. SFDX made it really easy to create Apex classes as shown above.
Tip 2.1: Dynamic Supplementary Documents
The impetus of the project! Like all solutions I recommend, it had to be fast, sleek, effective, and efficient. Apex Toolkit was the way to go. Docusign Apex Toolkit, Salesforce’s Apex, and Salesforce’s Object Query Language work closely together. This means that we can do amazing stuff. In this instance, an envelope had one standard document (application form) and dynamic supplementary documents (different terms and condition forms for different countries) added on the fly.
Below is an example of how supplementary documents were added:
//	Attached documents based on some logic
List<string> supplementaryDocIDs = new List<string>();
try {
    supplementaryDocIDs.add('0694W00000IKQR4QAP');
}
catch(Exception e){
    System.debug('Supp Doc error');
}

//	Add supplementary documents to envelope
try {
    //  The ID of a document stored in a Salesforce library
    for(Integer i = 0; i  docList = dfsle.DocumentService.getDocuments(ContentVersion.getSObjectType(), new Set <id> {myFileId});
        dfsle.Document suppDocument = docList.get(0);

        suppDocument.withSupplementalOptions(new dfsle.Document.SupplementalOptions(
            dfsle.Document.SIGNER_ACKNOWLEDGEMENT_VIEW_ACCEPT,      // Signer must view and accept this document
            true));     // Include this document in the combined document download.

        envDocList.add(suppDocument);
    }

    //	Adding all documents into envelope
    myEnvelope = myEnvelope.withDocuments(envDocList);
}
catch(Exception e){
    System.debug('error');
}</id></string></string>
Tip 2.2: Personal DOB access codes
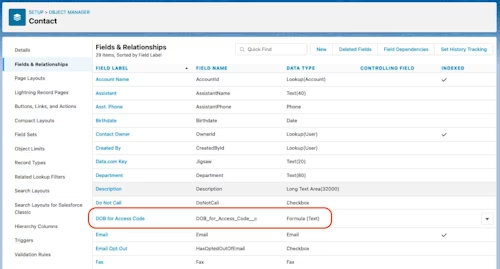
Personal access codes were added to envelopes based on the contact’s date of birth (DOB). This was achieved using a Formula field, as seen above, and parsing it into the envelope using Apex Toolkit:
// Adding access code based on Contact's DOB
dfsle.Recipient.Authentication authentication = new dfsle.Recipient.Authentication(myContact.DOB_for_Access_Code__c, false, null);
myRecipient.withAuthentication(authentication);
System.debug('DOB Access Code: ' + myContact.DOB_for_Access_Code__c);
Tip 2.3: Linking Docusign envelopes to a Salesforce object
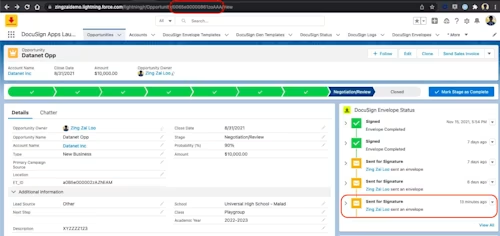
In the prebuilt out-of-the-box Docusign eSignature for Salesforce extension, most of the heavy lifting is being done for us. In this instance, since I was building a custom Lightning Web Component, I had to update custom fields to link Docusign envelopes with the respective Salesforce object myself.
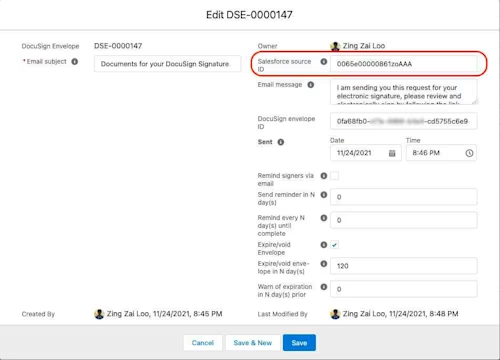
Getting envelope updates on Salesforce was crucial, as I did not want to straddle between Salesforce and Docusign to track my envelopes. This was achieved by updating a custom field:
//	Set SF ID to link envelope to SF object for tracking
dfsle.CustomField sf_source_id = new dfsle.CustomField('text', 'dfsle__SourceId__c', recordId, items, true, false);
myEnvelope = myEnvelope.withCustomFields(new List<dfsle.customfield> {sf_source_id});</dfsle.customfield>
Tip 3: Lightning Web Components (front end)
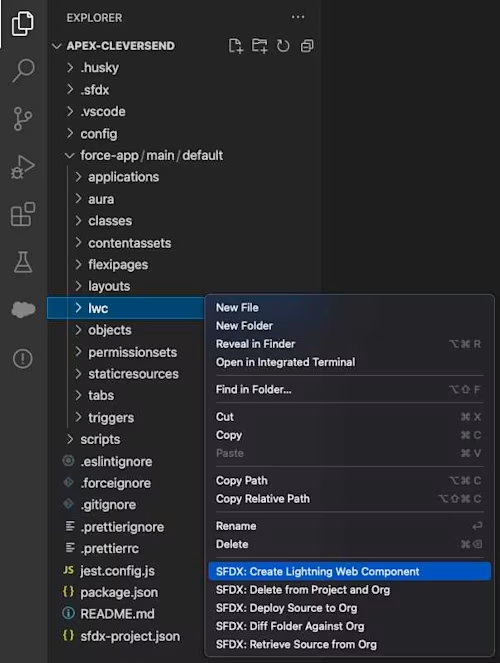
Similar to creating an Apex class, Lightning Web Components (LWC) can also be easily created. After creating a LWC, a folder with three files (HTML, JS, and XML) will be created.
Tip 3.1: Populate the combobox with templates and update the respective template ID upon selection
Since the spring of 2020, fields have had to be decorated with @track to make the component re-render. Today, today all fields are reactive, which is great because the components re-render when their values change.
Given that the update was pretty recent, documentation regarding this is still pretty limited online.
Refer to the connectedCallback and handleChange methods to re-render the component to update the template ID whenever a template has been selected from the dropdown list.
<lightning-layout-item padding="around-small"><p>Selected template ID: {value}</p>
  <lightning-combobox name="progress" value="{value}" placeholder="Select Progress" options="{options}" onchange="{handleChange}"></lightning-combobox></lightning-layout-item>

//  Populate combobox with templates
connectedCallback() {
    getDocuSignTemplates()
        .then(result => {
            for (var i = 0; i  {
            console.log(JSON.stringify(error));
        });
}

//  Update template ID
handleChange(event) {
    this.value = event.detail.value;
}
Tip 3.2: Provide feedback with a loading spinner and show success message
Even though this was a proof-of-concept, I have added a spinner to provide feedback to the user after an envelope was sent successfully to give the sender a better user experience. This was achieved by adding a spinner and linking up to the returned Promise.
<template if:true="{isLoading}"><lightning-spinner alternative-text="Loading..."></lightning-spinner></template><template if:true="{error}">
    {errorMessage}
</template>

handleClick() {
        this.isLoading = true;            // Turn on spinner

        sendEnvelope({ recordId: '5004W00001XSwJHQA1', template: this.value, description: 'Template' })
            .then((envelopeId => {
                this.sent = true;
                this.sentMessage = "Envelope " + envelopeId + " successfully been sent.";
                this.isLoading = false;   // Turn off spinner
            }))
            .catch( error => {
                console.log(error);
                this.error = true;
                this.errorMessage = "Envelope error. Contact Admin";
                this.isLoading = false;
            })
    }
Conclusion
You have seen the power of the Apex Toolkit. It is an extremely powerful set of predefined methods that enable developers with the right tools to perform any kind of custom integrations with Docusign. Have a try today!
Additional resources

Zing Zai Loo is a Docusign solutions engineer with our APAC region. He enjoys using his knowledge in products and skills in engineering to help solve customers' problems in the fastest and most efficient manner.
Related posts
Docusign IAM is the agreement platform your business needs


