Comments: Real-Time Collaboration in Agreements
Everything you need to know about enabling and using comments in Docusign agreements.
Table of contents

It’s only natural to have questions before signing a contract and Docusign eSignature's comments feature allows users to pose those queries before electronically signing agreements or contracts. Using comments makes it easier for all parties to collaborate in real-time to discuss contract specifics and address concerns to keep the contract process moving forward.
Comments are available to all Docusign customers as a way to help expedite the collaboration process, while lowering risk by keeping a record of exchanges.
How to enable comments in Docusign eSignature
To help you hit the ground running, here’s a quick explainer on how to turn on comments.
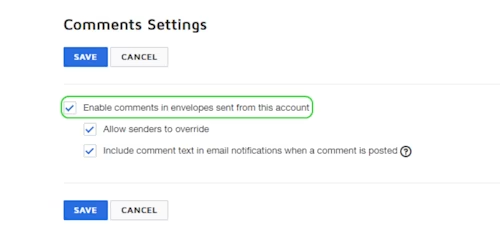
In Docusign eSignature Admin, select Comments.
Select “Enable comments” in envelopes sent from this account
If you wish, you can select “Allow senders to override” to enable senders to enable and disable comments for an envelope through the advanced options
Select Save.

Now that you know how to turn on comments, here are some quick tips to help you get the maximum value out of the feature.
Control whether comment text is included in email notifications
Depending on your type of organization, you may or may not want comment text to appear in email notifications. With comments, the choice is entirely in your control. Comment text is included by default in emails, but if you are an account admin, you can turn this feature off and on.
To control whether comment and reply text is included in email notifications:
Log in to your Docusign account.
In your Docusign account, click the account menu drop down in the upper right corner and select Go to Admin, which opens Docusign Admin.
On the right under Comments Settings, check “include a comment text in email notification when a comment is posted” to include comments in emails, then save.
To disable the inclusion of comment and reply text in email notifications, uncheck “Include comment text” in email notifications when a comment is posted and save.
Choose the frequency of comment notifications on envelopes you send and receive
Each account holder can control the frequency of comment notifications. You can change the frequency of comment notifications for either documents you are sending out for signature or for documents you have received and have been asked to sign.
If you feel like you're getting too many email notifications about comments on documents you're sending for signature, you can change the frequency of notifications you're receiving. The change applies to all documents you send from your account.
Once you’ve logged into your account, go to My Preferences, select “Signing and Sending”, and then toggle to Notifications.
To enable comment notifications, check “a comment is posted in an envelope I've sent.”
To disable comment notifications, uncheck “a comment is posted in an envelope I've sent.”
You can further customize the frequency of notifications by choosing whether you are notified every time one of your recipients comments or replies to a comment or whether the recipient chooses to reply only to you.
To receive notifications for all comments and replies, choose “All comments.” To receive notification of comments sent only to you, choose “Only comments that mention me or are private to me.” Don’t forget to save.
Conversely, if you feel like you're getting pinged too many times about comments in envelopes you're asked to sign, you can change the frequency of notifications you're receiving. The change applies to all envelopes you receive that are sent to the email address associated with your account. You can only change the frequency of comments notifications you're receiving if you have an account with Docusign.
In your account, go to My Preferences, select “Signing and Sending”, and choose Notifications
On the right under receipt notifications, select “a comment is posted in an envelope that’s been sent to me” to enable notifications
To disable comment notifications, uncheck “A comment is posted in an envelope that's been sent to me.”
You can further customize the frequency of notifications by choosing whether you are notified every time one of your recipients comments or replies to a comment or whether the recipient chooses to reply only to you.
To receive a notification for all comments and replies, choose “All comments”.
To receive a notification of comments sent only to you, choose “Only comments that mention me or are private to me.
Hit Save once you’ve made your selections
Accessing the Notification Center
Log in to your Docusign account.
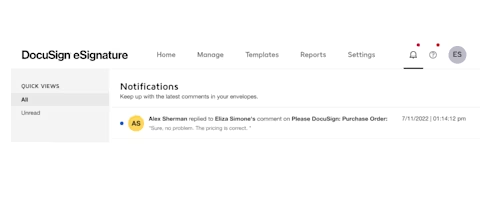
After logging into your Docusign account, click the Notification Center icon in the upper right. If there is a red dot next to the Notification Center icon, it means you have a new comment or reply.

In Notification Center, select the comment or reply you want to view. You can sort comments by selecting “All or Unread” on the left. Selecting a comment in the notifications list opens the document and takes you to the comment or reply.
Want to learn even more about how Comments can make coming to agreement simpler and easier? Look no further.
If you are not a Docusign customer, you can try eSignature with a free trial.
Related posts

The Checklist Every New General Counsel Needs
Discover what's new with Docusign IAM or start with eSignature for free


