How to send documents securely: Docusign Envelopes, Bulk Send & PowerForms
Learn how to send documents securely using Docusign electronic signature and its features: Docusign Envelopes, Bulk Send and PowerForms.

How to send documents securely - Docusign Envelopes, Bulk Send & PowerForms
Learning how to use Docusign to send documents securely for electronic signature? Here's a guide to using Docusign Envelopes, Bulk Send and PowerForms. Find out what each feature is, and how it works.
What is a Docusign Envelope?
If you imagine a physical envelope it's easy to understand what a Docusign envelope is. When you physically send a document, you insert the document into the envelope, address it and add instructions or a note saying where to sign.
When you send a Docusign envelope, the process is much the same, except it's electronic.
A Docusign Envelope includes the documents you want to send. You simply add the recipient's information including an email with a subject and body to explain what's included. Then you'll add fields and tags, which help indicate what needs to be done and where to sign.
Docusign envelopes also include timestamps that indicate delivery progress. The timestamps contain information about the send, along with security and authentication information.
How to send a Docusign Envelope
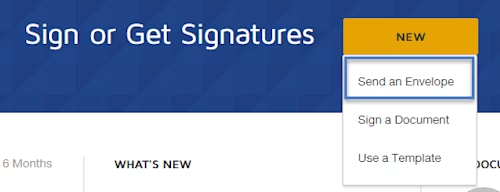
From your Docusign Account, click NEW, then click Send an Envelope.

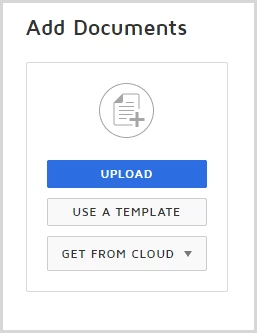
Upload one or more documents that you wish to send. These can be selected from your computer, or a cloud service, e.g. Box, Google Drive or DropBox.

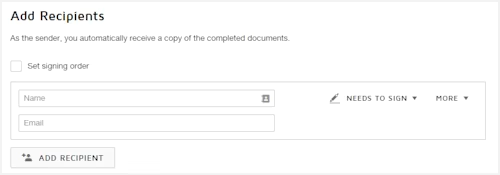
When your document or documents are uploaded, specify the recipient or ‘signer’ of the envelope. You just need their name, email address and action that needs to take place.
You can add additional recipients and define if people sign simultaneously or in a specified order.

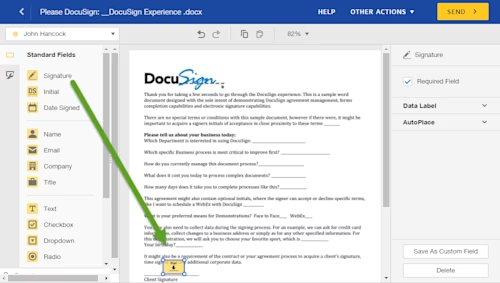
Next, add fields to indicate where to sign. Start by clicking the recipient drop-down menu to choose who you are assigning fields too. Then simply drag and drop the required fields.

Lastly, select send.

This quick 2 minute video will show you how:
What is Docusign Bulk Send?
The Bulk Send feature helps you send the same document to a large number of recipients. You simply import your list of signers, and each will receive an individual copy of the material to sign. This is a particularly convenient function - especially for transactions where you need acknowledgement from many recipients quickly.
One example of how you might need to use this feature is the acceptance of new working from home policies. It helps whenever the same document needs to be sent out to a large group.
When the documents are sent out, you get full visibility of who has and hasn’t signed it.
How to Bulk Send
From your Docusign Account, click NEW, then click Send an Envelope
Select ‘Send an Envelope’ from the Home or Manage page in eSignature.
Upload one or more documents that you wish to send. These can be selected from your computer, or from the cloud ,e.g. Box, Google Drive or DropBox.
Create a CSV file that includes the name and email addresses of your recipients - include any custom fields you require too. So for instance, if you needed people to sign to say they commit to new working from home practices, you may wish to include an Employee ID field and home address. Please note: The column names in your spreadsheet need to match the field labels on your document exactly.
Next click, on ‘Import a bulk list’.
Then make sure your document is tagged with the correct fields. For example, if you want to include the ‘EmployeeID’ on the document, place it as a data field tag. Custom data fields will be automatically populated when you send the documents. Click the gear icon on the data field tag, enter the label, then click Apply.
When you have finished tagging data fields, and you are happy that all of the information is correct, press Send.
Each of your recipients can sign electronically from wherever they are, and all of the signatures are tracked for auditing.
To track your documents, access your ‘waiting for others’ folder. That folder will give you information on who is still to sign their document and needs a reminder. Automatic reminders can be set within your document template.
You can check the ‘Completed’ folder to see who has already signed.
How to send PowerForms
To create or edit PowerForms, you must have PowerForm Administrator permissions.
PowerForms are created from saved templates, so to begin, choose an existing template in Docusign like an NDA or virtual event registration. Next, select the 'More' menu.
Select the 'Create PowerForm' option.
Copy the created URL and embed the link as a hyperlink where you need to use it, for instance, either on a web page or within an email. Once you create a PowerForm, you should test it before distributing it for signers to access.
If you have tested it and the form is working, the URL can be put live on your website or used in an email.
You can review the completed envelopes in View PowerForm responses. PowerForm envelopes, for which you are listed as the sender, appear in your Manage page and the list of responses for an individual PowerForm.
Here's a quick video to show you how to create a Docusign PowerForm:
Docusign Envelopes, Bulk Send, and PowerForms can all help organisations make the agreement process both easier and speedier for teams that need to work from home and send documents securely.
Want more Bulk Send tips? Check out our support page.
Related posts
Docusign IAM is the agreement platform your business needs


